|
|
|
|
|
| Author |
|
|
Registered
Join Date: Feb 2008
Location: El Cajon CA
Posts: 480
|
Issue: Alternative Solution When Clutch Fan is not refillable/Poor airflow at low speeds causing higher than normal water temps.
Solution: Electric Fan Conversion using cooling fans from 99-02 Ford Contour/Mercury Mystique or Mercury Cougar. Some have had great luck in refilling their fan clutches with silicone, I wasn't one of them. It would work ok for a short time then it would leak out. There are quite a few writeups already on doing this conversion so I'll just touch base on a few details that will make the swap easier for the next guy. This picture below is a generic shot I found on the internet of the Contour/Mystique/Cougar fan setup, as MPDano can attest, I'm pretty lazy when it comes to taking pictures. The areas noted by the red arrows need to be trimmed off. You want to end up with a nice rectangle with no protrusions. Dont' worry about the part of the left fan upper shroud, that'll clear everything no problem.  You'll notice an opening at the bottom left. My fan setup had some kind of resistor bolted in that area. I removed the insides out of it and stuck it back in place to cover up the hole. In retrospect you're better off making a small metal block-off plate for this area, it will free up a bit more space between the shroud and the lower radiator hose. Space is not really an issue, but doing this will give you even more clearance. All the write-ups I found just had the fans sitting on the bottom shelf of the radiator. On my 79 there were 2 tabs with speednuts on them that the stock lower shroud bolted to. I removed the speednuts, lowered the fans into position, marked where they lined up, then used a Dremel to cut a small slot for each. The electric fan shroud now slides down onto the tabs and this secures the lower section.  Here's a pic of the fans installed. Sleeving has the temp sensor that's inserted between the fins in the upper right side. I used a standard electric fan mounting kit, used one nylon mounting rod on each upper corner of the shroud. There are already pre-made holes on the shroud in these locations. I will eventually be making some kind of bracket to secure the fans to the stock upper shroud.  And speaking of upper shroud, here's a picture of it with the lower half trimmed off. It bolts right up in the stock position and allows me to retain full use of the air tubes.   I installed the relay/thermostat adjustment in the left front fenderwell, the same area the headlight retracts into. The yellow arrow shows the sleeving that holds all the wiring where it runs forward, then it runs through the fenderwell (forward of the radiator). I figured this would keep the relay/fan controller out of the hot engine compartment. If I ever need to readjust, I can just remove the splash guard and reach in there with a small screw driver to adjust the pot on the controller. I tapped into 12+ switched from the now disconnected aux fan temp switch at the bottom left side of the radiator. The fan controller and mounting kit are TorqFlo #733647 and #900210 respectively, picked them up from the auto parts store located in my Zone. The controller has power leads for 2 fans. It also has a hookup so the fans run when the AC is on. I left the AC feature unhooked. I don't want the fans running when I'm at highway speed with the AC on, seems like a waste. And I figure if I'm in city traffic and I have the AC on, then the fans will be on anyways. The fans each requires their own special weather pack connector, the seller included them with the sale for me, made hookup a lot easier. Otherwise you can find them on Ebay for about $10 each. Total cost breakdown was $35 for the fan controller, $5 for the mounting kit, and $50 for the fans from Ebay (including shipping). The fan assembly comes from 99-02 Ford Contour, Mercury Mystic and Cougar vehicles. Really happy with the results so far. If any issues crop up I'll update this post.
__________________
Raymond 1979 928 5 spd |
||
 10-03-2011, 11:33 AM
|
|
|
Moderator
|
Issue: Got Fire? Well you will if you don't change these 30 year old short Fuel hoses.
Fix: The proper size 5/16" 30R9 Fuel Injection Hose. Use proper Fuel Injection Hose clamps too. Some 928's have 2 sizes of Hose. 3/8" will be the 2nd Size Pics:          
__________________
1981 Porsche 928 "Euro" Auto Gunsmoke Metallic Flat - Black Interior 1983 Porsche 928S "US" Auto Light Bronze (Copper) Metallic - Brown Interior **SOLD** 
Last edited by MPDano; 10-31-2011 at 09:44 AM.. |
||
|
10-31-2011, 09:42 AM
|
|
|
Moderator
|
     
__________________
1981 Porsche 928 "Euro" Auto Gunsmoke Metallic Flat - Black Interior 1983 Porsche 928S "US" Auto Light Bronze (Copper) Metallic - Brown Interior **SOLD**
|
||
|
10-31-2011, 09:43 AM
|
|
|
Registered User
Join Date: Oct 2011
Location: The Jersey Shore
Posts: 66
|
PROBLEM/ISSUE: Removing 928S rear bumper cover to replace taillights/clean/etc..
SOLUTION/FIX: See picture for blue/red/green/yellow circles mentioned in writeup 1) Remove rear wheels and passenger side rear wheel well shield. 2) Undo wingnuts on rear sidemarkers from inside wheel well and hang lights outside of quarter panel. 3) BlueCircles: Phillips head screws removed from top where bumper cover meets hatch. 4) Red Circles: 8mm nuts removed from inside the wheel wells. (Soak in liquid wrench first) 5) Green Circles: 13mm (I think) nuts removed from underneath and behind bumper cover. 6) Yellow Circles: 19mm (I think) nuts LOOSENED from underneath bumperettes. (They don't need to be completely removed) 7) Bumper cover is now free. Pull out far enough to reach in and unclip harness for license plate lights. 8) Taillights are attached to bumper cover with 4 nuts, 2 on top 2 on bottom. i would suggest removing these when the bumper is completely off. Unclip the light harnesses from inside the hatch, behind the covers on each side and push harness through the frame. 9) With all harnesses unclipped and nothing going through the frame, the bumper cover with taillights attached is completely free. PIC 
__________________
1984 US 928S AT Black/Black Last edited by Johnny V; 02-18-2012 at 12:35 PM.. |
||
|
01-01-2012, 07:55 PM
|
|
|
Registered
Join Date: Aug 2004
Posts: 142
|
Dano
I installed a battery in my 1984 S to check a few of the electonic systems. The PO said he always had a dead battery; another reason for him to discard the car. I noticed NO interior overhead light bulbs. I installed the upper front bulb and it does not fire. Then turned the key to run. The $ .50 toggle switches from the "switch tower" all worked; windows, roof, rear wiper. Headlamps lit and raised. The fuel pump charged, marker/turn/four ways work. I turned the key off. somethinhg near the rear wiper was still running/humming. I am suspecting the rear hatch release. Rear hactch will not latch upon closing. I disconnected then reconnected battery and it stopped. Dano what do you mean "checking the jumper"? What is a "jumper circuit"? Why do you remove the interior light fuse? ... other than disable the light and going to dead battery. (I see you refer to rebulbing and maybe grounding out the fixture. Correct?) Is there no other way to fix the problem? You mention the clipboard and system check. If something is not working wouldn't I know it's not working? What would I be looking for? In 944's, I pulled the fuses one at a time (there are many) with an mili amp meter accross the negative battery strap until the meter was zero. Once you discovered the antenna, hatch release and int. light "leak", how did you make repairs? THX G-Man Quote:
__________________
G-Man 1984 928S Black/black 77,000mi 1986 944 NA w/ S2 front valence Black/black 91,000mi 1970 911T 49,000mi SOLD |
||
|
01-28-2012, 03:29 PM
|
|
|
Registered User
|
Aluminum BALL JOINTS!
best to change even if they feel good. I had my car on the lift the other day to change all the belts and checked my old alum. ball joints before i took her off the lift. seemed solid boots were not cracked all seemed good. drove 60 miles home then went to pick my wife up from work, Well pass side lower ball joint popped, good thing i was in the parking lot traveling slow, no damage. this along with the fuel lines should be 1 and 2 on this list! |
||
|
01-29-2012, 07:08 AM
|
|
|
Registered
Join Date: Aug 2004
Posts: 142
|
__________________
G-Man 1984 928S Black/black 77,000mi 1986 944 NA w/ S2 front valence Black/black 91,000mi 1970 911T 49,000mi SOLD |
||
|
01-29-2012, 10:05 AM
|
|
|
Registered
Join Date: Aug 2004
Posts: 142
|
Will this work as a fuel line clamp? Instead of the screw type clamp.
I've seen them used to 135 psi Crimped w/ end nipper or "side dikes" (Sorry.. not certain of the spelling  ) )Ear Clamps | MSCDirect.com
__________________
G-Man 1984 928S Black/black 77,000mi 1986 944 NA w/ S2 front valence Black/black 91,000mi 1970 911T 49,000mi SOLD |
||
|
01-29-2012, 10:32 AM
|
|
|
1978 928 - 9288200072
|
Issue/Problem - front seat sagging
Solution/Fix If your front seats are pulling away from the pleats, here is a set of pictures of one way to repair them. Original seat bottom:  Removing the leather from the frame and then start to disassemble the seat. The side pleats are held down by a piece of cloth sewed to the leather.  Here is a closer look. There is a thick wire inserted in the bottom of this piece of cloth  The cloth/wire is attached to the foam at the bottom of the seat with hog rings. The foam is quite solid, but can break loose quite easily. Here is how it is attached.  The central section is composed of two pieces that are glued together.  Once separated you can see the top part has pieces of felt that are sewed to the leather and hold down the pleats.  Now you can see how the felt has pulled away and is no longer holding the pleats.  Gluing the felt back to the foam would probably not be strong enough (that is why they came apart in the first place). After some trial and error, I ended up lacing the pieces of felt together with thick thread. This allows the two pieces to be glued back together (contact cement) as they were before, but with some added strength with the felt pieces connected together  For the side connections, I added some supportive wire underneath to attach to the cloth/wire coming using hog rings.  Here is the final result with everything put back together. 
__________________
1978 928 - 5 speed - no sunroof - Copper Brown Metallic - Cork Interior |
||
|
02-18-2012, 11:37 AM
|
|
|
1978 928 - 9288200072
|
Issue/Problem - Cracked, dirty and faded leather seats.
Solution/Fix - Re-dye the seats (this example uses Leatherique products Here is the starting point.  Step 1 - wet sand the leather using the Prepping Agent from Leatherique. The Prepping Agent softens the dye on the leather making it sand off quite easily. I used 400 grit wet sandpaper. Here is how it looked after sanding.  Step 2 - fill the cracks with the Crack Filler product from Leatherique. This is a white paste that goes into the cracks. I applied a couple of coats in the large cracks. Here is what it looked like after applying the Crack Filler before the second sanding.  Step 3 - second sanding. I actually sanded, applied additional Crack Filler and sanded several times. I also ended up poking a needle into all the holes in the leather as the crack filler filled them in. Here is the result ready for dyeing.  Step 4 - apply the dye. I tried using a brush on a sample piece but found it took three coats and used a lot of dye. I ended up using a pencil sprayer with my compressor to spray on the dye. For the most part, only two coats were needed. I bought "Cork" colored dye as that is the original color for my car. The seats had been replaced some time ago and were "Champagne". Here is the final dyed result.  The final result: 
__________________
1978 928 - 5 speed - no sunroof - Copper Brown Metallic - Cork Interior |
||
|
02-18-2012, 11:47 AM
|
|
|
Registered
Join Date: Aug 2004
Posts: 142
|
THX All my fuses are in place and "good"(alto they will be cleaned". But overhead/map lights will not light.
Should interior light come on w/ door opening? Do I need key on? Quote:
I understand. I made reference to a '"short detector" it plugs across a removed fuse w/ a meter and a capacitor. it blinks and allow one to search for a short without having to ruin a good fuse. Have you ever used the glass fuse instead for the ceramic fuses? I have a set of 8/16/25's. Thought they might eliminate some corrosion. Quote:
I agree. One fuse at a time to search out a problem. As I stated earlier. the hatch release is a source of draw. The hatch does not latch; might be the hatch latch is not extending out enough to catch the lower release Quote:
__________________
G-Man 1984 928S Black/black 77,000mi 1986 944 NA w/ S2 front valence Black/black 91,000mi 1970 911T 49,000mi SOLD |
|||
|
02-18-2012, 05:27 PM
|
|
|
Antsmands
|
Excellent work. Like New. Now I can repair my seats and redye them!
Thanks!
__________________
1983S 5 Speed / Platinum Metallic / Dark Brown Interior / GE NightHawk LED Headlights / Super Bright LED / Flex-a-lite Cooling Fan / Dragon Gauges / Custom Auto Sounds Spare Tire Sub Woofer / H3R HalGuard Fire Bottle |
||
|
02-24-2012, 09:43 AM
|
|

|
|
Moderator
|
Issue: No Spark or Weak Spark. The GREEN Wire will degrade over time and lose it's insulation, etc. A lot of the Green Wires out there look Brown due to age and heat of the Engine Compartment.
Solution: There have been some people trying to repair but in my opinion, just replace it. It's easy and not too expensive. Also, watch those end connectors as they also become brittle, I was able to re-use mine and I am also not sure if they are NLA. Pics:         
__________________
1981 Porsche 928 "Euro" Auto Gunsmoke Metallic Flat - Black Interior 1983 Porsche 928S "US" Auto Light Bronze (Copper) Metallic - Brown Interior **SOLD**
Last edited by MPDano; 02-27-2012 at 05:20 AM.. |
||
|
02-27-2012, 05:17 AM
|
|
|
Moderator
|
More Pics:
      
__________________
1981 Porsche 928 "Euro" Auto Gunsmoke Metallic Flat - Black Interior 1983 Porsche 928S "US" Auto Light Bronze (Copper) Metallic - Brown Interior **SOLD**
|
||
|
02-27-2012, 05:18 AM
|
|
|
Network Native

Join Date: Jan 2007
Location: SoCal
Posts: 10,349
|
Quote:
Great deal on Tool Aid 25100 at ToolTopia.com I've had one in my cart a couple months waiting for the magic $99 and free shipping of stuff to accumulate. Not a clue how well it might work on our cars, but its a common short finding technique (guessing radio frequency signal is put on wire and you follow it to ground with the meter). |
||
|
02-27-2012, 11:00 AM
|
|
|
Registered
Join Date: Aug 2004
Posts: 142
|
Yes that's it.
We used them in school buses to locate shorts in rear lamps. You are correct . Connect the "capacitor" across fuse and it clicks. Then I believe we used the meter along the path to locate the short. Quote:
__________________
G-Man 1984 928S Black/black 77,000mi 1986 944 NA w/ S2 front valence Black/black 91,000mi 1970 911T 49,000mi SOLD |
||
|
02-27-2012, 12:59 PM
|
|
|
Moderator
|
ISSUE: Got Bass? If your running your Stock set up in your 928, you have no Bass.
FIX: Our fellow 928er has found a nice solution with an existing Bose Bass Box that fits in our Spare Tire (16") nicely. It comes in some of the Nissans, Mazdas, etc. Just do a search with these keywords on eBay: subwoofer (rsx,murano,rogue,mazda 6) A lot will come up but only one so far has been tested to fit nicely. The cheapest we've seen are $55 shipped. 19psi used this specific Murano one: Part Number 28170-CA100 2003-7 Nissan Murano. There are also some that have amps embedded as well. The best thing is to get one with a Pigtail so it will be easier to wire up. Plus a pin out chart. PICS: Here is how his sits in his spare tire: 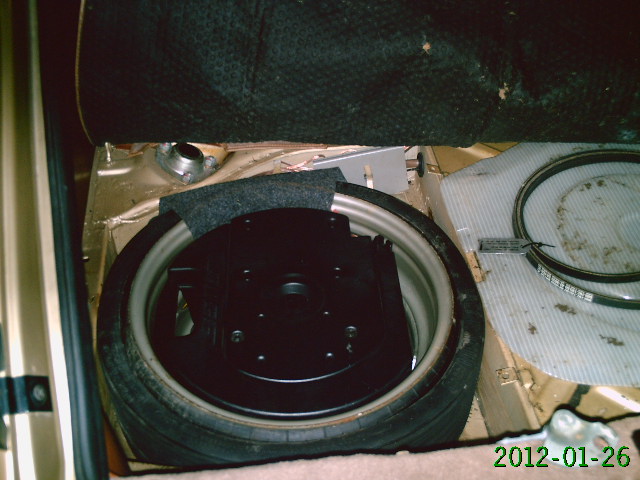 ...and after covered (looks nice, clean and stock) 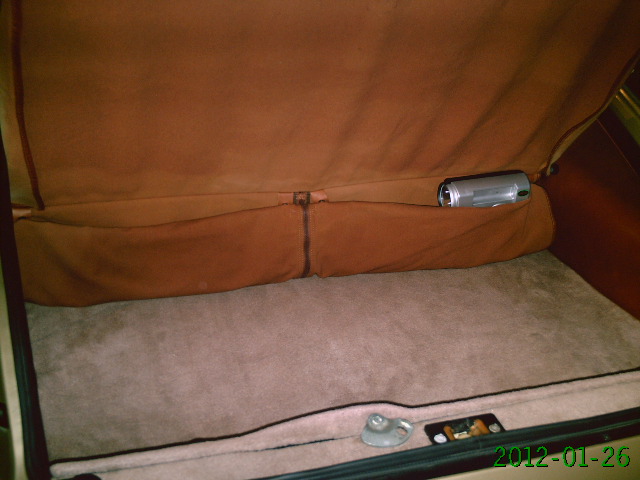 I'll add more pics of those other part number Bose Boxes that become tested to fit. Here's one that Xlot is trying out, I'll verify once he gets his installed. 
__________________
1981 Porsche 928 "Euro" Auto Gunsmoke Metallic Flat - Black Interior 1983 Porsche 928S "US" Auto Light Bronze (Copper) Metallic - Brown Interior **SOLD**
|
||
|
03-19-2012, 07:19 PM
|
|
|
928: Serial Enabler
Join Date: Sep 2007
Location: Elkhart, Indiana
Posts: 2,929
|
Great thread! I promise to use the new format Issue / Solution / Pics in the future. This can really help folks.
__________________
84,85,86 928 cars Last edited by Landseer; 03-20-2012 at 02:55 AM.. |
||
|
03-20-2012, 02:50 AM
|
|
|
Recovering dismantler
|
Nice thread Leo, just catching up on posts - i'll be sure to use the new format when i do whatever comes up next !
__________________
Neil 2009 Mini Cooper 2004 Mercedes CLK500 2024 Subaru Outback Touring XT 2020 Entegra Coach |
||
|
03-28-2012, 08:45 PM
|
|
|
Moderator
|
ISSUE: Don't know what the specs of your Engine?
FIX: I've posted a couple pics of where you need to locate your Engine Code, which you use to find your Engine Specs. It doesn't require any special tools, but just a spare rag/towel to clean the grime off. The numbers are located just below your Top Radiator Hose and the just Above the Water Pump. Here is a quick chart, just use the Engine Number and find your line of Specs. 928 Model - Engine Size/Type - HP (SAE) - Torque ft/lbs (SAE) - Comp. Ratio - Fuel Injection System - Top Speed MPH - 0-62 mph (sec) - 1/4 mile (sec) - Weight (lbs) 77-79 - 3-auto (US) 4.5L-16v M28/04 219 245 8.5:1 K-Jetronic 140 8.5 16 3373 77-79 - 5-man (US) 4.5L-16v M28/03 219 245 8.5:1 K-Jetronic 143 7.5 15.5 3285 77-79 - 3-auto (Euro) 4.5L-16v M28/02 229 250 8.5:1 K-Jetronic 140 8 16 3197 77-79 - 5-man (Euro) 4.5L-16v M28/01 229 250 8.5:1 K-Jetronic 143 6.8 15.5 3197 80 - 3-auto (US) 4.5L-16v M28/14 220 265 9.0:1 L-Jetronic 140 8.5 16 3385 80 - 5-man (US) 4.5L-16v M28/13 220 265 9.0:1 L-Jetronic 143 7.5 15.5 3351 81-82 - 3-auto (US) 4.5L-16v M28/16 220 265 9.0:1 L-Jetronic 140 8.5 16 3385 81-82 - 5-man (US) 4.5L-16v M28/15 220 265 9.0:1 L-Jetronic 143 7.5 15.5 3351 80-82 - 3-auto (Euro) 4.5L-16v M28/10 229 271 10.0:1 K-Jetronic 140 7.7 16 3197 80-82 - 5-man (Euro) 4.5L-16v M28/09 229 271 10.0:1 K-Jetronic 143 7.2 15.5 3197 80-83 S - 3-auto (Euro) 4.7L-16v M28/12 300 263 10.0:1 K-Jetronic 152 7.2 15.5 3197 80-83 S - 5-man (Euro) 4.7L-16v M28/11 300 263 10.0:1 K-Jetronic 155 6.6 15.2 3197 83-84 S - 4-auto (US) 4.7L-16v M28/20 234 263 9.3:1 L-Jetronic 143 7.2 15.5 3385 83-84 S - 5-man (US) 4.7L-16v M28/19 234 263 9.3:1 L-Jetronic 146 6.8 15.2 3351 84-86 S - 4-auto (Euro) 4.7L-16v M28/22 310 295 10.4:1 LH-Jetronic 150 6.7 15.5 3308 84-86 S - 5-man (Euro) 4.7L-16v M28/21 310 295 10.4:1 LH-Jetronic 155 6.2 15.2 3308 85-86 S - 4-auto (US) 5.0L-32v M28/44 288 302 10.10:1 LH-Jetronic 152 6.8 14.9 3439 85-86 S - 5-man (US) 5.0L-32v M28/43 288 302 10.10:1 LH-Jetronic 155 6.3 14.2 3351 87-88 S4 - 4-auto (US) 5.0L-32v M28/42 316 317 10.0:1 LH-Jetronic 162 6.6 14.7 3550 87-88 S4 - 5-man (US) 5.0L-32v M28/41 316 317 10.0:1 LH-Jetronic 165 6.0 14.5 3505 87-88 S4 - 4-auto(Euro) 5.0L-32v M28/42 316 317 10.0:1 LH-Jetronic 165 6.3 14.5 3484 87-88 S4 - 5-man(Euro) 5.0L-32v M28/41 316 317 10.0:1 LH-Jetronic 168 5.9 14.2 3484 89 S4 5-man 5.0L-32v M28/41 316 317 10.0:1 LH-Jetronic 168 5.9 14.2 3505 89-91 S4 - 4-auto 5.0L-32v M28/42 316 317 10.0:1 LH-Jetronic 165 6.3 14.5 3550 89-91 GT 5-man 5.0L-32v M28/47 326 317 10.0:1 LH-Jetronic 171 5.8 14.1 3505 92-95 GTS - 5-man 5.4L-32v M28/49 345 369 10.4:1 LH-Jetronic 171 5.7 13.7 3593 92-95 GTS - 4-auto 5.4L-32v M28/50 345 369 10.4:1 LH-Jetronic 171 5.9 14.1 3593 PICS: Here is a location view and a close up. Picture shows an 80 - 3-auto (US) 4.5L-16v M28/14 220 265 9.0:1 L-Jetronic 140 8.5 16 3385  
__________________
1981 Porsche 928 "Euro" Auto Gunsmoke Metallic Flat - Black Interior 1983 Porsche 928S "US" Auto Light Bronze (Copper) Metallic - Brown Interior **SOLD**
|
||
|
03-29-2012, 01:00 PM
|
|


 1978 Porsche 928
 1983 Porsche 928S
 1981 928
 1984 928 S Euro
 1986 928S
