|
|
|
|
|
| Author |
|
|
(man/dude)

|
Incredible, I've been looking forward to this update (and, no doubt, a flurry of activity to come!). There's a natural ebb and flow to projects and the accompanying updates, but hopefully you'll get your Mojo back! Maybe a Sunday night update instead of Mondays? At any rate, welcome back!
I've been on a bit of a summer break and doing less forum-ing and more living, summers are short up here and being labor day weekend of course there's a chill in the air, so it'll be back to work for me too after another week or two.
__________________
Heavy Metal! Part Deux - The Carbon Copy Project Heavy Metal https://tinyurl.com/57zwayzw (SOLD) 85 Coupe - The Rot Rod! AX beater Quality Carbon Fiber Parts for Classic 911s: instagram.com/jonny_rotten_911 |
||
 09-01-2024, 08:03 PM
|
|
|
Registered
Join Date: Aug 2014
Location: Sydney, Australia
Posts: 596
|
Only suggestion I have is before you modify the bumpers put on the wheels at the width you are going to use and make sure you can get full lock in either direction. I built my whole car with spacers on the fronts and it all looked great until the first time I tried to drive it and the wheels hit the bumper with even a little angle. Now I have narrow front wheels that I hate the look of but I would have to do a whole heap to change it now.
__________________
See my 2.8RSR build on YouTube 'Home Built by Jeff' http://youtube.com/homebuiltbyjeff http://forums.pelicanparts.com/porsche-911-technical-forum/889676-home-built-hot-rod.html#post8868732 |
||
|
09-02-2024, 04:14 AM
|
|
|
I'm good with tools.
|
Well done Chris. Sure would like to see it outside to get a better idea of how well everything is fitting. I know this was a dry run and your just getting an idea of what is what. Can't believe it's September and time is marching on..... I'll start motor assembly pretty soon. Hated not driving the car this year. Next month is a year. Keep up the good work.
__________________
72 911 Coupe "OILDOOR" 24 INEOS Grenadier (daily) 13 991.1 Coupe 2S 3.8L (currently undergoing mods) 02 996 4S |
||
|
09-02-2024, 08:12 AM
|
|
|
scumbag
|
Quote:
Quote:
Quote:
__________________
My first Porsche - http://forums.pelicanparts.com/porsche-911-technical-forum/989493-my-low-budget-dream-car-build.html AchtungKraft #009 - IG: @doktor_b |
|||
|
09-02-2024, 04:19 PM
|
|
|
scumbag
|
Happy Labor Day!
The late Summer heat subsided this weekend enough for me to work on the car two days in a row. I can't even tell you all the last time I worked on it for two straight days. When I got done yesterday, the front bumper was clamped in place and fit terribly. Today, it is bolted in place and fits terribly.  Getting it bolted in took significantly more work than I expected. What an affair that was...and still will be. While it's bolted in, it's not completely installed. First thing was getting it centered. I took a ton of measurements from multiple reference points and came up with a black mark on white tape on a black bumper. Getting it bolted in took significantly more work than I expected. What an affair that was...and still will be. While it's bolted in, it's not completely installed. First thing was getting it centered. I took a ton of measurements from multiple reference points and came up with a black mark on white tape on a black bumper. exhibit A.  The V is the center mark. I also marked the hood placement from last night to track my tucking progress. In the following pic, you can see how far it tucked just by getting it initially bolted up. (1/2")  That black marks on white tape on a black bumper quickly reproduced and became many white marks on a black bumper. (after my new china markers were delivered)  From this point, I (tediously) executed a push/pull 23-pt turn to get the car out into the drive to get a better look at it.  Here's the front bumper profile...highlighting the majestic underbite my car now (temporarily) features.  Somewhere along the line, I spilled water on the white marks and they reproduced again.  Stay tuned. The cool part is still on the way.
__________________
My first Porsche - http://forums.pelicanparts.com/porsche-911-technical-forum/989493-my-low-budget-dream-car-build.html AchtungKraft #009 - IG: @doktor_b |
||
|
09-02-2024, 04:56 PM
|
|
|
scumbag
|
Labor Day 2024, continued.
While I had the LBDC out in the sun, I took some pics to illustrate the change that's taking place. Before  After  With that picture in mind, it was time to tackle the RF flare. More measuring. More masking tape. More measuring. More thinking. More measuring. Set one screw. More measuring. Made a couple marks. Moved some tape. More measuring. One more screw. More measuring. I'm reasonably certain you're getting the picture, so I'll cut to the next pic.  And from a protestor's perspective. 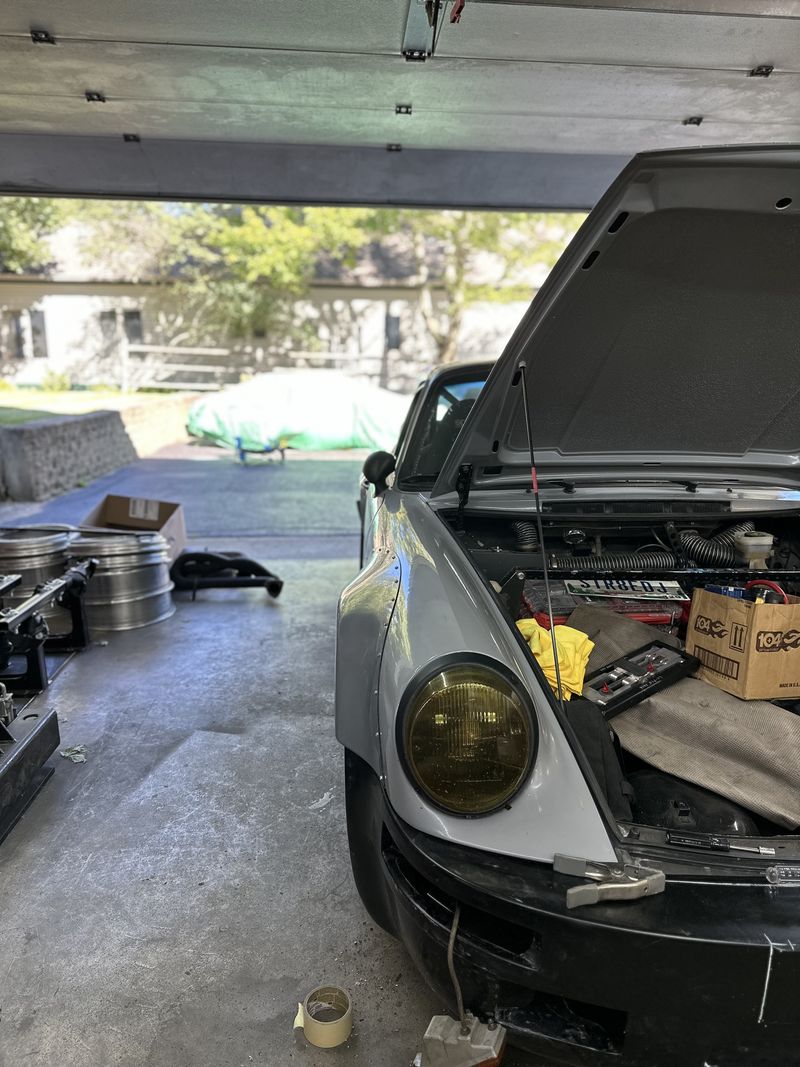 Wash. Rinse. Repeat for the RR and you get this.  A little better angle.  Two days of being hunched over has my back aching and my knees hurting. I took a position on the retaining wall to stare at the car and field questions from Kelly. After a couple minutes of sitting, this happened and concluded this weekend's work.  I'm keen to hear any pro-tips or caveats Pelican has to share before I start cutting this thing. Don't be shy, I'd rather have too much info than not enough. See you all in a couple days.
__________________
My first Porsche - http://forums.pelicanparts.com/porsche-911-technical-forum/989493-my-low-budget-dream-car-build.html AchtungKraft #009 - IG: @doktor_b |
||
|
09-02-2024, 05:30 PM
|
|

|
|
Registered
|
Bumper fitment issues are common I guess. Had myself... Here, page 2 you can see:
http://forums.pelicanparts.com/911-930-turbo-super-charging-forum/555993-help-iroc-rear-bumper-do-you-suggest-2.html And after I had the tub made for the second time: http://forums.pelicanparts.com/911-930-turbo-super-charging-forum/634616-another-rust-combat-21.html
__________________
Roland 930 Turbo '81 Too many modifications to list |
||
|
09-03-2024, 04:16 AM
|
|
|
Registered
|
The FFP (Forum’s Favorite Project) is at a fast boil now! Going wide body is not for the timid, that’s my early takeaway at least. I love seeing your thought process on display as you lay out your plan for tucking bumpers, squaring up fenders and such. I’m the product of public education, so my comprehension may be somewhat lacking... But I don’t recall if these wide body bulges are fiberglass or steel. If fiberglass, what’s the plan for permanent attachment? Just curious. I think you have a good eye for detail and proportions, and this little coupe is gonna look sharp — already does!
Patrick
__________________
912E-3.2ss |
||
|
09-03-2024, 04:53 AM
|
|
|
(man/dude)
|
Great update! I think it would be easy to underestimate how much pleasure (and inspiration!!!) you bring to all of us with these updates.
Can't wait to see what comes next.
__________________
Heavy Metal! Part Deux - The Carbon Copy Project Heavy Metal https://tinyurl.com/57zwayzw (SOLD) 85 Coupe - The Rot Rod! AX beater Quality Carbon Fiber Parts for Classic 911s: instagram.com/jonny_rotten_911 |
||
|
09-03-2024, 06:11 AM
|
|
|
scumbag
|
Quote:
Quote:
Like Roland, and many else whove come before, Im keen to keep down the weight. So all the body parts are fiberglass. My plan is to panel-bond the flares to the car, so no hardware at all, much less exposed hardware. There are spacers en route and wheels being pulled from anothers car to help me confirm flare placement before the big cut. I have been advised that measurements are important, but seeing the wheels in the arches is more important when it comes to ensuring it all looks right. So (much to my chagrin) the stock arches will come out in pieces rather than in big, beautiful offcuts like an RWB. I want to see it at ride height with the arches full before I commit fully. Quote:
I will do my best to show the process (in agonizing detail) as I inch closer to my next DIY paint job.
__________________
My first Porsche - http://forums.pelicanparts.com/porsche-911-technical-forum/989493-my-low-budget-dream-car-build.html AchtungKraft #009 - IG: @doktor_b |
|||
|
09-03-2024, 07:17 PM
|
|
|
I'm good with tools.
|
Quote:
Chris, I have to say that these two shot alone have me feeling pretty good on where this is headed. The flares appear to fit really well.
__________________
72 911 Coupe "OILDOOR" 24 INEOS Grenadier (daily) 13 991.1 Coupe 2S 3.8L (currently undergoing mods) 02 996 4S |
||
|
09-04-2024, 09:28 AM
|
|
|
Registered
Join Date: Mar 2011
Location: Minneapolis
Posts: 404
|
Quote:
I don't think you're going to need to inch up on your cut line like you are thinking. Once you get the flare positioned in it's permanent position, mark it, take the flare off, and cut. The downside to fiberglass versus steel is that I was able to butt weld the fenders where you will have a bit of a steel/panel bond/fiberglass sandwich. You'll really want to make sure that it's sealed so you don't have any rust issues down the road. Also curious how much work the bodywork will be for it to look smooth, it was a doozie even with a pretty great weld.
__________________
Instagram @everythingcrafted Day Job - Crafted Wealth www.craftedwealthmanagement.com |
||
|
09-04-2024, 11:53 AM
|
|
|
scumbag
|
Quote:
I'm with you though. I think once it's all done, it'll look pretty great. Quote:
The blending I'm a little leery of. But I got the roof decently smoothed in my first attempt....and if I bork it up, I'll just get to paint the car again in a year or two.  Update in progress. Likely a double, since I have 10+ pictures to share.
__________________
My first Porsche - http://forums.pelicanparts.com/porsche-911-technical-forum/989493-my-low-budget-dream-car-build.html AchtungKraft #009 - IG: @doktor_b |
||
|
09-08-2024, 04:10 PM
|
|
|
Registered
|
Wow - big transformation - Am looking forward to see how this turns out!
|
||
|
09-08-2024, 04:46 PM
|
|
|
scumbag
|
Happy Sunday!!!
I spent the day shooting in preparation for the Big Match next Sunday. I carved out some time to work on the ol' bucket yesterday. Here's how it went. I knew what had to come next, but cutting into something so valuable gave me a lot more pause than expected. (about six minutes) Then the RF flare came off and exposed the stock arch. Some concentrated effort using two different air saws with very used blades and this happened.  I swapped the rear wheel to the front and screwed back on the flare and this happened.  Not the best fitment, but hardly the worst.   I stared at this for a while and shared these photos with a few friends to get some feedback. The Full Send Society was very supportive (as they're wont to do) and the other friends I shared this with were similarly stoked. So when all the teams call for blood, blood must be shed. Next sacrifice on the altar...  More air-sawing (and swearing and wondering how RWBro does it) and voila!  GD, that's a big spacer! (2" or ~0.0000508km)  I got the LR swapped 'round to the RR (fronts on left, rears on right for those of you playing along at home) and pushed it all out into the driveway. 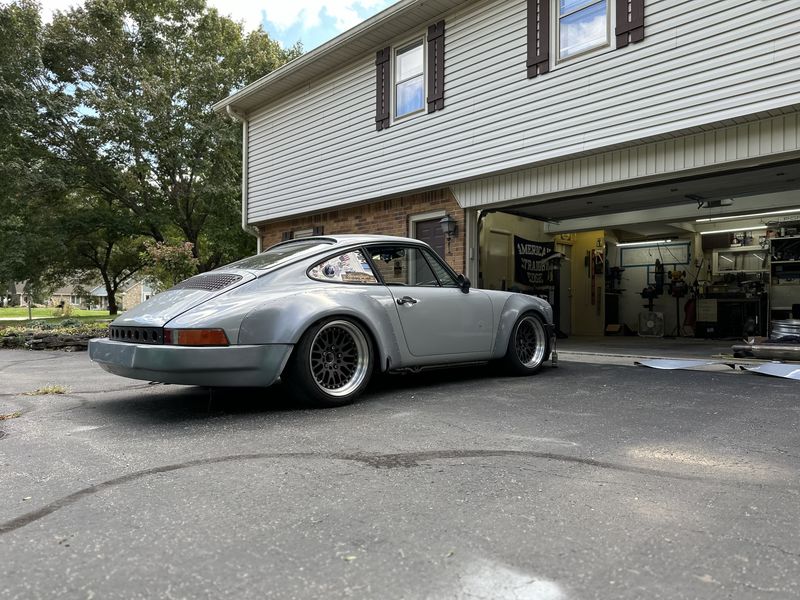 Now that is awesome...even if the wheels still don't fit well...yet. That's 17x9.5 et13 front and rear, rear with a 2" spacer. (The other side looks like a crashed car kludged together enough to roll around the impound lot.) I stared at this for a while...like an hour. I shared this pic and a couple similar others. Many texts were shared. Hell, I think I even made an IG post. Eventually, I realized that I wouldn't be able to work on it Sunday (today) so I better get to hacking away on the other side. 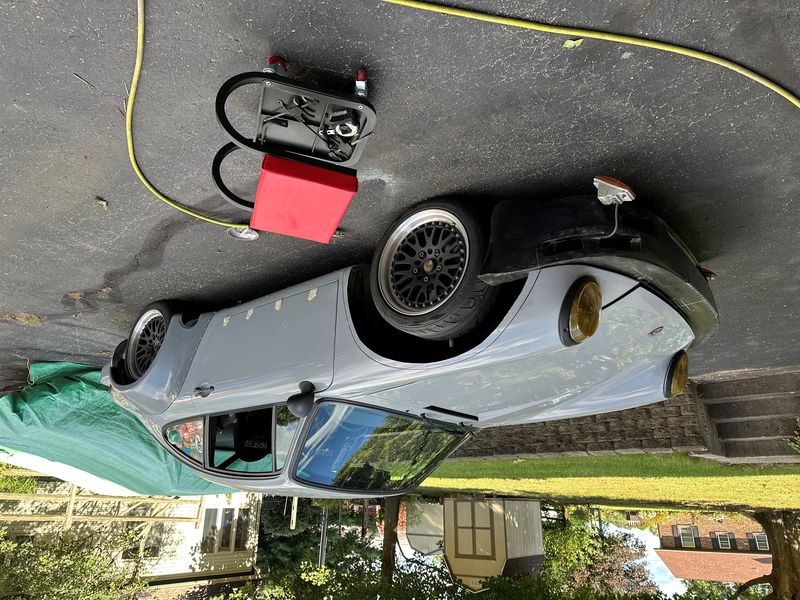 I buttoned back up the LF and moved to the LR. 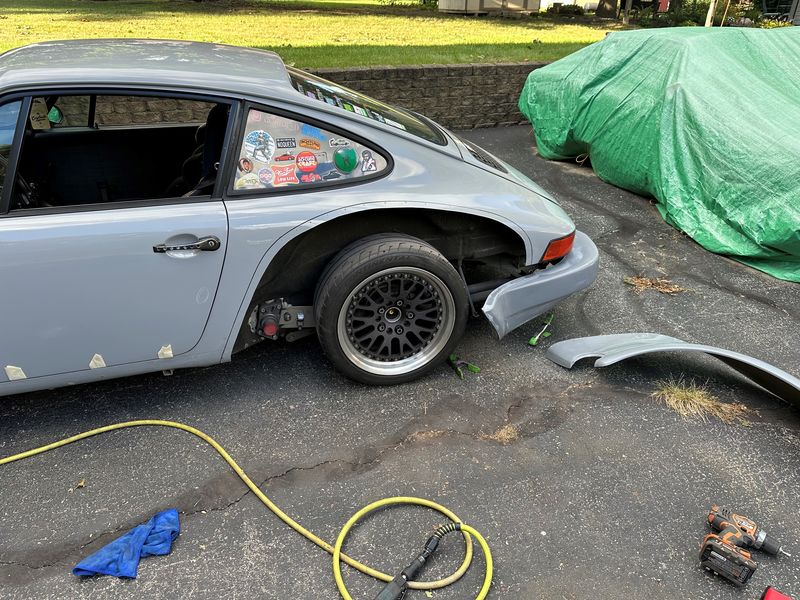 I then buttoned back up the LR...just in time to get done ~15 minutes after Kelly got home which means I was ready to go out to dinner (with friends) about 45 minutes late. #whoops No pics of the left side because it looks like the poop with the wheels sunk way in and the bumpers still hanging on with clamps and tape. Next steps are: - swap the wheels to the left side and make sure the flares fit how they should - tidy all the cuts to make sure they aren't wavy messes - bodywork the cuts to make sure they nicely mate up to the flares - strip the paint from the car up to just above the line - scuff the mating surface of the flares - panel bond the flares on - reinstall the ~100 screws to make sure the panel bond does its job If I can get all that done before Sunday, it'll be a great week. So you all have a great week too.
__________________
My first Porsche - http://forums.pelicanparts.com/porsche-911-technical-forum/989493-my-low-budget-dream-car-build.html AchtungKraft #009 - IG: @doktor_b |
||
|
09-08-2024, 04:52 PM
|
|
|
Registered
Join Date: May 2019
Location: Vancouver, BC
Posts: 652
|
I believe the American philosopher Timothy McGraw said it best - "I like it, I love it, I want some more of it"
|
||
|
09-08-2024, 07:04 PM
|
|
|
bottom of slippery slope
Join Date: Jul 2019
Location: Syracuse NY
Posts: 212
|
Quote:
 carry fourth carry fourth
|
||
|
09-09-2024, 05:55 AM
|
|
|
Registered
Join Date: May 2010
Location: atlanta
Posts: 1,982
|
Hot Damn !!!
I like where this is going. |
||
|
09-09-2024, 06:58 AM
|
|
|
I'm good with tools.
|
Quote:
Damn straight that is awesome........ and then some.
__________________
72 911 Coupe "OILDOOR" 24 INEOS Grenadier (daily) 13 991.1 Coupe 2S 3.8L (currently undergoing mods) 02 996 4S |
||
|
09-09-2024, 08:37 AM
|
|
|
(man/dude)
|
Quote:
Also, can you return the sideskirts? Not sure they are needed after seeing it like this.
__________________
Heavy Metal! Part Deux - The Carbon Copy Project Heavy Metal https://tinyurl.com/57zwayzw (SOLD) 85 Coupe - The Rot Rod! AX beater Quality Carbon Fiber Parts for Classic 911s: instagram.com/jonny_rotten_911 |
||
|
09-10-2024, 06:29 AM
|
|


 Porsche 911 Coupe
 1979 Porsche ROW 911 SC

 P912E 3.0
