|
|
|
|
|
| Author |
|
|
Registered
Join Date: Jan 2009
Location: Missouri
Posts: 199
|
Head Gasket Job - Replace OC Seals?
Ok, so ordering parts for a head gasket replacement and am asking for advice on whether to replace the Oil Cooler seals as well. Adds quite a bit of cost to the job after the cost of seals and OPRV Alignment Tool.
There is no mixing of oil and coolant at this time, it's just using coolant (gallon/week) and leaking a bit of oil at the HG and valve cover. I already have the front camshaft seal left over from the FOE's work a while back. Oil pressure is good as well, so the OPRV doesn't need replacement. 5 bar cold, 3-4 bar at idle and driving when hot. Still debating replacing head studs, as that REALLY adds cost. Thanks for all those who reply.
__________________
'83 944 N/A '88 Ford F-150 4WD - Does Everything '99 300M - Daily Driver, headlights just polished! '85 34' ITASCA MotorHome, built-in blender baby! '89 Supra - Black - Future 400hp NA sleeper. |
||
 06-09-2009, 12:59 PM
|
|
|
That Guy

|
Dont bother with the head studs. I honestly would not bother, especially on a n/a model.
Replacing the seals on the oil cooler is very easy with the head off, alot more space to work. If you pull the cylinder head with exhaust manifold attached its even easier. Better to do it now... 'while your in there'. See if someone can loan you the alignment tool.
__________________
Jon 1988 Granite Green 911 3.4L 2005 Arctic Silver 996 GT3 Past worth mentioning - 1987 924S, 1987 944, 1988 944T with 5.7L LS1 |
||
|
06-09-2009, 01:40 PM
|
|
|
Registered
Join Date: Jan 2009
Location: Missouri
Posts: 199
|
Thanks Techno...
It's not that I mind buying a $20 tool, just wanted to throw it out there. So far then, I have this list: Quantity 1: 944-100-901-00-M17 - Head Gasket Set. Quantity 1: 999-701-613-40-M104 - Air/Oil Separator, Filler to Engine, Upper Quantity 2: 999-701-661-40-M100 - Air/Oil Separator, Filler to Engine, Lower Quantity 1: 999-510-022-08-M260 - Camshaft Bolt Quantity 1: 944-107-147-03-M17 - Oil Cooler Gasket Quantity 1: 944-107-153-02-M17 - Oil Cooler to Housing Seal Quantity 1: 944-107-154-00-M260 - Oil Cooler to Housing Spacer Washer Quantity 2: 944-107-219-00-M260 - 0.5mm Adjusting Shim for Oil Cooler to Housing Quantity 2: 999-707-043-40-M17 - Oil Cooler O-Ring Quantity 1: PEL-TOL-P218 - OPRV Alignment Tool Please add to list if I am missing something. I understand the OPRV Alignment tool can only be used on one of the two types of OPRV's.
__________________
'83 944 N/A '88 Ford F-150 4WD - Does Everything '99 300M - Daily Driver, headlights just polished! '85 34' ITASCA MotorHome, built-in blender baby! '89 Supra - Black - Future 400hp NA sleeper. Last edited by SuperXRAY; 06-09-2009 at 05:31 PM.. Reason: HG Set comes with Exhaust Flange Gaskets |
||
|
06-09-2009, 02:02 PM
|
|
|
That Guy
|
Looks good to me. They do make an oil cooler gasket set.. might be easier to just order that.
Make sure you replace the cylinder head nuts also. I recommend replacing the flat washers, but some have success scuffing them with sand paper.
__________________
Jon 1988 Granite Green 911 3.4L 2005 Arctic Silver 996 GT3 Past worth mentioning - 1987 924S, 1987 944, 1988 944T with 5.7L LS1 |
||
|
06-09-2009, 06:15 PM
|
|
|
Registered
Join Date: Jan 2009
Location: Missouri
Posts: 199
|
Should I really buy the ones from our host? I actually meant to put the washers on there, but forgot. I have had experience with washer issues on other cars/machinery, so no worries there. Are the nuts that special, $2.50? They do look like Grade 8 hardware...
__________________
'83 944 N/A '88 Ford F-150 4WD - Does Everything '99 300M - Daily Driver, headlights just polished! '85 34' ITASCA MotorHome, built-in blender baby! '89 Supra - Black - Future 400hp NA sleeper. |
||
|
06-09-2009, 06:39 PM
|
|
|
winter-hater club member
Join Date: Oct 2003
Location: salt lake city, utah
Posts: 24,705
|
replace the head studs. my .02
__________________
2000 Corvette - ????, 2007 Buell XB9R - Astrid, 1996 Discovery - Piglet, 2000 Forester "COOL PRIUS!" - Nobody Ever |
||
|
06-09-2009, 07:02 PM
|
|

|
|
Registered
Join Date: Jan 2009
Location: Missouri
Posts: 199
|
Well, good news and bad news!
I spent an hour on her today and managed to get all of the Intake stuff off. I'll post pictures here in a bit, but I do have some questions: Can anyone supply me with part numbers and pictures (I hope) of the various molded vacuum hoses? All my systems run Vista x64, so running the PET is a no go. Most of the molded hoses are cracked, such as the AAV hoses, the one that goes to the Y-Pipe for the brake booster, etc. I'll be ordering the Lindsey kit for the smaller hoses. I'll explain more when I get the pictures up late this evening. I have lots of cleaning to do tomorrow and testing the AAV and some other valve/something-or-other that I took a pic of.
__________________
'83 944 N/A '88 Ford F-150 4WD - Does Everything '99 300M - Daily Driver, headlights just polished! '85 34' ITASCA MotorHome, built-in blender baby! '89 Supra - Black - Future 400hp NA sleeper. |
||
|
07-08-2009, 07:53 PM
|
|
|
Registered
Join Date: Jan 2009
Location: Missouri
Posts: 199
|
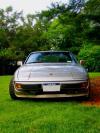
Here's the car:
 As already known, the AOS is leaking pretty badly:   Here's what most of the hoses under the intake looked like, broken:  Here's a Porsche Specialist's fix-it job from NC, what a crock:  And here's a bunch of water in the intake valves:  And, finally, what the heck is that valve in the center of this picture? It's an aluminum housing that bolts to one of the hoses for support. 
__________________
'83 944 N/A '88 Ford F-150 4WD - Does Everything '99 300M - Daily Driver, headlights just polished! '85 34' ITASCA MotorHome, built-in blender baby! '89 Supra - Black - Future 400hp NA sleeper. |
||
|
07-08-2009, 09:51 PM
|
|
|
Back from Beyond
Join Date: Nov 2004
Location: Alberta, Canada
Posts: 2,697
|
Holy goop in the intake, Batman! Your timing for doing the top end is pretty good, it seems. I agree about doing the oil cooler seals. This is also a good time to replace the AAV considering where it sits. I'd leave the head studs - they'll go for two headgaskets' worth of torquing - and replace the nuts.
The gubbins in the middle of the photo is an air valve that kicks open when you fire up the air conditioning. Have fun - I'll bet you'll be truly amazed at how good the bores look. Mine were just about perfect, even after at least 150,000 miles.
__________________
'88 944 Auto - project, kinda '87 944 Auto - died saving my wife '84 944 5SP - crushed under shop roof during snow storm All others GONE! |
||
|
07-09-2009, 09:55 AM
|
|
|
Registered
Join Date: Jan 2009
Location: Missouri
Posts: 199
|
Yeah, something is definitely amiss with the AOS, I'm afraid too. There is a pool of that goop sitting on the block below the AOS. I do know the engine has not been low on oil, as I have receipts for oil changes every 3k, sometimes before then. There is no lifter noise, etc...so all that should be fine.
I was planning on this anyways (HG R&R), but one day a couple weeks ago the GF said when she stopped at an intersection, a cloud of white smoke that was sweet smelling blew past her...so I figured it was time. I had her shut it off and we dollied it home. I thought the car ran pretty good before, but after seeing all these broken hoses, I can only imagine what it will be like when things are correct! I'm off to the garage to remove the AOS, drain the coolant, remove the timing belt, etc...
__________________
'83 944 N/A '88 Ford F-150 4WD - Does Everything '99 300M - Daily Driver, headlights just polished! '85 34' ITASCA MotorHome, built-in blender baby! '89 Supra - Black - Future 400hp NA sleeper. |
||
|
07-09-2009, 05:06 PM
|
|
|
Registered
Join Date: Jan 2009
Location: Missouri
Posts: 199
|
Well, the good news is the timing belt/balance belt I did a while back are still good, no signs of skipping or abnormal wear.
The bad news...them hex-drive bolts holding the cam tower are a real pain. I managed to get 6 of them out, but broke a Craftsman L-wrench (6mm) and a 1/2" drive 6mm shorty driver trying to remove them. One is broke off in the came housing, but I think I can get it out with hemostats. I'll call Snap-On tomorrow!
__________________
'83 944 N/A '88 Ford F-150 4WD - Does Everything '99 300M - Daily Driver, headlights just polished! '85 34' ITASCA MotorHome, built-in blender baby! '89 Supra - Black - Future 400hp NA sleeper. |
||
|
07-09-2009, 07:21 PM
|
|
|
Registered
Join Date: Jan 2009
Location: Missouri
Posts: 199
|
Visited ye'ol Snap-On guy today, $25 for a 6mm 3/8 Drive Hex, which is obviously a gazillion % better than Craftsman, because it removed every bolt. I had to remove the ball-end of the Craftsman hex wrench with some hemostats, but it came out pretty easy. So far, I'm two hours into the job and have everything removed but the head, which still leaves me with removing the headers first, and I already have four of those bolts/studs removed. The others are a really tight fit with a wrench, definitely can't get a socket on them.
BTW, water is everywhere in the engine...*sigh*
__________________
'83 944 N/A '88 Ford F-150 4WD - Does Everything '99 300M - Daily Driver, headlights just polished! '85 34' ITASCA MotorHome, built-in blender baby! '89 Supra - Black - Future 400hp NA sleeper. |
||
|
07-10-2009, 07:39 PM
|
|

|
|
Registered
Join Date: Jan 2009
Location: Missouri
Posts: 199
|
Well, I guess no one has part numbers they want to share...
The head is off and the bores are near perfect. There is plenty of carbon on the ridge and piston faces, but no scoring. I'll post pics later this evening.
__________________
'83 944 N/A '88 Ford F-150 4WD - Does Everything '99 300M - Daily Driver, headlights just polished! '85 34' ITASCA MotorHome, built-in blender baby! '89 Supra - Black - Future 400hp NA sleeper. |
||
|
07-14-2009, 07:05 AM
|
|
|
Registered
Join Date: Jan 2009
Location: Missouri
Posts: 199
|
Ok...been like 8 months since I started this job. We've moved...trailered the car to the new place and lost the sunroof in the process!!!
Anyways, I'm back at it, but I have a few questions: 1. Why is the OPRV on this car a one piece design? It's just a chunk of steel with a spring the goes into the block. There is an alignment/wear sleeve in the block where the OPRV rides sticking out...I assume to align the cooler housing, so I can't use an alignment tool. 2. The shims that we bought to shim the oil cooler against the housing are too small of an I.D. to use on the cooler. I have to shim it nearly 1mm towards the block, so I have to pick up bigger shims from a local machine shop here. Is this just one of the original 944 housings/coolers? I noticed in the shop manual it says to replace with an updated housing, but nothing about the cooler itself. The seals were definitely shot, so I'm glad I'm doing this now.
__________________
'83 944 N/A '88 Ford F-150 4WD - Does Everything '99 300M - Daily Driver, headlights just polished! '85 34' ITASCA MotorHome, built-in blender baby! '89 Supra - Black - Future 400hp NA sleeper. |
||
|
03-18-2010, 07:35 PM
|
|
|
Registered
Join Date: Mar 2004
Location: Las Vegas, NV
Posts: 317
|
heres the 5 molded hose's part numbers, though most of them can be switched with silicone hose and be of much better quality and cheaper in some case's. only one that cant really be done is the backwards"J" looking one and that happens to be the most expensive.
944 110 187 01 944 110 173 00 944 110 177 00 944 110 178 00
__________________
1983 944 Guards Red (87' Implant Complete) |
||
|
03-18-2010, 10:24 PM
|
|
|
Registered
Join Date: Jan 2009
Location: Missouri
Posts: 199
|
Well, to answer #1 above, I just have had too many beers to think correctly. I can use the OPRV Alignment tool that I have, but I have to get the OPRV cover screw out of the oil cooler housing, which is beginning to really upset me. I am going to have to put the housing in place on the block just to hold it, then try to remove the screw...which I hope doesn't lead to disastrous results.
Answer to #2 anyone? All the OPRV's I've seen pictures of look totally different than ours. There are no seals to replace on what I have, unless there is still a piece stuck inside the block. I have the head torn down and found that the valve seals were definitely junk, but I already have the Head Gasket R&R kit, so I am covered there. However, I do know the head was replaced once before and by looking at the valve seal in the combustion chamber, they did NOT lap the valves. I don't see significant signs of leaking, so I'll leave it the way it is. My question is: There were two wear rings (not sure what Porsche calls them) under the valve spring seat of the #2 cylinder exhaust valve. Is this normal? Why in the world would you do that when all the valve springs have measured out to within spec? I have a feeling the Porsche Specialists in N.C. just don't have much of an eye for detail... I still have to clean the valves, springs, seats, retainers, etc., before reassembling the head, but I am hoping to get that accomplished today or tomorrow and will post pictures before assembly to the engine. I have steam cleaned most of the engine, and of course ALL of the parts going back on. I hate the grease stains on the cooler housing and head, but I don't have my bead blaster at the new place, so they are just 'clean'. It also went from being 70 on Friday to 33 today outside. We have two inches of snow on the first day of spring (yesterday)...the garage is cold...it sucks. Once I get the head back on and disassemble/reassemble the cam tower, I will focus on the vacuum hoses. Steam cleaning the engine sure does make a difference in it how looks though. 
__________________
'83 944 N/A '88 Ford F-150 4WD - Does Everything '99 300M - Daily Driver, headlights just polished! '85 34' ITASCA MotorHome, built-in blender baby! '89 Supra - Black - Future 400hp NA sleeper. |
||
|
03-21-2010, 10:33 AM
|
|
|
Registered
Join Date: Jan 2009
Location: Missouri
Posts: 199
|
Also, what is preferred on the exhaust manifold studs? All but two came out, so I am going to have to drill the remaining two. I can tell by the color that the Porsche Specialists obviously replaced those two with cheap ones, because judging by the pictures of the factory studs, they were Grade 8, while the two that have broken off in the head are NOT Grade 8.
Do people normally drill/tap for plus-sized studs? I can easily get some 10mm x 8mm upsizing studs, but that of course means drilling the head and tapping for 10mm studs. What is the preferred way for this? I am definitely going to use copper nuts for the exhaust manifold, but I also want a stud that isn't going to rust that easy. I have found, on other cars, that coating the completed assembly with teflon wax seems to inhibit rust production for quite a long time. Stainless studs? I don't know...suggestions are welcome. Should I take the manifold, have it bead blasted, and cerama-coat it?
__________________
'83 944 N/A '88 Ford F-150 4WD - Does Everything '99 300M - Daily Driver, headlights just polished! '85 34' ITASCA MotorHome, built-in blender baby! '89 Supra - Black - Future 400hp NA sleeper. |
||
|
03-21-2010, 10:55 AM
|
|


 The Kraut Burner
 The Bratwurst Burner
 Das Boost
