|
|
|
|
|
| Author |
|
|
Registered
Join Date: May 2005
Location: Houston
Posts: 5,472
|
930 Coilover Conversion Complete..w\ Pics!
In case you guys do not frequent the regular Tech section:
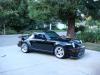
Well..I have a big weekend planned..refresh my entire front suspension, detail and convert the car to coilovers from Rebel S Racing (RSR Projects Home). I worked closely with Clint from Rebel S Racing and he was wonderful, patient and great \ honest to work with, his products speak for themselves. The car is an '89 930 with 60K and has never had any suspension work. Car is a 100% street car that will never be tracked and the spring ratings on the coilovers were chosen to be progressive compliant and match this application. I have owned this car for 6+years and it has been (sadly) sitting for most of the past 2years, it will be driven after this project is completed hopefully this weekend...cross fingers! The plan is keep the stock sway bars - RSR bushings - New rubber sway bar bushings - New ball joints with all new OEM Lemforder wedge pins, catle nuts and lock washers - New tie rod kit with anti-rub spacer - New front RSR coilovers (250# Eibach with 200# Bilstein tender spring) with restored housings, reinforced (gusset plates welded) housings and revalved Bilsteins - New rear RSR coilovers (150# Eibach Spring) on new Bilstein Rear Sport Shock - Rennline dual bar strut brace - Sand and paint wheel wells - Powder coat - New stainless fasteners - Detail wheels The rear RSR coilovers will be used in conjunction with the stock and re-indexed torsion bars to address the squat issues these cars have a tendency to have under hard acceleration. The first set of pictures are the front suspension tear down from a previous weekend (you can see the tire rub on the inner fender). I had previously added the 993 Turbo brakes in the summer of 2007. Enjoy the pics. questions, comments, feedback please add. Wheels removed and 23years of driving, stock fender wheel wells:    Underside of car:    Front Torsion Bars coming out..easy:  Separating the front ball joint from the strut housing..stubborn:  A-Arms out, sway bar and shields: 
__________________
Ole Skool - wouldn't have it any other way |
||
 07-08-2011, 07:28 PM
|
|
|
Registered
Join Date: May 2005
Location: Houston
Posts: 5,472
|
Front bushing Removal..fun with fire..and not that tough really:
  Ball Joint Removal..little tricky but not bad:   $15 4x4 Hub tool from Advance Auto Parts and my Impact Gun..life saver on this step:   Sanding Down Wheels Wells and removing dirt..sweaty..wow!  
__________________
Ole Skool - wouldn't have it any other way Last edited by slow&rusty; 07-08-2011 at 07:34 PM.. |
||
|
07-08-2011, 07:29 PM
|
|
|
Registered
Join Date: May 2005
Location: Houston
Posts: 5,472
|
Primed:
 All the hose brackets getting ready for sanding (wire brushing) and painting 
__________________
Ole Skool - wouldn't have it any other way Last edited by slow&rusty; 07-08-2011 at 07:35 PM.. |
||
|
07-08-2011, 07:29 PM
|
|
|
Registered
Join Date: May 2005
Location: Houston
Posts: 5,472
|
Everything back from the powdercoaters:
     
__________________
Ole Skool - wouldn't have it any other way Last edited by slow&rusty; 07-08-2011 at 07:36 PM.. |
||
|
07-08-2011, 07:30 PM
|
|
|
Registered
Join Date: May 2005
Location: Houston
Posts: 5,472
|
Well yesterday's progress was not great (sadly)...had huge problems trying to remove the tie rods AND so decided to remove the rack, and then stripped the allen head bolts on the U-clamp in the Smugler's box. Hoping to use a bolt out to address that this morning and get back into it today! Looks like this project will spill over to next weekend.
Some pics of the new parts: I painted and clear coated each hose clamp:  All new stainless hardware and fasteners:    Yasin
__________________
Ole Skool - wouldn't have it any other way Last edited by slow&rusty; 07-08-2011 at 07:37 PM.. |
||
|
07-08-2011, 07:30 PM
|
|
|
Registered
Join Date: May 2005
Location: Houston
Posts: 5,472
|
Got the rounded allen bolts out that secures the U-Clamp for the splined steering shaft in the Smugler's Box (yessss..sweet victory! thank-you bolt extractor!) and started reassembling the control arms (notice the rubber bung to seal the control arm end as the Torsion bars will not be going back in.
    Yasin
__________________
Ole Skool - wouldn't have it any other way |
||
|
07-08-2011, 07:31 PM
|
|

|
|
Registered
Join Date: May 2005
Location: Houston
Posts: 5,472
|
Ok..so got the steering rack out of the car...
 I fought and fought and fought with the tie rods and removing them using pipe wrenches, cheater bars, crescent wrenches, tie rod wrenchl from Smart Racing that I bought from our host, standing on the damn cheater bars and putting all my body weight on the cheater bars...and nothing..no budge..nada..I even heated the crap out of the tie rods..arghh!! By the end of it my T-shirt was drenched in sweat and I was riddled with frustration. 1+hours later still nothing..with being pissed off, in a last minute vain attempt I cracked out my angle grinder and put a fresh metal cutting wheel on it and then began some surgery... I cut the tie rod right at the point where it is mated to the rack, took a couple of minutes, my thinking was to use a drill and an easy (EZ Out) on the remaining threads into the rack and remove it that way..then to my surprise / shock after I cut the tie rod off the threaded section came off in my hand..sweet.   I then reassembled the new boots on the tie rods, hint on this, easy too that takes 1 minute...use two plastic bicycle tire irons to slip the outer part of the boot against the rubber bung and a tie wrap to keep it all in place and prevent air from getting under the boot, analogous to changing a tire on a bike really just smaller, better than using a screwdriver and risking damage to the new boot or it slipping and taking some skin and flesh out of your fingers or hands!.  Making progress! Yasin
__________________
Ole Skool - wouldn't have it any other way |
||
|
07-08-2011, 07:32 PM
|
|
|
Registered
Join Date: May 2005
Location: Houston
Posts: 5,472
|
Ok Guys here it is...car is finally finished! It took waaay longer than 48hours..laughing, there is my optimism getting the best of me!
I cleaned up rack after removing the tie-rods (what a pain in the ass removing the tie rods were!)  the powder coating was too thick to fit the RSR bushings, so I had to remove it. Word of caution for any of you guys powder coating your parts and trying to place these bushings on, it is a total precision fit.  Then I mocked-up the RSR bushings and the control arms to check the "resistance" and fall of the control arms, to check how many shims (supplied by RSR) would be required between the underbody of the car and the top of the bushings. After chatting with Clint, about 5-ish lbs tied around the ball joint should make the control arms falls nice and smooth, no resistance, no binding is the key. Also the control arms should be in the same axial plane front to rear.     Conical male and female washers required sandwiching the front bushings plus one flat washer 
__________________
Ole Skool - wouldn't have it any other way |
||
|
07-08-2011, 07:32 PM
|
|
|
Registered
Join Date: May 2005
Location: Houston
Posts: 5,472
|
Weltmeister rack spacers installed in the back ground of this picture, after this was mocked up, I took the rack out of the car and installed the new Tie Rods (yes I enjoy doing everything twice!).
  Suspension Techniques 22mm poly urethane sway bar bushings that I bent gently in a vice to match the bend on the factory mounting brackets  Part Number for you guys, for future reference:  Coming together!   Rennline twin bar strut tower brace also installed  I even had some time to re-polish my wheels, really needed! Before:  Before  After: 
__________________
Ole Skool - wouldn't have it any other way |
||
|
07-08-2011, 07:33 PM
|
|
|
Registered
Join Date: May 2005
Location: Houston
Posts: 5,472
|
After the car was done I double, triple and quadruple checked the number of threads on the old tie rods that I removed and made sure that the new tie rods matched it, and with the car back on its wheels I pushed the car back and forth several feet with the front and rear control arm mounting bolts loose (VERY important) to ensure that the weight of the car settled on the new suspension, and then I torqued everything up with the car on the ground. I guess I must have done something right, as the car rolled very easily and freely and was very easy to push, there was no toe-in at all and just enough negative camber to improve handling.
This is the final ride height I settled on after playing with the adjustable collars on the coilovers. If I wanted I could go about 1inch lower (!!).     I have since put about 10miles on the car and it feels great, extremely well composed and very linear, the car tracks perfectly straight as well. The spring rating I chose with Clint's guidance is great for a street car and not too stiff. Hope this is a good guide for you guys attempting something like this at home. Be patient..it does take way more than 48hours! But so worth it. Yasin
__________________
Ole Skool - wouldn't have it any other way |
||
|
07-08-2011, 07:34 PM
|
|
|
Registered
Join Date: May 2008
Posts: 422
|
Looks like great job .......but, there is always a but. Anyway, do not set ride height based on what looks good like the Street Rod crowd. Also there is no way to get an accurate alignment just by counting threads or any other guess.
You saved a fortune doing the work yourself have the car corner balanced and aligned. You installed the coil overs which make corner balancing easier not for looks I hope. Also make sure there is enough movement in the shock throughout travel at that height. Kind of like stopping 5 feet before the finish line. |
||
|
07-08-2011, 07:57 PM
|
|
|
Max Sluiter
|
Or at least check it with a DIY method- strings, lasers, etc.
__________________
1971 911S, 2.7RS spec MFI engine, suspension mods, lightened Suspension by Rebel Racing, Serviced by TLG Auto, Brakes by PMB Performance |
||
|
07-08-2011, 08:21 PM
|
|

|
|
Registered
Join Date: Mar 2008
Posts: 1,082
|
That looks awesome!
I am not so sure about using stainless hardware for suspension parts though. |
||
|
07-08-2011, 09:13 PM
|
|
|
Registered
Join Date: May 2005
Location: Houston
Posts: 5,472
|
Quote:
Quote:
Yasin
__________________
Ole Skool - wouldn't have it any other way |
||
|
07-09-2011, 02:26 AM
|
|
|
Registered
Join Date: May 2008
Posts: 422
|
I didn't even see the stainless hardware. Just double check the bolt strength. To keep it simple stainless bolts are usually of less strength then regular say grade 8 hardware. There was a great LONG discussion about bolts and hardness VS. strength of the HAMB if you can find it.
I would just use regular (higher grade) plated (not chrome) hardware next time they do not corrode as quick as most think. |
||
|
07-09-2011, 03:29 AM
|
|
|
Registered
Join Date: May 2005
Location: Houston
Posts: 5,472
|
Quote:
Here is an informative chart I found: Bolt Grade Markings and Strength Chart Yasin
__________________
Ole Skool - wouldn't have it any other way |
||
|
07-09-2011, 04:30 AM
|
|
|
Registered
Join Date: Mar 2008
Posts: 1,082
|
There is an A-4 stainless grade that is about as strong as an 8.8 bolt but it's hard to find.
Personally I don't like how stainless has a tendency to "gall" under high stress applications. I usually get all my fastners from a specialty fastner store. They have an awesome selection of metric fastners in 10.9 anf 12.9 strengths. For reference a metric 8.8 is about the strenght of a grade 5 standard bolt. A metric 10.9 is about a grade 8 and a 12.9 is about a grade 9. Also, match the grades of your fastners. So if you use a 10.9 metric bolt use a 10.9 nut with it. Last edited by nocarrier; 07-09-2011 at 04:51 AM.. Reason: spelling |
||
|
07-09-2011, 04:49 AM
|
|
|
ibanezjs
Join Date: Aug 2008
Location: France
Posts: 54
|
Wow amazing!

|
||
|
07-09-2011, 05:48 AM
|
|
|
After the next project
|
Extremely well done and great write up. This thread will serve as a great resource to others for a long time to come.
Great looking car as well. Regards, Bryan
__________________
Current cars: 2012 Cayenne TT, 1997 993TT, 1912 Buick Model 34, Audi S8, 1976 912E, 2016 Cayenne Diesel |
||
|
07-09-2011, 06:00 AM
|
|
|
Registered
|
That is very nicely done.
What a beautiful car.
__________________
Jesper Carrera 3.0 1975 930 1978 OEM Matte Schwartz, ANDIAL IC, BL WUR, SC cams. LMA-3 w. XD-16 and CP transducer www.stauningwhisky.dk |
||
|
07-09-2011, 06:23 AM
|
|


 1971 Porsche 911S

 Blacked 930, Fresno CA
