|
|
|
|
|
| Author |
|
|
@reimaginedcoachwerks
Join Date: Nov 2020
Posts: 116
|
so i get all of the pistons assembled to install on the short block. i only install the inside circlip for now because after checking clearances i will completely disassemble and wash everything.
always use a liberal amount of engine oil on your cylinders. i measure every single part of the engine to make sure both banks will line up and not bind the cam housings. you can see i measured each base shim to be the same thickness.    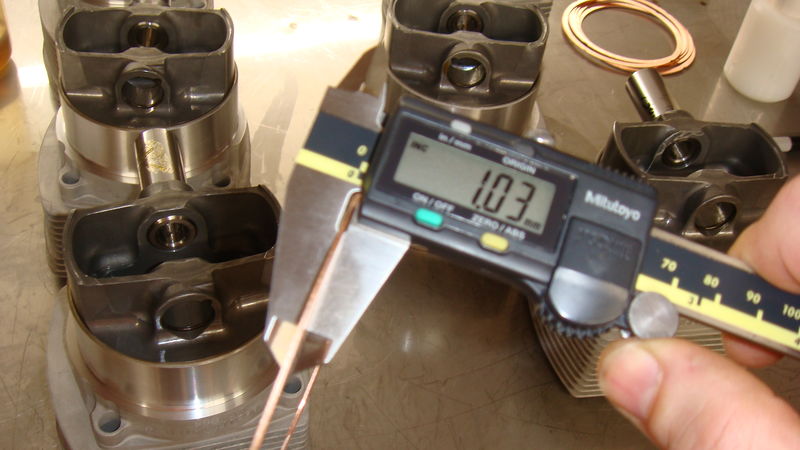
|
||
 01-13-2021, 11:22 AM
|
|
|
@reimaginedcoachwerks
Join Date: Nov 2020
Posts: 116
|
now the short block is together i will check my deck height with clay and a dial indicator. the pic of the dial indicator was too blurry so im not posting that one.
     
|
||
|
01-13-2021, 11:24 AM
|
|
|
@reimaginedcoachwerks
Join Date: Nov 2020
Posts: 116
|
next i will assemble the long block with clay in the valve pockets. for this check i will set the lash with a feeler gauge to save time. i always check the feeler is not out of spec before i start. as you can see from my machinist rule the heads are all level, so i can not stress it enough, measure everything 100x's before assembly to avoid getting frustrated. that includes making sure the case is flat and that the height of the cylinders and heads are the same from mating surface to mating surface. i have a 24x30 granite block with a height gauge to do this but it does not need to be that big to measure everything but the case halves.
       
|
||
|
01-13-2021, 11:31 AM
|
|
|
@reimaginedcoachwerks
Join Date: Nov 2020
Posts: 116
|
the specs for the cams on this engine are 1.26 mm +/- 0.1 mm. start with #1 then do #4. make sure that if you ever have to go CCW that you go past your goal so you can come up to your goal without any backlash in the chains otherwise you will be chasing your tail for hours. i like to have #1 and #4 set up with their own indicator so i do not have to go back and forth so i can set both with one set up.
some time ago i made a fixture to hold my digidix from stomski racing. after messing with the glare and it never being exactly where i wanted it, this was the best solution for me. of course you can use a degree wheel or the joint where the case halves meet if you do not have a digidix. here is #1 timed.   
|
||
|
01-13-2021, 11:41 AM
|
|
|
@reimaginedcoachwerks
Join Date: Nov 2020
Posts: 116
|
and here is #4 timed. after they were both timed and rotated a few times, they ended up at 1.25 mm on #1 and 1.27 mm on #4 which is obviously with the tolerance of 1.26 mm +/- 0.1 mm. i do not waste half a day on the eyewash of getting exactly 1.26 on both sides. for me personally, +/- 0.05 mm is good enough and usually i am within +/- 0.02 on a bank and +/- 0.04 bank to bank if not better.
now lets take it apart to check the clay.     
|
||
|
01-13-2021, 11:48 AM
|
|
|
@reimaginedcoachwerks
Join Date: Nov 2020
Posts: 116
|
here is a pic of the fixture i made for the digidix.

|
||
|
01-13-2021, 11:49 AM
|
|

|
|
@reimaginedcoachwerks
Join Date: Nov 2020
Posts: 116
|
the clay reveled we have sufficient clearance for the valves.

|
||
|
01-13-2021, 11:52 AM
|
|
|
@reimaginedcoachwerks
Join Date: Nov 2020
Posts: 116
|
another way to check clearance is to remove the valve springs from the heads. to do this you need a valve spring compressor. after you compress the springs you remove the keepers, then release the spring tension. make sure there is no more tension on the spring before removing the springs. my compressor uses the cam housing to mount.
here are the intake valve travel amounts. these were taken at 20* bTDC to 20* aTDC in 5* intervals.          
Last edited by rcw911rsr; 01-13-2021 at 12:07 PM.. |
||
|
01-13-2021, 12:00 PM
|
|
|
@reimaginedcoachwerks
Join Date: Nov 2020
Posts: 116
|
and here are the exhaust valves travel amounts. i check for zero before each measurement. these were taken at 20* bTDC to 20* aTDC in 5* intervals.
take these measurements and subtract the cam travel at each interval to mathematically solve for the final clearance on your engine. your cam builder can provide you with this information.          
|
||
|
01-13-2021, 12:06 PM
|
|
|
Registered
Join Date: May 2004
Posts: 891
|
A word of caution for anyone reading the above post. It was done correctly but the value to subtract from the measured distances is the net valve lift. This is the known cam lift (cam spec's given by cam supplier) multiplied by the rocker ratio.
You can use the gross valve lift which will give you closer clearances to the piston. Typically if its really close where you have to machine pockets you calculate the clearances you want and factor that into the amount removed from the pocket. |
||
|
01-13-2021, 01:57 PM
|
|
|
@reimaginedcoachwerks
Join Date: Nov 2020
Posts: 116
|
Quote:
|
||
|
01-13-2021, 10:28 PM
|
|
|
@reimaginedcoachwerks
Join Date: Nov 2020
Posts: 116
|
i thought i would post up one more way to check valve clearances that is a hybrid of both of the ways already mentioned. i did not expect to spend as much time as i have on this but thought this would add some additional value.
i picked up some springs that had just enough tension to hold the valves closed but soft enough that i could easily push the valve past where the cam lob positioned the valve. this of course required assembling the most of the motor to demonstrate. i also set the timing again. i started at 20* bTDC and moved in 5* increments again till i got to 20* aTDC. each time i stopped i would push the valve till it hit the piston. here is a pic of one of the springs i used and the setup.     
|
||
|
01-13-2021, 10:36 PM
|
|

|
|
@reimaginedcoachwerks
Join Date: Nov 2020
Posts: 116
|
i think the pics from #4 are easier to visualize due to the dial indicator on the exh is facing the same direction as the intake dial indicator.
here is how far the valve was moved by the cam.  here is how much additional travel it had when i pushed it.  this is how much further the exh traveled when i pushed it.       
|
||
|
01-13-2021, 10:42 PM
|
|
|
@reimaginedcoachwerks
Join Date: Nov 2020
Posts: 116
|
        
|
||
|
01-13-2021, 10:48 PM
|
|
|
@reimaginedcoachwerks
Join Date: Nov 2020
Posts: 116
|
        
|
||
|
01-13-2021, 10:50 PM
|
|
|
@reimaginedcoachwerks
Join Date: Nov 2020
Posts: 116
|
did everyone count how many heads there were?

|
||
|
01-13-2021, 10:51 PM
|
|
|
@reimaginedcoachwerks
Join Date: Nov 2020
Posts: 116
|
|
||
|
01-13-2021, 11:10 PM
|
|
|
@reimaginedcoachwerks
Join Date: Nov 2020
Posts: 116
|
|
||
|
01-13-2021, 11:20 PM
|
|
|
Registered
Join Date: Mar 2019
Posts: 1,642
|
The light spring method is what I usually use. Works great and gives a more accurate measurement than the clay method, IMHO.
|
||
|
01-14-2021, 03:03 PM
|
|
|
@reimaginedcoachwerks
Join Date: Nov 2020
Posts: 116
|
Quote:
|
||
|
01-15-2021, 10:46 PM
|
|


