|
|
|
|
|
| Author |
|
|
Registered
|
964 3.6 Engine Top End
I didn't know much about 911 engines when I got my 92 C2. It started innocently with an oil change. Then, I did valve adjustment and change out my suspension and brake. Then my car started smoking at idle. After doing everything that I can to fix it, the next thing I knew is that I got the engine out and ready to tear into it.
I won't document the top end rebuild process. Wayne's book does and excellent job of this. But it's not specific to a 964. I am going to use this thread to point out the differences between the Carrera and the 964 during my top end rebuild. Hopefully, this can help someone. So let's get started... I am using Wayne's book, the factory manual on CD, PET, and this forum to get me through this rebuild. I won't go into dropping the engine since it's been discussed a million times and the process is the same. When removing the intake manifold/injection system on top of the engine, it's easier to remove it in 2 pieces. Undo the 6 hose clam on the intake manifold and lift the whole intake manifold assembly up. See pic below.  Lift the intake manifold assembly off and you will have.  Next, remove the injector, fuel lines, wiring harness, etc. assembly as a whole. You may have to remove some other pieces out first. You will be left with nothing except the engine shroud on top.  On the 964, you have to remove the fan belt pulley in order to remove the AC bracket/mount. Undo the 22mm bolt, and the pulley will still be stuck to the crank. There is a special tool to pull the pulley off, but I used a 3 claws 6-inch pulley remover to take it off. Put the claw on the thickest edge of the pulley, otherwise, the pulley edge will bend. The pulley will pop off so be careful. It will land on your toes. The pulley is an integrated pulley and harmonic balancer so it is fairly fragile. Don't bend, drop, or bang on it.  With the AC bracket/mount removed, you can remove the timing chain housing cover. Note that the 964 uses triple square head bolt nuts. The flywheel bolt is also a triple square design. So pick up a set of these 12 points tools. They are availble in a set of 4 for about $12 at Autozone.  
|
||
 04-27-2005, 11:47 AM
|
|
|
Registered
|
When you are removing the timing chain housing, there are two oil feeds you need to remove. The first one is the oil feed connecting the cam housing to the timing chain housing. Undo the 10mm bolts and yank it off. There is an o-ring on the connections that would be a good idea to replace. Unfortunately, I don't think the rebuild kit Pelican sells come with them.
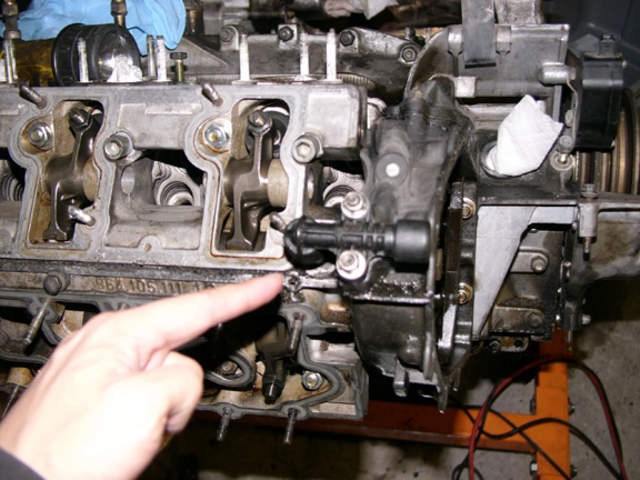 The next is the timing chain tensioner. Be careful when you remove the bolts, the tensioner is under spring tension.  I did not remove my timing chain ramp (not sure how or need to), so I jus popped the end next to the cam out of the lower chain ramp to remove the timing chain housing. See pic below.  On the 964, there is power steering you have to deal with. I used the cam tool to hold the cam steady, then just remove the remove the bottom bolt of the power steering gear/belt drive. Take of the gear, undo the bolts and remove the whole power steering assembly. 
|
||
|
04-27-2005, 12:04 PM
|
|
|
Registered
|
Here is a pic of the cam housing to timing chain housing oil feed since the image didn't come through.

|
||
|
04-27-2005, 12:06 PM
|
|
|
Registered
|
Let's try that again.

|
||
|
04-27-2005, 12:07 PM
|
|
|
Registered
|
Getting the cam, rockers, cam housing, and cylinder head off is straight forward. The head stud bolts were on extremely tight. I had to use a 6 ft. breaker bar. When it comes to re-assembly, the factory manual calls for tighening to something like 15 ft-lb and turing it 90 degrees further. I don't know how tight this would be, or is it enough.
Anyway, after you get the head off, you will notice that the later 964 models have a sealing ring between the cylinder and the heads.  Don't just write on the cylinder heads, when you send it in to be rebuild. Everything will be cleaned off.  Back to the cylinder head ring, it is a .75mm graphite-aluminum-graphite gasket. I used a small wood chisel at a shallow angle to dig it out. If you just scrape off the graphite, you did not remove all of the gasket. The gasket itsef is .75mm thick. Cleaing it is a pain.   Another difference is the 964 uses a green viton rubber o-ring for the cylinder base gasket insted of copper. 
|
||
|
04-27-2005, 12:18 PM
|
|
|
Registered
|
Removing the piston wrist pin circlips is a pain. To prevent it from flying off at a million miles into your face, take a long 3/8 inch socket extension and insert it into the wrist pin. This will prevent the circlip fling off.
 Now to replace the thru bolt o-rings that is a source of my oil leak. The factory calls for a special tool to cover the thread of the through bolt thread so it won't cut the o-rings when you put it on. An small EXPO dry erase marker cap fits perfectly. |
||
|
04-27-2005, 12:25 PM
|
|

|
|
Registered
|
Here is the pic.
  And here it is in action. 
|
||
|
04-27-2005, 12:27 PM
|
|
|
Registered
|
BTW, the through bolt and nuts are 14mm 12-points or tiple square.
|
||
|
04-27-2005, 12:28 PM
|
|
|
Registered
|
My head came back from Ollie's the only exhaust valve guides were worn. I think that was the source of my smoking at idle. Oil consumption went from 1000 miles per quart down to 400 miles per quart in a VERY short amount of time. The is no way to check the condition of the valve guides for wear. When it begin burning oil, it will burn quick.
I also have oil leaks at my through bolt and my cylinder base. Hopefully, the new o-rings will cure them. The car is from Texas and has 92K miles. The cylinders still shows cross-hatch marks, and the compression ring gap is .5mm. So, I will only re-ring. some of the rocker arms show very slight pitting, so I sent them off to be polished. The cam shows no wear. I will be putting the engine back pretty much stock. I have been busy lately and haven't worked on it one bit except for re-installing the piston and cylinder back. Will add more as soon as I can. ---anthony |
||
|
04-27-2005, 12:56 PM
|
|
|
Irrationally exuberant

|
BTDT and that a great write up!
-Chris
__________________
'80 911 Nogaro blue Phoenix! '07 BMW 328i 245K miles! http://members.rennlist.org/messinwith911s/ |
||
|
04-27-2005, 01:47 PM
|
|
|
Crusty Conservative

|
Anthony,
Great write up! How long since you removed the engine from your car? Any surprises so far? I was surprised at how tight your head bolts were, are you replacing any of that hardware, or just new sealing rings, etc..?
__________________
Bill 69 911 T Targa, 2.4E w/carbs (1985-2001) 70 911 S Coupe, 2nd owner (1989- 2015) 73 911 T Targa, 3.2 Motronic (2001- ) |
||
|
04-27-2005, 02:05 PM
|
|
|
Registered

|
What a fantastic, selfless thread !!!! This is a lot of add'l work to be able to present this to us here....wow....I am impressed.
Thank you and keep the detailed pic's and progress coming !!!!
__________________
Johnny Riz 1973 911 Custom Euro 3.2L "Sports Purpose" '10 Subaru WRX-STi Hatch - modded. RGruppe#152 Early 911S Reg.#335 |
||
|
04-27-2005, 02:18 PM
|
|

|
|
Registered
Join Date: Apr 2005
Location: San Francisco
Posts: 5
|
Nice !
If it's still open, this engine has to be tuned :P
__________________
Homepage about my performance tuning projects |
||
|
04-27-2005, 02:19 PM
|
|
|
Doesn't want/need a 3.6L

|
Thanks for taking the time to show us the steps!
 Ralph |
||
|
04-27-2005, 02:22 PM
|
|
|
Registered
Join Date: Jan 2003
Location: Langley,B.C.
Posts: 12,092
|
Nice write up, thanks. Good pics too.
Cheers, Jeff
__________________
Turn3 Autosport- Full Service and Race Prep www.turn3autosport.com 997 S 4.0, Cayman S 3.8, Cayenne Turbo, Macan Turbo, 69 911, Mini R53 JCW , RADICAL SR3 |
||
|
04-27-2005, 02:47 PM
|
|
|
I would rather be driving

Join Date: Apr 2000
Location: Austin, TX
Posts: 9,108
|
Thanks for taking the time to fill in the holes on a 3.6 build. It makes the task of a 3.6 rebuild seem much less daunting.
Now we can all start shopping for those cheap 964s that need the head oil leaks fixed...
__________________
Jamie - I can explain it to you. But I can not understand it for you. 71 911T SWT - Sun and Fun Mobile 72 911T project car. "Minne" - A tangy version of tangerine #projectminne classicautowerks.com - EFI conversion parts and suspension setups. IG Classicautowerks |
||
|
04-27-2005, 03:25 PM
|
|
|
Registered

Join Date: Dec 2004
Location: san jose
Posts: 4,982
|
The new sealing rings that I got in my gasket kit do not resemble the graphite gasket at all. Did you get new graphite gaskets and from where? thanks
__________________
steve old rocket inguneer |
||
|
04-27-2005, 03:30 PM
|
|
|
Registered
|
To answer some of your questions.
>>How long since you removed the engine from your car? Any surprises so far? was surprised at how tight your head bolts were, are you replacing any of that hardware, or just new sealing rings, etc..? It's been 3 months. 1/2 the time taking things apart, 1/2 the time cleaning. I am at a stage to begin reassembly. No surprises. Minimal wear. The problem had been exhaust valve guides and the bad thru bolt o-ring and cylinder base o-ring. But they looked normal when I took them out. I can post the pics of the o-rings if you want. I am only replacing rings, seals, gaskets, etc. >>> The new sealing rings that I got in my gasket kit do not resemble the graphite gasket at all. Did you get new graphite gaskets and from where? I got the same thing with my rebuild kit. They are metal rings. I got the graphite from Supertech Performance. Below is the side by side comparision of the two cylinder head rings. It seemed the graphite one would seal better, but I don't know why Porsche switched to the steel one on later models. Maybe cost? Graphite is on left. Steel is on right.   ---anthony |
||
|
04-27-2005, 07:27 PM
|
|
|
Registered
Join Date: Dec 2004
Location: san jose
Posts: 4,982
|
What is the phone number for Supertech and how much do those rings cost? thanks
__________________
steve old rocket inguneer |
||
|
04-28-2005, 02:06 PM
|
|
|
Registered
|
I completed the reinstallation of the cylinder heads and camshaft housing this weekend. The biggest difference is the torque sequence on the head stud nuts. The nuts are 10mm(?) 12 points, and use no washer.
You first torque it to 15NM, then turn it an additional 90-92 degrees. The torque pattern for them is different than in the book. The manual starts with the middle cyl head and tighten the 4 head studs in a cross pattern. Then do the right side, then the left. Here is what I did. First hand tighten the cyl head nuts. Put on the camshaft housing. Tighen the cam shaft housing nuts to 13-15NM. Tighten again them again to 25NM. Then tighten the head stud nuts to 15NM. Finally tighten them to the specified 90 degrees. Below is a picture of my setup to tighten the nut to 90 degrees.  I also took measured what is the torque value when you tighten them to 90 degrees. The average is around 40NM. Below are what I recorded. Cyl 5 1 48.2 nm 2 45.7 3 39.9 4 40.6 Cyl 4 5 41.2 6 48.9 7 39.9 8 38.5 Cyl 6 9 38.3 10 40.2 11 39.4 12 39.6 Cyl 2 1 39 2 41 3 38.3 4 42.2 Cyl 1 5 33.9 6 40.9 7 35.8 8 41.8 Cyl 3 9 36.4 10 40.2 11 40.9 12 38.3 I fitted both camshaft, and they turned fine without any resistance. |
||
|
05-02-2005, 08:13 AM
|
|


 The Blue Pheonix
 1970 Porsche 911S 2.2l MFI
 1988 Porsche 911 3.5L Motronic Twin-Plug


