|
|
|
|
|
| Author |
|
|
Kartoffelkopf

|
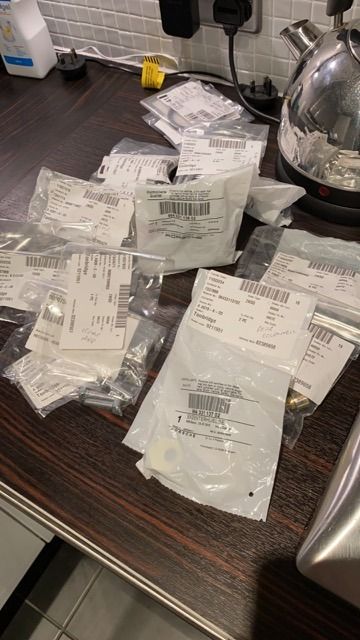
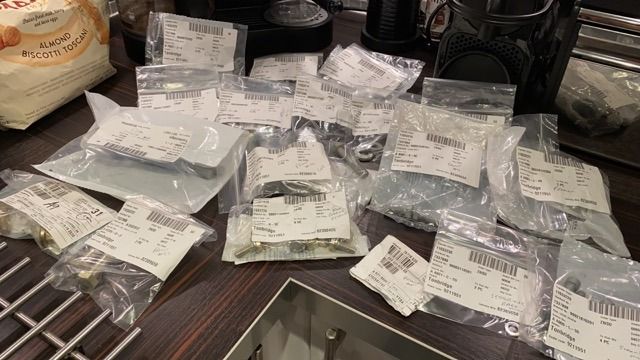
Very quick update - my new fasteners arrived the other day, so I've steadily been able to swap-out the old fixings for the new ones. Nothing spectacular to see here, none of them are even shiney, just a dull almost galvanised finish. Hard to dress up what £600-worth of nuts'n'bolts looks like, but here's some pics anyway, just to prove I got them, haha.
  As mentioned previously, effort is going into the house project right now but I have almost finished making the steering rack stops. And still not rigged up the plating kit. Hmmppphh. I'll post pics of the front suspension build when I'm further along, it'd just be a spot-the-difference competition otherwise. |
||
 05-27-2020, 03:21 PM
|
|
|
Registered
|
Ouch! Did some tiny purebred German gnomes from the Ruhr area bend over and $hit those out of their magic little bung holes to justify that price?
All good ... small price to pay for safety ... I'm just being a pillock. John |
||
|
05-27-2020, 07:10 PM
|
|
|
Kartoffelkopf
|
Hi everyone, long time/no update, sorry about that, been busy on other projects (motorbike, work, etc) but lets have a go at trying to remember the last year or so
.
Update Part 1 Chassis So, the last time I updated the thread, back in the middle of the U.K.s Lockdown #1 in 2020, Id just received the consignment of replacement fasteners for the suspension refresh. Until then, it was assembled but using old fixings that had been stripped of plating and rust, and potentially ready for re-plating. Here you go, a load of semi-random photo's I took along the way. First off, the plating setup for the parts I was comfortable refurbishing...       Steering lock stops in-situ on the rack...  Rear suspension bearing retaining plates 
Last edited by Spenny_b; 01-14-2022 at 10:06 AM.. |
||
|
01-14-2022, 08:11 AM
|
|
|
Registered
|
Hi Spence
Worth the wait I guess - Ridicules as time flies. Anyways, really, really happy for you. Looking fwd to further updates  Cheers Jesper |
||
|
01-14-2022, 08:49 AM
|
|
|
Kartoffelkopf
|
The rear suspension plates were plated by the guys I usually use; by this point companies in the UK were starting to open back up. These were just too large to fit in my plating tanks (and maintain the right proximity of the anodes)
 All assembled with the new Elephant Racing bush pack...   Some more progress shots of the front and rear suspension being rebuilt...    
Last edited by Spenny_b; 01-14-2022 at 10:05 AM.. |
||
|
01-14-2022, 09:55 AM
|
|
|
Kartoffelkopf
|
Front suspension....
    Elephant Racing bump-steer "correcting" (assisting) rod ends... 
|
||
|
01-14-2022, 09:58 AM
|
|
|
Kartoffelkopf
|
Next challenge was to make a tool that I could use to torque the spring plate pivot bolts with. Access on the RHS is very tight (it's asymmetric, left to right)...
 So, time to get creative and hack around a spanner and other sundries...      And then you can get it into the hex just fine. A quick re-calculation of the required torque, and job's a goodun'  If memory serves, swapping over the old fasteners for new ones was very easy. The next job once Covid restrictions allowed was to drive the car across town to get a pal of mine to set up the geo very approximately to 964 RS settings. Although he has a laser alignment rig, its not a setup like a specialist chassis setup operation has .so this really was just a case of getting the car in the ball-park, usable and driving in a safe non-shopping-cart kind of way. Which we did, and I did get some use out of it between lockdowns in summer 2020. |
||
|
01-14-2022, 10:04 AM
|
|
|
Kartoffelkopf
|
And this leads on to quite a nice piece of going full circle task, which was to make good on a commitment, or rather an intention, I made 10 years earlier! When I first bought the car in early 2011, the very first jobs that were undertaken were to do basic servicing, plus other odd jobs like sorting a snapped exhaust manifold stud, remove the (badly) leaking air pump system, fix the A/C and so on. The next piece of work I had scheduled was to replace the original Boge dampers for some Bilsteins (I think I mentioned this a long time ago in a previous write up). At the time, these were going to be supplied, fitted and then fully setup by an excellent family business over here called Centre Gravity. Id worked with Chris and Jane before, doing several geometry/ride height/corner weighting setups on my previous 996.2 GT3. Chris is an absolute legend in UK Porsche circles the word tolerance simply doesnt exist in his lexicon; its either spot-on, or its wrong. Simple as that. And were not just talking about setting up to Porsches book numbers, this is using their experience and truly understanding the principles of chassis dynamics, using judgement and experience to set a car up. On the GT3, Id been at their workshops as late as 11/12.00 midnight, still refining a setup and test driving it. He, and now his son-in-law Pete, really are suspension-whisperers. They dont do restoration or engine projects, they do suspension and only suspension, and boy do they do a great job. (Im a fan
.can you tell?)
Anyway, Bilstein at the time were having supply issues, and so to get the ball rolling I sourced a set of dampers from Gert at Carnewal in Belgium (another really nice guy to deal with) ..then, because Centre Gravity are so popular, the soonest suspension slot I could book was some months away in early 2012. No problem (I thought), Ill just crack on with the simple EFI conversion in the meantime .er ..yeah right. And so, after 10yrs of this project, I was able to make that booking with Centre Gravity, and get the car up to them. In the interim, my thoughts on the chassis post-refresh were actually really underwhelming. In fact, not for the first time, I was mentally preparing myself to sell the car if this was the best I could get from it. After all that work with upgrading the suspension, it still felt leaden, uncooperative and frankly, dull as ditchwater. Id read many threads over the years about the benefits of the narrow bodied Carrera chassis (of course being the basis for the legendary 964RS) as well as another modification to the Turbo chassis being to source (!!) Carrera trailing arms to narrow the trak, then using mega wheel offsets to fill the arches. I confess to this being a nagging pair of thoughts; was this ever going to be anything other than meh? BUT .I had to keep reminding myself that despite the new parts now being bolted to the car, its still unfinished. You know what they say, Children and fools see things half-done, so all I had to do was bide my time until chassis setup day. Other concerns were that the engine calibration still felt peculiar. If driving it over a weekend for a couple of days, then its fair to say that I got used to it, but actually this was learning to drive around the problems. Midrange throttle and WOT were fine, but the slow speed driving around town, in traffic, even parking, were becoming a ballache. It felt very much like a binary throttle, unpredictable and often stalling .but .one job at a time, eh Spence? The big day came in mid June (2021). My little roadtrip would see me travel up country (I also managed to squeeze in a visit to the National Motorcycle Museum, well worth a visit) for an overnight stop before arriving at Centre Gravity early the next day. First job upon arrival was for Pete to take the car for a solo drive and get a baseline reference. Encouragingly, when I asked him for his thoughts when he returned, the conversation went something like . [me] What did you think of it Pete? [Pete] Er, how honest do you want me to be Spence? [me] Please, give it to me straight [Pete] Its utter sh**....let me get to work on it. and the wave of relief was immense. If hed have replied that was about as good as the Turbo wide-bodys get, then my next job wouldve been to draft the For Sale advert. A few hours later, and having had a great chat with another customer who was getting his Cayman set up (hey Charlie!), I could hear Pete taking it for another test drive, then handing me the keys and asked me to take it on a specific cross-country test route. Thirty minutes later I returned, physically shaking and with the biggest grin on my face. Of the cars Ive owned, this is now my high-water-mark of sublime handling even my Lotus Exige now feels like it now needs some damping adjustments to let it breathe with the road a little more. ('scuse the oft-trotted out cliche) No further adjustments required by Pete, it was spot-on .I paid my bill and headed off to my second destination a very happy customer. Something interesting that became apparent, was that because the chassis now felt so much more communicative and confidence inspiring, the engine became quite different to drive. Because I was able to carry more throttle into corners and not have that confidence lift, the engine felt smoother, not losing boost and therefore not having to transition through that awkward rev range. Was I able to now live with the calibration, I wondered? |
||
|
01-14-2022, 10:05 AM
|
|
|
Kartoffelkopf
|
Some more photos of the suspension completely reassembled. Actually was really rather proud of my efforts on this, if only it would stay this clean and nice.
The Tarrett drop links did have the rubber boots installed; definitely a knck to doing them but easy enough once you do the first one. Not long after these photos were taken, I then sprayed everything with the waxy Dinitrol (clear) protective coating. Which instantly makes it look grubby! Oh well, it'd there to do a job I guess. Rear suspension....      
|
||
|
01-14-2022, 10:17 AM
|
|
|
Kartoffelkopf
|
Front suspension....(again, in no particular order)
       
|
||
|
01-14-2022, 10:20 AM
|
|
|
Racer
Join Date: Oct 2010
Location: Franklin, TN
Posts: 5,890
|
Are those helper springs (near zero rate) on the dampers?
If yes, the helper springs really should be on the damper body end instead of the shaft end.
__________________
Scott Winders PCA GT3 #3 2021 & 2022 PCA GT3 National Champion 2021 & 2022 PCA West Coast Series GT3 Champion |
||
|
01-14-2022, 10:28 AM
|
|
|
Kartoffelkopf
|
Quote:
As you say, feel happier knowing that the fasteners are all new now. No way of telling how many times they'd been tightened/loosened and (dare I say) over torqued perhaps, during their life. Hope you're well mate, my next job is going to be to catch up on your thread S |
||
|
01-14-2022, 11:17 AM
|
|

|
|
Kartoffelkopf
|
Quote:
Yeah I was really having to stretch my memory back whilst writing this; the sequence of events and that "lost year" of Covid lockdown really plays tricks with trying to remember how things played out. More updates coming soon! S |
||
|
01-14-2022, 11:19 AM
|
|
|
Kartoffelkopf
|
Quote:
|
||
|
01-14-2022, 11:20 AM
|
|
|
Racer
Join Date: Oct 2010
Location: Franklin, TN
Posts: 5,890
|
Well, the reason the helper springs should be on the body end becomes clear when you push the coupler (the piece between the two springs) laterally. If the coupler is on the shaft, it can move quite a bit more than if it were on the body. In other words, the spring to spring interface is more robust if it happens on the body of the damper.
In droop situations while driving, the spring is not as likely to stay centered if the coupler is on the shaft end. I saw one car almost destroy the coupler due to spring movement. The problem was immediately solved by putting the helper spring at the body end of the damper. The more droop you have, the more pronounced the centering problem is. I just sent my dampers in for a refresh and had the droop reduced to 2" front and 3" rear. Now the helper springs are more compressed than they were so the likelihood of a spring centering problem is reduced. Nonetheless, I still mount the helper springs on the body end as there is no chance for a problem even at full droop. Sure, this problem is more likely to happen on a race car, but why not eliminate the possibility?
__________________
Scott Winders PCA GT3 #3 2021 & 2022 PCA GT3 National Champion 2021 & 2022 PCA West Coast Series GT3 Champion |
||
|
01-14-2022, 11:51 AM
|
|
|
Kartoffelkopf
|
Part 2 – Driveability
My next stop on the mini roadtrip was to drop the car off with Troy at Northampton Motorsport, who are only about 30-40 miles south of Centre Gravity. Troy and I had been speaking about leaving the car with them, for him to use as his “daily”, driving it to and from work in mixed traffic on a variety of slow and fast roads to then refine the mapping. From this he could then mentally note areas that needed work and make those changes (sometimes with Chris, his son, driving whilst he adjusted the maps live from the passenger seat). If ever there’s been a case of one car almost breaking a mans will to live, I think this might have been it for Troy! Many many hours of driving, refining, testing, refining and re-testing were spent, but eventually he called and said that he thought he’d improved it quite a lot, but not really to his satisfaction. Troy’s a great guy, absolutely no bulls**t and calls it how it is….no over-enthusiastic smoke and mirrors….I’d go as far as saying that he does himself a disservice by under-playing what he does. However, his initial thoughts that an improvement had been made were quashed when Chris then drove the car (Troy riding shotgun with laptop), and all of a sudden Chris was stalling the car and struggling with the same driveability issues. Ugh. [head-in-hands]. Troys theory that he may have just got used to driving it, were perhaps spot-on. I remember Troy phoning me one day when I was on the motorbike, midway through a week-long tour, saying that he was running out of ideas, and *perhaps* it was down to the injectors being too large, requiring too low a duty cycle at low engine speeds. He wasn’t convinced this was the case, it was more of a hunch but suggested another session on the dyno with smaller injectors. I have to confess, this wasn’t really music to my ears but it did seem like a pragmatic way forward – we had to try something, or just be satisfied with how it was. BUT…..their dyno was now fully booked until November, as they were cramming in bookings before having to shut the dyno cell for 3-4 weeks for noise insulating work to be undertaken. Three other tasks I asked Northampton Motorsport to look at were: T1) The inconsistency with battery life. Sometimes, if I forgot to put the trickle charge on the car, a few days later it would be fine and fire up no problem. Other times, the battery would be utterly drained. I’d tried checking current draws but couldn’t find anything immediately obvious. Things like the car remaining “live” for a few minutes after the doors being shut were working as expected, my suspicions layed with the ECU not being powered down, or rather, being kept live. T2) To resolve an issue where the engine idle speed would go into complete “hysteresis” when the A/C was switched on. Very odd, it would just hunt up and down and never quite gather itself and settle down. T3) To try and finally get the rev counter to work. It had previously worked just fine with the old MBE ECU on Build #1, but had never so much as flickered into life with the Syvecs, annoyingly. The guys there did an awesome job, they really did. Candidly, these were jobs I just didn’t have the willpower to keep going at. Fixes thus…. F1) I’d tried diagnosing the battery current drain, and wasn’t seeing anything obvious. Chris spent some time working it, and did find some wiring strangeness with the ECU harness. I have to admit, I can’t remember exactly what it was, but whatever he found was occasionally keeping the ECU from powering down after engine shut-off. He’s pretty handy with making looms himself, so I had confidence to just let him get on with it and resolve, which he’s done. I’ve had the car back since the 22nd December, and not once had it on the battery tender, with no starting issues. F2) Whilst in the mood for wiring, we got our heads together and found a way to overcome the idling issue. By taking a feed from the A/C compressor clutch, and using that as a signal into another input of the ECU, we can now detect the additional electrical load and switch to a higher target RPM map. It works flawlessly; activate the A/C and it’s undetectable that the engine will then switch across and run a few hundred RPM higher. We’ve tested it with not only the A/C but also windscreen wipers, headlights and main beam lamps all switched on simultaneously, and there’s no stalling or fluctuation of the idle. F3) This one was *fairly* straightforward for Chris to investigate…. [Background story…] I just realised that it was a year ago when I had a few spare moments over the Christmas/NY break, and decided to have another go at trying to get the tach working. No idea what I did, but when I went to start the engine again, there was absolutely nothing. It cranked but no sign of bursting into life. I bit the bullet and dropped the ECU off with Syvecs for them to diagnose, and I’d done a proper job (!!) and blown both drive-by-wire outputs and an onboard fuse, lol. A week later and £130 lighter, and the ECU was back with me and back to normal. Time for me to hand this little issue over to somebody else. So, according to the SCal s/w, the tach driver output from the ECU was setup correctly, the output pin and number of pulses all checked-out OK. All fingers pointed at the rev counter itself. Not what I wanted to hear, as getting this repaired was going to be a right pain….1980’s/90’s tech is long forgotten, so I thought. Big thanks to Matt at Fearnsport who very kindly lent Chris a known-good 964 tacho for us to test with. Per Chris’s suspicions, within 30secs of plugging it in to my car, we had a needle doing its thing and reading correctly. Arse. In terms of repairing, I had a tentative lead on the guy in Germany who actually worked for VDO at the time and designed this exact unit. However, this turned out to be bloody slow in terms of reaching out via somebody else, to persuade him to take on this job. Like a lot of the specialists out there, because of the current trend to restomods, they’re inundated with work and getting choosy as to what they want to do. Luxurious position to be in. Wish I could do the same [tut]. I went up to retrieve the rev counter, got back home and opened it up. Yup…..I think we’ve found the smoking gun…..     Having retrospectively trawled the forums and thanks to John (304065), we found that this isn't an isolated incidence, it's been seen before. Not sure whether it's something that just happens under certain conditions or whether we accidentally stuck 12v up its arse when the wiring harness guy and I were trying all sorts of things to try and get it working. Who knows. I then had a brainwave. Good old Tore over in Norway, from Bergvill F/X! I’d liaised with him a number of times some years ago, he’d been helpful in diagnosing and fixing my HVAC, and I’d also bought a few things from him too. As it happens, he now has all the diagnostic and test gear to repair these units. He also took care of the shipping paperwork (sounds a menial task, but post-Brexit it really isn’t….incredibly frustrating and time consuming while we all get our heads around the new system). It was exactly 1 week between the rev counter leaving me and then receiving a lovely DHL parcel with it all repaired. Not only did he replace the blown components, and repair the PCB track that had vapourised, he also did some preventatively modifications to the OBC components on the board below, as these are known to expire. A new set of bulbs fitted and it’s now got a guarantee. |
||
|
01-15-2022, 02:09 PM
|
|
|
Racer
Join Date: Oct 2010
Location: Franklin, TN
Posts: 5,890
|
Quote:
ID1050-XDS - Injector Dynamics There are no better injectors and they have worked phenomenally well on my 431 HP normally aspirated race car.
__________________
Scott Winders PCA GT3 #3 2021 & 2022 PCA GT3 National Champion 2021 & 2022 PCA West Coast Series GT3 Champion |
||
|
01-15-2022, 02:21 PM
|
|
|
Kartoffelkopf
|
Quote:
|
||
|
01-15-2022, 02:27 PM
|
|

|
|
Racer
Join Date: Oct 2010
Location: Franklin, TN
Posts: 5,890
|
Quote:
How much power are you making? What ECU are you using?
__________________
Scott Winders PCA GT3 #3 2021 & 2022 PCA GT3 National Champion 2021 & 2022 PCA West Coast Series GT3 Champion |
||
|
01-15-2022, 03:11 PM
|
|
|
Kartoffelkopf
|
Quote:
Last edited by Spenny_b; 01-15-2022 at 03:33 PM.. |
||
|
01-15-2022, 03:31 PM
|
|
 |
|
|
| Tags |
| 964 c4/c2/turbo , efi conversion , life racing , syvecs , turbokraft |


 1993 Porsche 911 (964) Turbo 3.3
 2006 Lotus Exige Cup 240 (#45 of 50)
 BMW M2 Competition
 BMW R1250 GS Rallye HP
 Ducati 748R


