|
|
|
|
|
| Author |
|
|
Kartoffelkopf

|
Time for an update, lots of effort, but I'm not sure there's a lot to show for it at the moment. Like decorating, all the effort goes into the preparation.
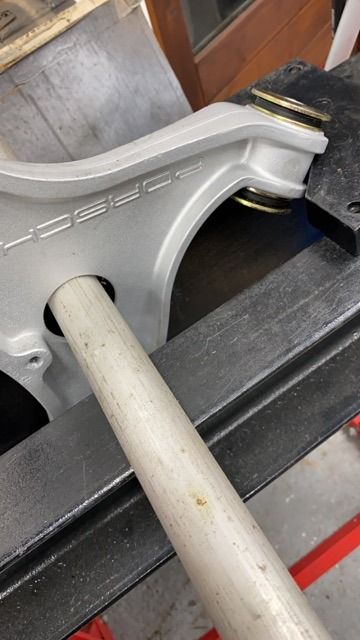
We had a 4-day public holiday weekend last week, and great weather to get outside into the garden and crack on with the parts cleaning. Bit of a chore, but necessary and quite therapeutic...podcast on and get on with it. 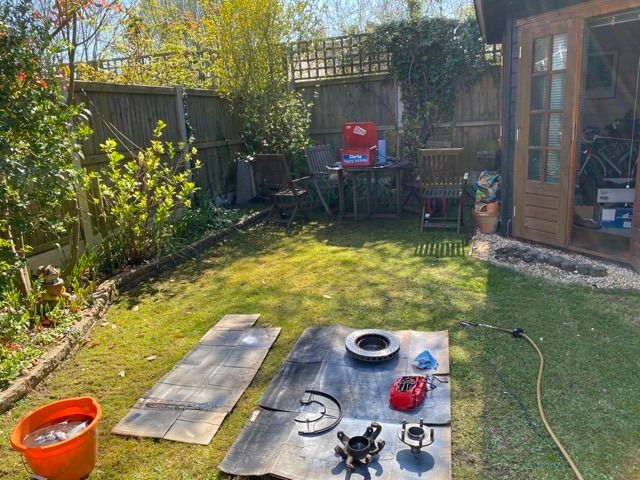 In more interesting news, I finally got around to removing the steering rack from the car, then starting the cleaning process in readiness for shipping it off to Western Power Steering (it seems that a number of folk Stateside are also shipping it across the pond to them). The rubber donut seal used around the input spline was absolutely shot...  Emailing with Gary at WPS, the refurb process all sounds very straightforward. They'll dry media blast the case, then burnish it for protection before lacquering it. They did offer to do the same on the pipework, but I'm instead going to use POR-15 to give a longer term protection. After cleaning them up last night, thankfully they're mechanically fine, no pitting to the point of being unusable. The case itself has been tank cleaned once the ends and input spline were sealed. It actually came up very well - lots of factory wax protector still on there. Before....I've noticed previously that there was Pentosin fluid being leaked by the RHS of the rack; there's plenty of evidence of this on the outside, but also an unhealthy amount inside the gaitor. From doing some research, this seems to be a common failure points on this model rack.    The rack has been fitted with the factory stops, used when 18" wheels are fitted. To the left is the rubber joint which the Elephant Racing single-piece arms will eliminate.  After some scrubbing...   The hydraulic lines came off ok last night as well. I spent a few minutes removing surface corrosion from the banjo bolt heads and then running a craft knife around the join. A hex bit with a 1/2" drive and a breaker bar was used, not because it required massive torque but you can certainly feel what's happening moreso, when you don't need to heave on a shorter ratchet/bar. Another case of gently springing/bouncing each bolt until they cracked open. 
Last edited by Spenny_b; 04-17-2020 at 02:40 PM.. |
||
 04-17-2020, 10:09 AM
|
|
|
Kartoffelkopf
|
The suspension structures were collected last Friday by my local vapour blasting company, then returned to me on Monday. Needless to say, I'm absolutely delighted with how Steve has got these to come up....
      In addition, I also asked Steve to blast the trailing arm spring plates, ready for plating....  There is some pitting on one face of each - thoroughly expected, but with the peened finish that the blasting leaves, these should electroplate nicely. |
||
|
04-17-2020, 10:14 AM
|
|
|
Kartoffelkopf
|
That's about where we're up to at the moment. Lots of planning and research; a new can of Dinitrol arrived yesterday, as did the POR-15 products I ordered. A little wary about using this stuff again; my first/last encounter was 5-6yrs ago when working on the Exige and not having time (I thought) to have a load of brackets powder coated, whilst doing a radiator swap. I bought their kit including all the marine clean liquids, but the finish I got was absolute rubbish - looked like a 5yr old had had a go with nursery school brushes. In the end I sent it for grit blasting and waited for the powder coating to get done. I think the ambient temps didn't help, I know that conditions have to be "just so" to apply it. Anyway, we'll give it another go, this time using their brush on base paint (not UV stable) in grey, with their top coat (chassis black) as an aerosol. In addition to the steering rack pipework, I'm planning on also using it for the front uprights once they've been wire brushed, the back-side of the front and rear hubs as well as some small brackets that hold the ABS wiring in place on the trailing arms.
We'll give it a go this weekend. I may well also rig up the plating kit and try some stuff out. Will report back soon. |
||
|
04-17-2020, 10:22 AM
|
|
|
Kartoffelkopf
|
Little bit of a tardy start today - needed to do another lathe job, rigging up a patio heater head to a new heavy duty tripod stand that was delivered yesterday....got to have some evening heat while chilling outside. Looks like we're going to be confined for a good while yet, may as well make the most of it!
So, proper preparation of the front uprights and hubs. Time to use the angle grinder with wire wheel attachments. Apologies to the neighbours, not the quietest of jobs. The new paint also arrived yesterday, so I'm keen to get this underway. For those who haven't heard of POR-15, it's "Paint On Rust". However, the state of the uprights was nowhere near just painting straight over it, not that my OCD would ever allow that anyway....   A heady mix of genuine rust, some remaining factory black coating (looks to be an epoxy, with a cream base layer) and other areas with Dinitrol still over the top. Not much of that, mind you, just some areas on the arm connecting to the ARB's. 4-5 hours of hard slog (I really should've got Steve to vapour blast these last week; partially forgot, but also didn't think it'd be quite the job it turned out to be), and this is how they look. Not perfect - they don't need to be, so long as the epoxy is off (it is) and any surface corrosion is smooth. 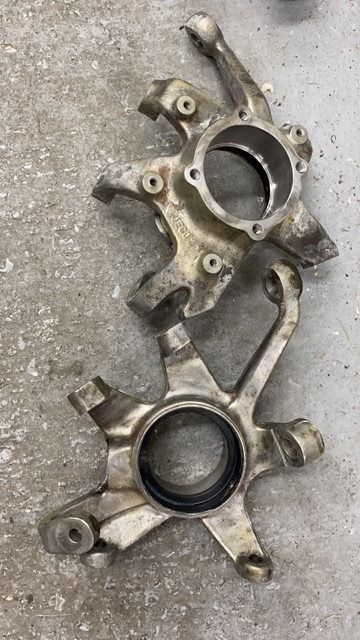 As mentioned above, I've gone with their grey base coat but the way you apply this is to paint on a thin first coat, then when that is tacky (a slight drag to the finger, usually 4-6hrs later), apply the second coat. Wait for that to harden, use 350 grit w&d to sand it off if required, then spray the UV stable satin black top coat. This top coat can also be applied direct to the metal (or rust), it doesn't need the base coat, but offers more corrosion protection with both layers, naturally. Interestingly, the curing of this paint is actually quicker in humid/damp conditions - it uses air moisture to harden, the opposite to regular paint. My plan is to use primer on all surfaces other than machined faces, but then a thin layer of black top coat onto these faces (not bearing faces obviously) to protect them. It's currently 22.30, so the timings don't work out for doing it tonight, instead I'm going to try and install some of the Elephant Racing bushes into the front control arms. They've been in the freezer for over 24hrs now, so gentle heating of the arms should allow these to go in relatively simply. He says, fingers crossed. Last edited by Spenny_b; 04-18-2020 at 02:33 PM.. |
||
|
04-18-2020, 02:31 PM
|
|
|
Kartoffelkopf
|
....and 2hrs later....
100% success. Nerve wracking, I'll admit. Unless you get very lucky with a removal, you only get one shot at getting this right, and new parts for me are literally weeks away. And, of course, they're not pocket-money to buy again. First ones to go in were the rear split bushes. A lot smaller than the front single piece bush, so not quite so daunting.
1) The "key" on the mushroom head of the bush has to be aligned to the front casting mark on the arm. 2) The mushroom goes inwards, pointing towards the rear bushes. 3) The outermost face (the one you're pushing down against with the press) must sit dead flush with the wishbone casting. To assist, I drew a marker pen line with an engineers square, all the way down the length of the bush, so I could ensure nothing was twisting as it was being pushed in. Not vital, perhaps, but gave me peace-of-mind.  This is where I used my new seal insertion kit; a 65mm OD press tool is perfect, small enough that you can see what's happening, but big enough not to have to mess about carefully aligning it, once you're ready to push it in. Apology for lack of photo's at this point - no time to take them and nobody else here to assist. Anyway, this is what it looks like when finished. Chuffed to bits, time to call it a night and finish on a high.....      
Last edited by Spenny_b; 04-18-2020 at 04:58 PM.. |
||
|
04-18-2020, 04:55 PM
|
|
|
Kartoffelkopf
|
Final update for the weekends activities;
The front and rear hubs, as well as the uprights were all prepped with the POR-15 preparatory products today. This was stuff left over from my not-so-successful first effort on the Lotus a few years ago.  First step is to use their degreaser. This coupled with an Ikea dishwashing brush is perfect to give them a damn good scrubbing, then wash in water and allow to dry. Then use their Metal Prep; spray on and keep it from drying out for 10-20mins. This will remove any remaining surface rust (or I guess neutralise any non-removable rust). Wash everything again and allow to dry. All the hard work from yesterday is now undone, as the parts looks pretty grim with whatever that prep liquid is doing.   Parts now ready for painting. The grey paint I'm using as a base layer is super thin, no way you're getting good coverage with a single coat, and even two coats would be nowhere near what I'd be happy with - but this is just an undercoat for me, so happy so far. First coat...  Second coat...  I was told to apply the second coat before the first coat fully cured, about 4-6 hours...actually, it was a lot quicker than this, and perhaps it'd gone off a little too dry, but the second coat did seem to go on okay. It's now drying overnight, ready for a quick sand (keying) tomorrow and a top coat in satin black. Not a particularly interesting post, just a case of moving things along. The key selling point for POR-15 is how tough it apparently is - the videos you see show the guy absolutely laying into a section of pipe they've coated in it, and the thing is buckled before any any paint damage is seen. For sure a healthy dose of sales BS, no doubt, but even if it's half that durability, it'll beat anything else I've found this side of powder coating. |
||
|
04-19-2020, 04:18 PM
|
|

|
|
Kartoffelkopf
|
Nightly update....
This evenings job was to scuff the surface of the grey paint - seems a shame given how glossy it is, but more important the top coat keys correctly. This paint has set HARD - it feels very durable indeed, I'm starting to change my opinion on this stuff. The odd run of paint needed to be cut off with a sharp blade; 180 grit paper was barely touching it. Red Scotchbrite to scuff the surface was fine. Some masking up of the bearing surfaces, and carefully applied grease to the inside faces where the balljoint taper fittings will go (easier than fiddly masking tape and will wipe off afterwards).  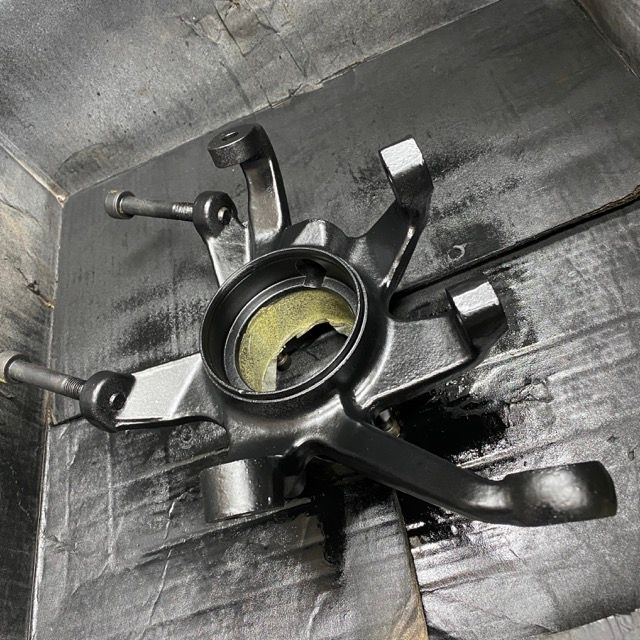 This is just the first coat, now drying overnight. Pleased with how these have come up; the hydraulic pipework has come up nicer, as it's been sprayed directly onto the prepped metal, no grey base coat. The finish on the hubs and uprights looks identical to what a powdercoated finish would give. Some of the "fidelity" of the markings is not quite there - it's bound to happen with 3 coats (so far), but it's more important that it does the job being asked of it, to remain durable to wear and not to allow rust back. Second black coat tomorrow night, then let it harden for 48hours before fitting the new wheel bearings. |
||
|
04-20-2020, 04:45 PM
|
|
|
Kartoffelkopf
|
Pics of the power steering lines....found some perfectly sized washers to mask the sealing surfaces for the O-rings and banjo bolts...handy to also use for hanging...
  Rack is getting sent across to Western Power Steering very soon; sending it ahead of plating the banjo's - by agreement with Gary at WPS, I'll do that once the rack returns. Takes the pressure off to rig up the plating system and experiment. |
||
|
04-21-2020, 03:22 AM
|
|
|
Registered
|
Spenny, lovely work. I'm no longer a fan of POR15, but you've clearly gone the proverbial extra mile by using all of their products in sequence (most people don't) and the results look excellent. You just have used a decent respirator because you're still forming cogent sentences (Deadly fumes.) Best as always, John
|
||
|
04-21-2020, 11:06 AM
|
|
|
Kartoffelkopf
|
Quote:
Hmm, interesting about the fumes....I had to do last nights painting in the workshop, in my makeshift shanty-town spray booth. Erm, box. T'was right by the door (opened, natch) but even so, that was a heady mix. I very quickly opened the big front garage door to give me my usual wind-tunnel, and blow it through! Needless to say, all of this evenings second coats have been done outside in the fresh air. I think tonights plan has got to be to fix the ruddy hydraulic press pump. Bloody thing gave up on me again when I was millimeters from seating one of the control arm bushes - thankfully it worked just enough to finish it, but no chance I'm going to risk putting a wheel bearing in like this. Bloody thing. Time for another sub-project teardown... |
||
|
04-21-2020, 12:31 PM
|
|
|
Kartoffelkopf
|
This evenings work was to install the Elephant Racing trailing arm bushes. I have to say, this was an absolute joy to do. Very easy, everything just fits. Elephant supply the various press mandrels you need, with the kit. These are designed in such a way that:
a) You can't over-install the initial bush (ie, push it through too far) b) You don't damage the underside of the arm, as there's a slug "base" to use underneath    c) The second stage with the outer bushes have their own mandrels, 2off, that are shaped to the profile of the rubber, so no damage to the part. The second one is then used underneath when installing the second outer bush.   d) The core (pivot) is just a very nice push fit to get it most of the way. They supply a lubricating grease to smear on the rubber. A quick nip up in the press and it seats both halves nicely into the outer bush.     It's beyond easy, so hats off to Elephant for putting together a really nice kit. Seeing how successful that little job was, I was going to have a go at installing the wheel bearings, but getting a bit late now to be doing that; save the fun for tomorrow night. |
||
|
04-21-2020, 04:54 PM
|
|
|
Registered
|
That vapor blasting is amazing.
|
||
|
04-21-2020, 06:43 PM
|
|
|
Kartoffelkopf
|
Quote:
With these guys literally being on my doorstep, it's a no-brainer for me now. Some idiot did comment a few years ago on the engine parts I had done, that the whole thing now looked "over restored". Can't remember who it was now, but it did make me laugh; it's an 89k mile car, not exactly concours bodywork (although very nice by anyone's measure) and it's lived a life - how can that be "over restored"?! Compared to what, another 89k mile car that's looking very tired, greasy and with rusty parts where the Dinitrol is no longer protecting anything?! I swiftly moved that person into my mental "bell-end" compartment. |
||
|
04-22-2020, 03:13 AM
|
|
|
Registered

|
I really want a vapor blasting cabinet!!
Normal media blasting leves aluminium to rough so it will stain really quick. As an experiment I had a few parts blasted and then tumbled, that left a really nice finish the pores where sealed without it being polished. A bit like the vapor blasting but smother.
__________________
Magnus 911 Silver Targa -77, 3.2 -84 with custom ITBs and EFI. 911T Coupe -69, 3.6, G50, "RSR", track day. 924 -79 Rat Rod EFI/Turbo 375whp@1.85bar. 931 -79 under total restoration. |
||
|
04-22-2020, 04:20 AM
|
|
|
Kartoffelkopf
|
Yup, I also want a cabinet as well mate!! Unfortunately, until I can optimise my workshop layout, there's no room for one - well, not one that's a decent size to be able to get things like trailing arms into it.
If I did have the room, I have to be honest, a mill would be more useful to me, especially with this service so local to where I live. Last edited by Spenny_b; 04-22-2020 at 04:55 AM.. |
||
|
04-22-2020, 04:25 AM
|
|
|
Kartoffelkopf
|
Knew it was too good to be true....
Evening was going ok; installed the front bearings absolutely no problem. No heat on the upright, just bearings that had been in the freezer for a few days. Rig it up on the press, and they went in without even troubling the pressure gauge - very light pressure required to push them home....  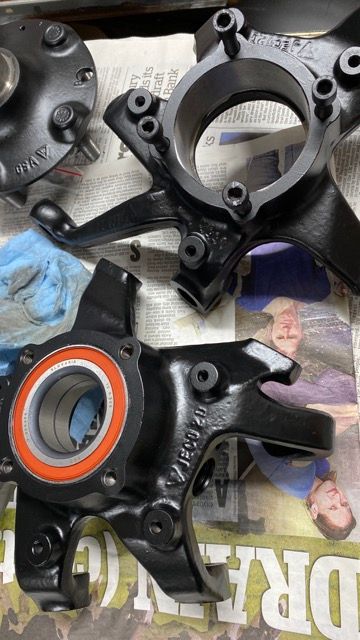 Then onto the rear trailing arms. For some reason, both started off slightly cocked for the first few mm....on the first arm I kept going, a slight bang as it snapped straight, then it went in like a dream. The second did the same, no matter how much fiddling I did on the rig to try and get everything square. I should've just used the bearing removal/install kit and not bothered with the press.... This niggled me, so I then quickly set about removing the second bearing to inspect the bore, BEFORE the bearing thawed out....in my haste, I grabbed the fcuking 78mm mandrel, instead of the 80mm.....5mins later, the bearing came out, no damage to the bore other than slight scuffing that can be Scotchbrited out....and then I found that the mandrel had buried itself into the back of the bearing, pushing in, and fcuking-up, the seal. Beyond pissed off - I should've trusted my instinct and bloody well left it alone. Now I'm back to square fcuking one, in lockdown and unable to just go and get a replacement. Was about half a twitch away from launching the bloody thing across the workshop. £110 down the fcuking shute and another delay. Thankfully, good old Chris can still get them and send one across with another few bits that were due to be sent anyway. . |
||
|
04-22-2020, 03:59 PM
|
|
|
Kartoffelkopf
|
The rear wheel bearing installed on the RH trailing arm...
 And the buggered bearing from the LHS....  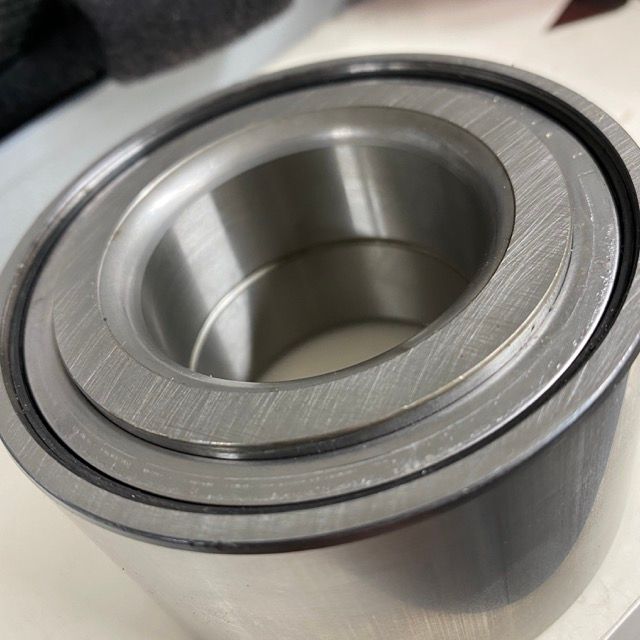 Thankfully OPC Tonbridge had one left in stock, and now the means to ship it out. Hopefully it may arrive either tomorrow or Saturday. In other news, the steering rack was collected today and en route to be rebuilt. Securely wrapped to within an inch of it's life, both rack ends and input shaft carefully protected - paranoid about this leaving my possession, the cost of replacing is eye-watering. Normally I hand deliver this kind of thing...hmmm. Night off tonight, a tonne of other stuff around the house needs sorting. Last edited by Spenny_b; 04-23-2020 at 12:22 PM.. |
||
|
04-23-2020, 12:19 PM
|
|
|
Kartoffelkopf
|
New bearing arrived - what they look like before you bugger them up...it's currently in deep freeze...

|
||
|
04-24-2020, 08:28 AM
|
|

|
|
Registered
|
Hi Spencer,
Although I am used to reading with great pleasure the restoration of your toy, I am continually amazed by your skills and meticulousness, It’s caviar to read and admire, keep it up! |
||
|
04-28-2020, 03:13 AM
|
|
|
Moderator

Join Date: Dec 2001
Posts: 9,569
|
Can you point out the buggery here? It looks like the new bearing but perhaps I am blind.
__________________
'66 911 #304065 Irischgruen 96 993 Carrera 2 Polarsilber '81 R65 Ex-'71 911 PCA C-Stock Club Racer #806 (Sold 5/15/13) Ex-'88 Carrera (Sold 3/29/02) Ex-'91 Carrera 2 Cabriolet (Sold 8/20/04) Ex-'89 944 Turbo S (Sold 8/21/20) |
||
|
05-01-2020, 06:48 PM
|
|
 |
|
|
| Tags |
| 964 c4/c2/turbo , efi conversion , life racing , syvecs , turbokraft |


 1993 Porsche 911 (964) Turbo 3.3
 2006 Lotus Exige Cup 240 (#45 of 50)
 BMW M2 Competition
 BMW R1250 GS Rallye HP
 Ducati 748R
 ). The inner half was first to go in, pressing the arm down onto the upside down bush which was resting on the press bed.

 1977 Porsche 911 Targa 2.7s
 930
930
