|
|
|
|
|
| Author |
|
|
Kartoffelkopf

|
Plasticine build questions/help needed pls?
Guys,
Have now received everything I need to start building up the long block on my rebuild; new pistons, new Nickies and rebushed small-ends in the existing rods. Appreciating that everything *should* be equal across all 6 cylinders, but also appreciating that "assumption is the Mother of all f***-ups"....is it standard practise to plasticine all 6 cylinders? Of course, all 6 cylinders and heads have to be built to accommodate the cam carrier, but can I avoid fitting all pistons into the barrels, maybe just installing #1 & #4? Second question - I've already installed my ARP bolts into the rods. I'm using stretch gauge to tighten them, but would feel more comfortable not fully tightening more times than I need to. When dummy-building, what's best to do? Remove the ARP's and temporarily re-install the OE bolts, and torque up to spec for each rod....or keep the ARP's in place, but just nip-up each bolt (or torque to say 20lb/ft instead of approx 40lb/ft that is the ultimate tension). Would rather do the second option (as the ARPs needed to be gently pressed in) but is this realistic for what I'm looking to achieve? For background, I installed and tightened the ARPs a few weeks ago, when checking big end dimensions with new shells, and to ensure the ARP's remained elastic after a tightening cycle. Many thanks Spencer.
__________________
1993 (MY92) 964 Turbo 3.3 - Horizon Blue - Follow my 964 Turbo project here... http://forums.pelicanparts.com/911-engine-rebuilding-forum/626572-964-3-3-turbo-efi-conversion-using-syvecs-life-racing-engine-management.html On Instagram (along with other stuff) as @spenny_.b #spennybengineproject |
||
 04-13-2012, 06:47 PM
|
|
|
Registered
Join Date: May 2004
Location: Boulder, Colorado
Posts: 7,275
|
Spencer
I don't understand why you would want to futz around with your rods at this point. You have the rods on your crank, new bearings installed, and torqued to the stretch gauge spec, right? At least they are on the crank? Once you have the crank with rods assembled, there is no reason to loosen any rods (assuming all turn well on the crank, etc. You are done with that part of the job. Time to put the crank in the case and button up the case so you can get on to the next tasks. As to whether you should clay or otherwise measure each cylinder and head to insure youhave at least the minimum clearance you have decided on, that is up to you. If you have an aluminum case, and especially if a machine shop has trued up the spigot tops, you might get away with just doing one on each bank for piston to head clearance, and ditto for valve clearance. Sounds like you have new Ps and Cs, but they ought to be very close dimensionally. And everything else has been together before. It is possible to do a dummy cam/valve check setup with a piston only in #1, and cylinders in 1 and 3, with the cam carrier bridging the two. Much easier to pull things apart that way if need be for more base shims or pocket deepening or whatnot. And you don't have to install both wrist pin keepersl. for checking purposes if you think dimensions may have changed. But a lot of guys (and shop owners) aren't going to be willing to leave it at that, and will want to do them all. Not that big a deal. You could leave the rings off for checking purposes, just in case you found something you didn't like.. |
||
|
04-14-2012, 12:20 AM
|
|
|
Kartoffelkopf
|
Quote:
No, rods not on the crank yet; I assembled the rods off the crank the other week so I could dial-bore measure the big ends to calculate journal clearances, then disassembled them all to re-measure and ensure the static lengths returned to their original dimensions (they did). Quote:
I'm currently stripping, cleaning, checking and rebuilding the heads I had done for me - complete lack of trust with the guy who built them. These have been ported and fitted with brand new Schrick valve train gear - new shims, rotators, springs and Ti retainers, so am double checking the spring install heights and that the new valve seats are all ok and lapped in. Heads have been machined for Ni-resist Le Mans rings (long story), so now need lapping in with my new Nickies. The cams are also new, 964 n/a items rather than the 930's, so all-in-all, a lot of new stuff/unknowns, albeit the crank hasn't been touched (excellent condition) and the rods were checked for ovality and centre-centre dimensions, but nothing was found to warrant re-working (only the small ends were replaced with smaller 22mm bushes). Cheers Spencer.
__________________
1993 (MY92) 964 Turbo 3.3 - Horizon Blue - Follow my 964 Turbo project here... http://forums.pelicanparts.com/911-engine-rebuilding-forum/626572-964-3-3-turbo-efi-conversion-using-syvecs-life-racing-engine-management.html On Instagram (along with other stuff) as @spenny_.b #spennybengineproject Last edited by Spenny_b; 04-14-2012 at 07:43 AM.. |
||
|
04-14-2012, 03:38 AM
|
|
|
Registered
Join Date: Apr 2010
Location: Houston, Tx
Posts: 951
|
Spenny, did you get a torque procedure with the ARP hardware? I thought those were supposed to be excercised through 3 or 4 stretch to torque-then-loosen cycles for the purpose of conditioning the material. I don't think you can hurt the bolt material if you stay within the torque specs of the bolt, but make sure you use plenty of lube on the threads and nut face between each cycle if conditioning is indeed called for.
I have not personally rebuilt a boxer engine yet, but have built some other machines and have been doing plenty of research in preparation for my first boxer too. I am personally a believer in practice run assembles...i.e. assembling for the practice to make sure everything comes together as it should. I think I would do a "practice run" with just the crankshaft in the case (lube the bearings) with rods not installed, through bolts and perimeter bolts installed and torqued. All this just to make sure the crank spins good in the case. Just my 2 cents.
__________________
"Simplicity is supreme excellence" - James Watt |
||
|
04-14-2012, 11:11 AM
|
|
|
Kartoffelkopf
|
Hi AlfonsoR,
Yeah I'm right with you on practise runs - in fact I've probably now done 5-6 runs on assembling the crank into the case halves + through bolts, plus one go with the perimeter bolts too. All this was to Plastigauge the main shells - and a good job I did too, as the Glyco's I was sent gave me clearances that were out of (Porsche) spec straight away, despite all the main journals on the crank being well within wear limits....turns out they were made of a thinner material than my old 84k mile old shells, that were a better fit!....Have now fitted new OE Porsche items, which are bang-on. So, not only valuable to practise the procedure for the time when I use the Loctite to seal it up, but it also highlighted an issue with the bearings. Re the ARP torque instructions, yes, they do say to repeat the torquing procedure a number of times, but I read this to be the case if you were only using a torque wrench, and not a stretch gauge. AFAIK, the purpose is to burnish the threads, ensuring that no artificial tightness is being introduced into a torque measurement. If you're using the stretch method, from what I've read, this is unnecessary, since ultimately, any method of tightening is only looking to achieve one thing - the stretch of the bolt which then provides the clamping force to the fastener....whether you achieve that clamping load with 37lb/ft or 42lb/ft is (almost) unimportant, so long as you stretch that fastener by 0.010". (Of course, ideally you measure the stretch with the torque reading to ensure you haven't got a dud bolt) But yeah, I did also use the ARP supplied lube on the threads and under the nut heads to ensure the stretch could be applied smoothly without any stiction. Cheers mate Spencer.
__________________
1993 (MY92) 964 Turbo 3.3 - Horizon Blue - Follow my 964 Turbo project here... http://forums.pelicanparts.com/911-engine-rebuilding-forum/626572-964-3-3-turbo-efi-conversion-using-syvecs-life-racing-engine-management.html On Instagram (along with other stuff) as @spenny_.b #spennybengineproject Last edited by Spenny_b; 04-14-2012 at 01:42 PM.. |
||
|
04-14-2012, 01:40 PM
|
|
|
Registered
Join Date: May 2004
Location: Boulder, Colorado
Posts: 7,275
|
Spencer
I'm with you on the stretch method. Stretch is stretch, no matter what the torque applied (assuming it isn't way low) to get there was. Typically, I'd say you have to apply more torque to get the stretch than the torque spec. This would be so if you didn't burnish and use the lube the bolt maker specified, etc., because there'd be extra friction to overcome. If ARP told you to stretch to 0.010", no doubt that is what you should do. Pauter, which supplied ARP 3/8" bolts with my 3.0 rods, said I should stretch 0.004-0.005", if I didn't just torque to 50 lbs/ft per the instructions which came with the rods. I had to inquire as to the stretch. In their standard instructions they just advised "Always oil threads with motor oil when assembling." Stretch seems to me to be the better and more accurate mousetrap. But on top of that, you can then determine if the bolts can be reused or not come next rebuild (which for us racers comes way more often than 200,000 mile street car motors). |
||
|
04-14-2012, 03:18 PM
|
|

|
|
Kartoffelkopf
|
Hey Walt, yes, I have to say that after years of simply working by torque settings, it was a very pleasant revelation to use my new stretch gauge for the first time - somehow it's far more "meaningful", feeling like the fastener really was done up accurately....sounds weird, I know, but in the back of my mind I always wonder about the calibration of torque wrenches (no matter how good, what brand, digital/analogue...they all need calibrating at some point) and the lives they live. Mine live outdoors, in a very nice padded drawer in my tool chest, but all the same, they're in the garage, cycling with ambient temps that we see here in the UK. Not mega swings either way, but nowhere near controlled lab conditions either.
The metallurgy element of the fastener was also brought into stark relief when you can see, on the gauge, it shrinking back to it's original length when undoing it. It's like the principles of a subject finally "clicking" (pun totally intended) in your mind when learning something. Anyway, suffice to say, smitten with my new gauge! 
__________________
1993 (MY92) 964 Turbo 3.3 - Horizon Blue - Follow my 964 Turbo project here... http://forums.pelicanparts.com/911-engine-rebuilding-forum/626572-964-3-3-turbo-efi-conversion-using-syvecs-life-racing-engine-management.html On Instagram (along with other stuff) as @spenny_.b #spennybengineproject |
||
|
04-14-2012, 04:06 PM
|
|
|
Registered
Join Date: Apr 2010
Location: Houston, Tx
Posts: 951
|
Spenny I was not aware of that on the ARP's. Good info, thanks. Definitely stretch is the best way. I read a book that claims that the accuracy of a torque wrench is +/-25%. This is based on a test that they did and data was presented in the text with not very much detail. I don't know if I agree with that but I definitely understand and appreciate how complex it is to correlate the measurement of friction to actual elongation. Something like 70% of the force that is applied is purely for overcoming friction. The rest goes into elongation.
However there are cases where you have no choice. For those critical tools, including mic's and indicators, I have a special place...I keep those tools in my sock drawer. 
__________________
"Simplicity is supreme excellence" - James Watt |
||
|
04-14-2012, 10:18 PM
|
|
|
Registered
|
ARP rod bolts for 3.0 liter.......
You need to stretch the ARP rod bolts as specified by the supplier between 0.0090"-0.0100" or torque them @ 50 ft-lbs. Here are some numbers (elongation) for your perusal:
@ 40 ft-lbs.-------- @ 50 ft-lbs. 1). 0.0089"-------------0.0100" 2). 0.0089"-------------0.0095" 3). 0.0084"-------------0.0097" 4). 0.0081"-------------0.0091" 5). 0.0077"-------------0.0092" 6). 0.0085"-------------0.0100" 7). 0.0079"-------------0.0093" 8). 0.0080"-------------0.0094" 9). 0.0082"-------------0.0097" 10). 0.0077"------------0.0092" 11). 0.0078"------------0.0095" 12). 0.0084"------------0.0099" At 40 ft-lbs torque, the elongation is less than the specified value (0.009" - 0.01"). It is spot on @ 50 ft-lbs. HTH. Tony |
||
|
04-15-2012, 04:21 PM
|
|
|
Kartoffelkopf
|
Hi Tony,
Thanks for the info but I'm OK with the spec for the rod bolts - the spec for my kit is actually different to what you post (I'm guessing for the 3.0, yours are the M10 variety?...The later Turbo's use M9, hence lower torque spec)---> 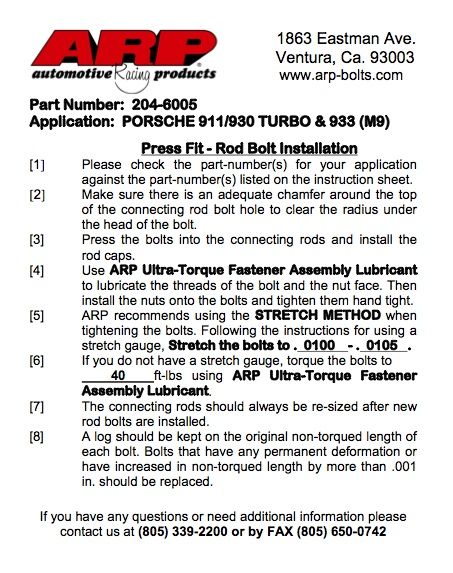 ...but when installing and tightening to take the big-end measurements, I did see a range of torques that got me to the 0.0100" stretch dimension....iirc, the lowest torque was 38lb/ft, with most needing 41lb/ft and a few 42lb/ft....of course, this is almost a meaningless set of data. Once you stop (at a safe 37lb/ft) to take a stretch measurement, then you need to overcome friction upon restarting...which is the whole point really. The only reliable way is to aim for stretch, only using the torque to ensure you're in the right ballpark. Ta Spencer.
__________________
1993 (MY92) 964 Turbo 3.3 - Horizon Blue - Follow my 964 Turbo project here... http://forums.pelicanparts.com/911-engine-rebuilding-forum/626572-964-3-3-turbo-efi-conversion-using-syvecs-life-racing-engine-management.html On Instagram (along with other stuff) as @spenny_.b #spennybengineproject |
||
|
04-15-2012, 04:42 PM
|
|
|
Kartoffelkopf
|
I have another question for those that know.....I had some time today to read through Wayne's chapter on valve to piston clearance checking.
The method described says to check by winding down the rockers, forcing the valve into the chamber until it either touches or you achieve >2mm of movement, then repeat at 10deg interval crank rotations. So, which is the preferred method?.... a) A fairly simple (by comparison) plasticine check, that can be done on all 6 cylinders in one 720deg rotation? b) Waynes method of winding down each valve until it either touches (hopefully not) or clears by >2mm? If I want to do each cylinder to ensure that all machining work is spot-on, then option b) is going to be far more time consuming. But I do take his point w.r.t. valves opening/closing far quicker than the piston retreats down the cylinder. And plasticine won't tell you this, it'll only give you an absolute clearance "at some point" in that 720deg of crank rotation. Argghh!!
__________________
1993 (MY92) 964 Turbo 3.3 - Horizon Blue - Follow my 964 Turbo project here... http://forums.pelicanparts.com/911-engine-rebuilding-forum/626572-964-3-3-turbo-efi-conversion-using-syvecs-life-racing-engine-management.html On Instagram (along with other stuff) as @spenny_.b #spennybengineproject Last edited by Spenny_b; 04-15-2012 at 04:51 PM.. |
||
|
04-15-2012, 04:48 PM
|
|
|
Registered

Join Date: Apr 2009
Location: Cape Vincent, NY
Posts: 841
|
You can do the plasticine check alone, or simply a careful rotation with the valve screws turned in to 2mm preload if your goal is simply that you have enough clearance. There really is no practical reason to find the actual points in rotation, just clearance.
If out of curiosity (which I now have, thank you very much.... more work) you wish to actually map piston and valve relationship then neither method would give you an actual full set of data. You would have to measure piston travel with a long-travel dial indicator and then valve travel as well and plot both in relation to the crankshaft rotation. It would be interesting to see, especially if you calculate compressio ratio and flame front propagation and combustion gas pressure and graph that as well.
__________________
1968 911S "Leona" Air goes in and out, blood goes round and round, any variation on this is a bad thing. |
||
|
04-15-2012, 10:24 PM
|
|
|
Kartoffelkopf
|
Thanks docrodg; was chatting this through with a mate on the phone last night - I think we're both in agreement with your thoughts ---> "There really is no practical reason to find the actual points in rotation, just clearance."
So long as a plasticine build or preloaded valves gives me more than ample clearance, then I feel pretty comfortable, as these aren't exactly wild cams I'm using, and the CR's I'll be running are modest (in general terms) @ 8:1. Will tinker over the weekend and report back! Cheers Spencer.
__________________
1993 (MY92) 964 Turbo 3.3 - Horizon Blue - Follow my 964 Turbo project here... http://forums.pelicanparts.com/911-engine-rebuilding-forum/626572-964-3-3-turbo-efi-conversion-using-syvecs-life-racing-engine-management.html On Instagram (along with other stuff) as @spenny_.b #spennybengineproject |
||
|
04-19-2012, 05:10 AM
|
|


 1993 Porsche 911 (964) Turbo 3.3
 2006 Lotus Exige Cup 240 (#45 of 50)
 BMW M2 Competition
 BMW R1250 GS Rallye HP
 Ducati 748R


