|
|
|
|
|
| Author |
|
|
Registered User
|
HELP - Rookie build, going to 3.5L
So, after much deliberation and saving, I have decided to try my hand at converting my 157 000 mile 3.2 Carrera motor to 3.5 N/A motor with mild cams & twin plugs. I am hoping to get close to 280hp at the crank on 93 octane pump gas in Dallas Tx.
It is quite possible I'm going to get chewed up on this forum for what Im about to say, but Im trying to do this as inexpensively as possible. The reason I am writing about the build, is because I need help on my approach to the project. I am a rookie and I dont know, what I dont know. So I am running blind down this very expensive road. I have been preparing for this for 2 years and feel I might be ready for the plunge. This cost saving theme will be an important one for me as I need to make my budget go as far as possible, without making cheap decisions. A challenge, to be sure. I plan to pull the motor and tranny. Send the tranny off to be rebuild. Send the engine parts out to be machined and have the heads worked on and then attempt to reassemble and reinstall again myself. Im posting my progress and my thoughts here, because Im hoping to get some considerate input from friends who have gone down a similar road to prevent me from making avoidable mistakes. And I will need help sourcing the parts and machine work for the build. So if you are willing to be friendly and helpful - I would LOVE your input. Engine plan
It all starts around the pistons and cylinders so after some reading and investigation I opted to give the QSC pistons and cylinders a try. I have noted that some regular contributors on our forums use their cylinders, but have opted for JE pistons. I decided to give the QSC P&C's set a try and measured the pistons and cylinders extensively when they arrived.    Pistons I measured the pistons at the crown where the rings sit in a North-South & East-West measurement and then again at the skirt at the bottom of the pistons at the widest point. All Pistons measured between 99.69 to 99.73 on the upper N-S & E-W measurement. The skirt measurements had a variance between 99.93 to 99.95. All in all I think the tolerances are pretty reasonable. I was using a digital micrometer. Manufacturer claims the compression ratio on factory heads is 11.2:1 I dont believe this to be accurate as much of the reading I have done on this forum shows me that claimed CR's and actual CR's OFTEN seem to vary. My problem is, I dont know how close that number will be to reality and if it isnt, I dont know if it will get higher or lower in reality. Im also not sure how to measure it without a burette or more sophisticated tools. Cylinders I measured the cylinders N-S and E-W at the top and the bottom of the cylinders. The top measurements ranged between 99.94 to 99.98 and the bottoms measured between 99.95 to 99.99 across all cylinders. The build will spread out over the next few months and with your help, hopefully conclude in the spring. |
||
 10-04-2015, 09:06 AM
|
|
|
Project Addicted
Join Date: Jul 2012
Location: Eastern Shore. MD
Posts: 919
|
This will be great!! First make sure to clean all the gunk you can off the engine and trans before you pull it. Get some Gunk degreaser and go the to local power washer place and blast away. There will still be lots of cleaning to do but the more you get off now, the easier it is later.
Get the sealants from Henry at Supertec. You must CC the heads. Usually the place that does the heads can do it for you or you can do it yourself quite easily. You MUST know the compression ratio. Craig CGARR on here can do the heads for you at a very reasonable price. Nice work, nice price, fast turn around. Get Wayne's book, read, read read. Watch some videos on line on how to do certain things until you really understand. These are not small block Chevy engines and take a bit more care. Cleanliness is super important. Set up a work area and keep it spotless and organized.
__________________
Jon 1966 912 1976 911 3.4 Backdate Project 1986 944 |
||
|
10-05-2015, 10:08 AM
|
|
|
Registered User
|
Jon, thank you for the initial response. That is the kind of informative direction I am looking for.
I will look up Craig for the head work. I am very much a measure twice cut once, kinda guy. |
||
|
10-07-2015, 11:44 AM
|
|
|
Registered
|
Allan - sounds like a fun project, I am in the middle of a milder 3.0L build, I will be sticking with stock cylinders and pistons. I will be following this with interest, as I will have a spare case lying around after I finish this build, and a future project might be along similar lines to yours. Good luck!!
John
__________________
John 1972 911T 3.0L Coupe 1986 Carrera Targa 1989 BMW M3 2007 328iT |
||
|
10-07-2015, 12:08 PM
|
|
|
Project Addicted
Join Date: Jul 2012
Location: Eastern Shore. MD
Posts: 919
|
Make sure you figure out your ignition too. The old Andial splitter for the Motronic system is a rare beast to find. As far as I know, there is no other device like it so your options get more spendy.
We were lucky enough to find an Andial splitter for Allie's project. My Daughter's 3.4 Build
__________________
Jon 1966 912 1976 911 3.4 Backdate Project 1986 944 |
||
|
10-07-2015, 02:21 PM
|
|
|
Porschemachinist
Join Date: Oct 2015
Location: Bay Area
Posts: 8
|
good luck with it. don't be afraid to ask questions. am usually here 8 to 5
Ted R 408 844 8331 |
||
|
10-07-2015, 05:02 PM
|
|

|
|
Porschemachinist
Join Date: Oct 2015
Location: Bay Area
Posts: 8
|
ps, important to recon big end of rods if using arp bolts
|
||
|
10-07-2015, 05:03 PM
|
|
|
Chain fence eating turbo
Join Date: Dec 2008
Location: Austin, TX
Posts: 9,199
|
Quote:

|
||
|
10-07-2015, 05:27 PM
|
|
|
carrerarsr65
|
heads
craig did my heads twin plu,gged em.replaced some valves ,great guy to deal with

|
||
|
10-07-2015, 08:39 PM
|
|
|
Registered User
|
Thanks guys, I have a message in to Craig at CGarr and we are connecting.
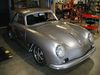
A vehicle comes available for my use, while my porsche is disassembled in about a month. Thats when things get more serious. This is the current state of my 1985 Carrera.  
|
||
|
10-08-2015, 01:17 PM
|
|
|
Registered
Join Date: Feb 2005
Location: California
Posts: 724
|
Hopefully it wasn't motormeister that painted that fan red.
andy |
||
|
10-08-2015, 02:46 PM
|
|
|
Registered User
|
I noticed there are no valve pockets cut into your QSC pistons. I understand CIS pistons do not have the valve pockets because of the SC cam design. With your WEB Cam 20/21 you will have a .485"/.452" valve lift. The QSC piston domes do not look like the stock CIS piston tops. Maybe with the 20/21 duration of 258*/246* it will work out but it just caught my attention.
__________________
Mark Jung Bend, OR MFI Werks.com |
||
|
10-09-2015, 09:42 AM
|
|

|
|
Registered User
|
Mark,
That is exactly the kind of concern I need to hear. I am suspicious about that potential problem too and dont know how to understand how real that danger is? Am open to input though. :-) Last edited by Allan Kelsey; 10-09-2015 at 12:23 PM.. |
||
|
10-09-2015, 12:21 PM
|
|
|
Project Addicted
Join Date: Jul 2012
Location: Eastern Shore. MD
Posts: 919
|
This is what the JE 3.4 pistons look like:
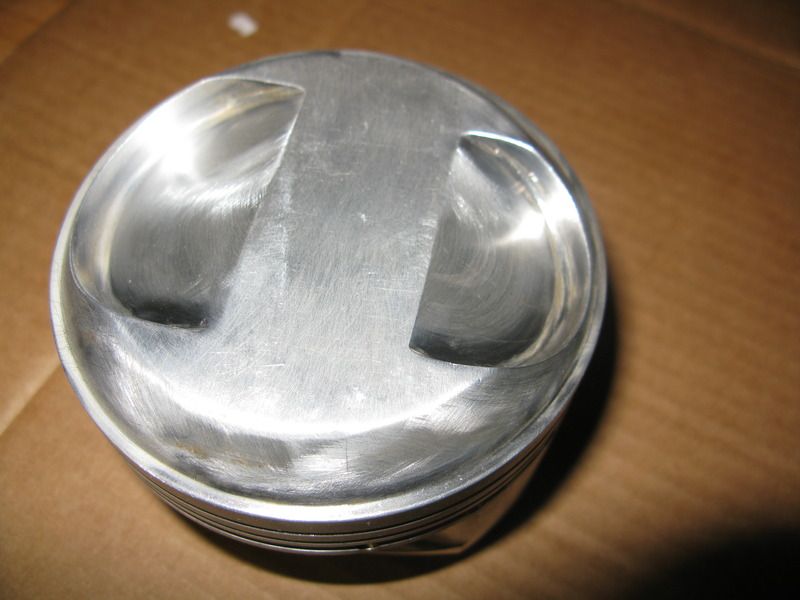 The valve pockets are deep.
__________________
Jon 1966 912 1976 911 3.4 Backdate Project 1986 944 |
||
|
10-09-2015, 12:47 PM
|
|
|
Registered User
|
Allan, When you ordered the pistons did they ask you what cam you were going to use?
The more I look at those pistons I think they just forgot to cut out the valve pockets. The piston dome looks to be about .350" to .450". There would most likely be some valve to piston contact. Also sense your keeping the CIS there seems to be no help from that dome to give the correct CIS flow path.
__________________
Mark Jung Bend, OR MFI Werks.com |
||
|
10-09-2015, 04:21 PM
|
|
|
Registered
Join Date: Oct 2013
Location: Prescott, AZ
Posts: 1,062
|
If I read the OP's first post correctly, he's got an 85 Carrera, so it should be a Motronic engine not CIS. The GSC piston domes aren't that different from the stock Mahle Pistons in my 3.6. Here's one of mine:
 Obviously, the valve-piston clearance needs to be measured to be sure that everything is going to work together. But, the general piston shape should work with the Motronic if the compression ratio is okay and the valve-piston clearance is safe.
__________________
1990 964 Coupe 1986 Carrera 3.2 Targa |
||
|
10-09-2015, 08:43 PM
|
|
|
Registered
|
There are several good threads on rookie rebuilds including mine (has lots of pictures) search out a few and read them completely. Also, read the complete thread on sealants. A lot of controversy on the subject so do your homework.
__________________
Tom Feeney 1970 911 T 1973 911 T Looking for engine 6103643 |
||
|
10-10-2015, 06:56 AM
|
|
|
Registered User
|
RedCoupe, Thanks I see the difference, my bad.
__________________
Mark Jung Bend, OR MFI Werks.com |
||
|
10-10-2015, 09:56 AM
|
|
|
Registered
|
Best of luck Allan, I finished mine up over the summer. Probably the most frustratingly rewarding self sufficient thing I've done on my car in the 11 years I've had it.
Tom is correct, there are a lot of good threads in the search file that you can refer to. I didn't do my on the cheap but I did figure out ways to do things myself which allowed me to have choices in the parts that I needed/wanted. The other thing you will find is that you are forever in need of such & such tool. That single thing created more set backs in my rebuild than any other thing. Your car is very nice looking.
__________________
Mike '89 CARRERA #402 |
||
|
10-10-2015, 04:48 PM
|
|
|
Registered User
|
There is a good news/bad news reason for the delay since my last post. My 20 y/o daughter just left to go and fulfill a 6 month internship in South Africa. I am going to miss her like crazy.
The upside to that reality is that her 4Runnr is now available and I need another daily driver if Im gonna pull the motor & trans, which is what just happened. I got help from a friend. He is a God-send, because the job would have taken me twice as long without his help. The extraction job isn't that complicated, just precise and very deliberate and when you are a pair of rookies like we are, it takes 10 hours. Thank you to DRACO for the ULTRA useful hints and tips as we encountered moments when experience saves you hours!!! Since it seems to be forum decorum, here is the requisite photograph...  It is remarkable how much content is packed into that small space in the back of the car.  I found it easier to do the job with the bumper etc removed from the back end of the car.  It also seemed prudent to remove as much of the upper engine attachments, so leave less height on the engine to aid in lowering, so we removed heater fans and airbox etc.  Surprises
I separated the clutch cable from the tranny so the unit could come out, but I didn't release the clutch fork by releasing the springs attached here and sliding the long arm down off the pivot, once the short arm was removed. This meant that once the unit was out and all 4 bolts were removed, I couldn't separate the tranny from the motor. It would easily break free from the engine, but after an inch of travel it would get stuck.  What I learned from DRACO, was that the seal closest to the transmission on the pivot rod had long ago deteriorated and the arm was 'corrosion welded' onto the pivot rod. Lots of lube, some heat, tapping with a hammer and plenty of wiggling and the arm finally broke loose and slid down off the pivot. Once off I could release the clutch fork in the tranny, the unit came loose from the motor. Next Now I've got to separate the pieces that are getting shipped all over for work, start cleaning and painting what I can and wait for them all to come back to Papa. |
||
|
11-07-2015, 08:29 AM
|
|


 1985 Porsche 911 Carrera
 1986 Porsche 911 Carrera Targa

 1957 Porsche 356 A Coupe 2.7 Short Stroke
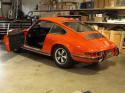 1972 Porsche 72 Coupe
 1973 911 T
 Porsche 911
 LS6 Convertible- Sold
 1963 Convertible- Sold
 1969 Z/28- Sold
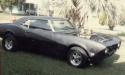 1968 Camaro-Sold
 1989 Porsche 911 CARRERA 3.2L
