|
|
|
|
|
| Author |
|
|
Registered

|
Ultimate soccer dad car...

__________________
"... changing without pain or agony not only in bulk and shape but in color too, approaching the color of wind ...." -- William Faulkner |
||
 03-18-2013, 08:18 PM
|
|
|
Registered User
|
 All shined up and ready for the first run of the season!!
__________________
1976 911 Targa 2.7 CIS Sienna Metallic /Diamond Sahara # 436-9-3 - Red Interior 1963 356 SC- crashed  1962 356 C- sold 1965- 912- sold- fun but too slow |
||
|
04-07-2013, 04:10 PM
|
|
|
Registered User
Join Date: Aug 2012
Posts: 501
|
The sweet results of winter's toil. Wet sanded and polished to a mirror finish ... what a lot of work! (But worth it).
Also new for this season: Dunlop Direzza ZII tires Lowered, aligned, corner balanced Bilstein HD's, turbo tie-rod kit M&K pre-muffler / 1-in, 1-out muffler Steve Wong chip  
|
||
|
04-07-2013, 05:51 PM
|
|
|
Registered

Join Date: May 2011
Posts: 7,245
|
Quote:
__________________
79 SC Targa 72 T Targa Sold 68 T Coupe Sold 65 912 Coupe Sold 62 356B Coupe Sold |
||
|
04-07-2013, 06:23 PM
|
|
|
Registered
|
Well here I got the Targa with 17x9's on the back and 16x7's on front with Yoko S-Drives, just going a different route with the staggered look!
 
__________________
U.S. Army Retired 85 Targa Guards Red  2018 BMW 530i M-Sport Personal Quote: "Do whatever makes you feel good" 
|
||
|
04-07-2013, 07:48 PM
|
|
|
Registered User
Join Date: Aug 2012
Posts: 501
|
Quote:
I'm no professional, but I did research before starting this project. Here is some of what I learned and applied, which may be of use to readers. This applies to re-painted cars only. The PO had the car painted about a year before my purchase, at a good shop (California Porsche Restorations). The work was good quality, but had surface ripple typical of a non-sanded finish. Having admired councours paint, I was taken by the idea that you could get there starting from a good baseline paint job. In my case, PPG paint was applied in the usual (modern) base color / clearcoat sequence. I checked with CPR to make sure their process yields a thick enough clear coat for wet sanding without break-thru to color coat (very bad). I started with 1500 grit 3M wet-or-dry paper. You MUST use a flexible sanding block (Meguiar's makes a great one). DON'T use the hard rubber hardware store type, especially not on our car's sensuous curves. Mix a bucket of warm water with a small squirt of dish soap. Cut a sheet of paper in two and drop in the bucket and let sit for a minute or two. Now, wrap the wet paper around the block, and your're ready to go. Start with an easy panel, such as the engine lid. You should remove any emblem, which I did by running dental floss under the emblem, cutting thru the adhesive. Tape off any adjacent plastic/metal areas, and open the lid to give some clearance to the adjacent panels. Now, sand the panel methodically by going back and forth in long straight strokes; edge-to-edge if you can. Overlap by 50% or so. Press down on the block so you can feel smooth resistance as you push across. This means you have good contact and the paper is working for you. Try to get even coverage, and keep the pad and paint wet; it's a messy process. After the first pass, dry the panel with micro-fiber towels (much better than old bath towels!). It's very apparent where the sanding is inadequate. What you want is a uniform, velvety smooth flat process. If more sanding is needed, and it probably is, go through the same process but this time up-and-down rather than back and forth. With each pass you should go 90 degrees relative to the previous. Keep doing this until you get a uniform smooth finish. In my case, no more than 3 passes were needed, so it doesn't take that long. The clear coat is actually shockingly easy to sand; after all it's basically plastic. Now, do the same thing with 2000 grit paper, except just one or two passes, just enough to get out the 1500 grit scratches. The surface will be even more velvety. Optionally, go over again with 3000 grit 3M Trizact. This will result in a bit less polishing time later. Trizact is expensive, but lasts a long time. At this point it's time to polish: I highly recommend Maguiar's M105 cutting compound; it worked great for me and the internet has nothing but praise for it. You MUST use a rotary type polisher for this step. These are the kind the pros use, and are not idiot-proof, but on the other hand are not to be afraid of; just follow a few basic rules and you're OK. The 'dual-action' polishers are just not agressive enough to remove sanding marks completely. Use a wool cutting pad; they are available in various diameters. I ended up using the smallest for most of my car (3 inch I believe). Larger is quicker for cars with lots of flat surfaces (not us); you may want to experiment. I worked approx 1 foot square sections at a time, but no strict rule here. Squirt some compound on the car, lay the pad on the compound and spread it out over your area. Not a huge amount; you will learn what works best. By the way, sprinkle a little water on the pad before you start, just enough to lightly moisten. Set the polisher to about 3/4 max speed. Put the polisher FLAT on the surface before starting it, or you will spray compound all over creation! Start the polisher, apply maybe 10 pounds (??) pressure, and move it slowly back and forth, and up and down, over your area. Keep it up until the compound mostly is gone. Wipe the area and inspect ... you are done when you have a mirror finish with no visible scratch marks. This is extremely satisfying! Try to keep the polisher always moving, and don't tip it so an edge is digging in. This is what can cause burn-through. This step is messy and you probably want to cover adjacent panels, glass, etc with drop-cloths or blankets to catch the inevitable spatter. Some spots can't be reached with the polisher, and don't push it by using the edge too much. That is where I got into trouble by the windshield wipers, resulting in a small burn-through. In those spots, you can go the manual route. Just get a small piece of old terrycloth, apply some compound to the nappy side, and rub the area with lots of pressure and fairly quick strokes. This is very labor intensive and takes awhile, but you can get to that mirror finish eventually. Remember it's best to be patient and don't overdo it with the machine. My feeling is that the overall result of this whole thing is so nice that I can live with a quarter-size patch of imperfection. So ... now do the rest of the car! It's quite satisfying to see those panels turn into mirrors, one at a time. I just did the work for a couple hours after work over a period of two weeks or so. You're not done yet, but the rest is much easier and safer. Go over the whole car with a finishing compoud, using a dual-action polisher and foam pad. You can't really damage anything with this combination, and you don't need to spend anywhere near as much time. This step kills any remnant haze and brings up a brilliant shine. The final step is application of wax or sealant. I haven't done this yet, but it will be a piece of cake compared to the rest. Here is some info on supplies and tools: Compound: Maguiar's M105 and M205 Paper: 3M wet-or-dry, 3M Trizact DA polisher: Porter Cable 7424XP, purchased in a kit with the compounds and pads for about $250 from Autogeek.net Rotary polisher: Neiko, from Wesco Autobody Supply (Seattle), $70 Beer: Whatever's on sale . Hope this is helpful, Jeff |
||
|
04-07-2013, 08:03 PM
|
|

|
|
Registered
Join Date: May 2011
Posts: 7,245
|
Hey Jerff, thanks, that is way more of a description that I was hoping for. Thanks again!!!
__________________
79 SC Targa 72 T Targa Sold 68 T Coupe Sold 65 912 Coupe Sold 62 356B Coupe Sold |
||
|
04-07-2013, 08:28 PM
|
|
|
964
Join Date: May 2012
Location: The Empire State
Posts: 168
|
BKLYNTARGA at AutoX this past weekend.
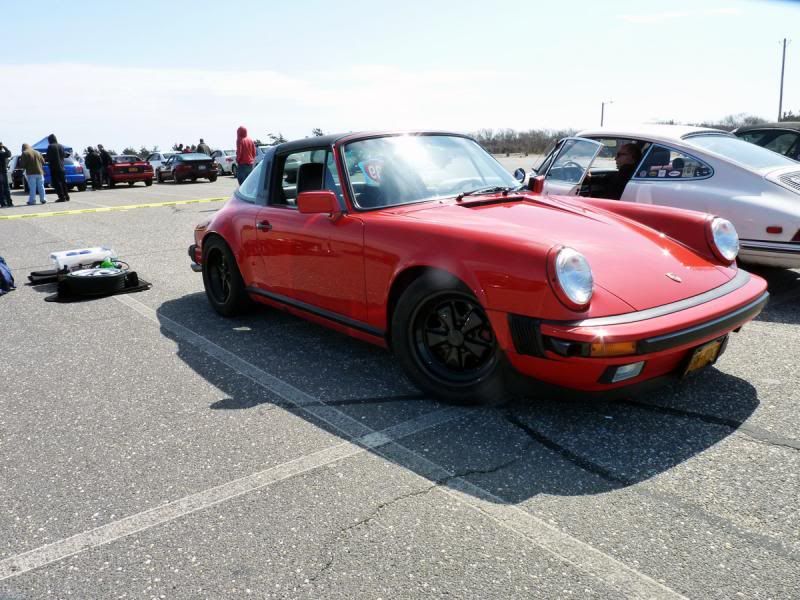
__________________
Guards Red 964 |
||
|
04-08-2013, 09:00 PM
|
|
|
Registered User
|
Quote:
gorgeous!!
__________________
1976 911 Targa 2.7 CIS Sienna Metallic /Diamond Sahara # 436-9-3 - Red Interior 1963 356 SC- crashed 1962 356 C- sold 1965- 912- sold- fun but too slow |
||
|
04-09-2013, 04:02 PM
|
|
|
Registered User
|

__________________
'77 Targa 3.0 |
||
|
04-09-2013, 05:40 PM
|
|
|
Registered
Join Date: Nov 2012
Location: Montréal, Canada
Posts: 453
|
Here's mine the day I finally got her home, on april the 6th :

__________________
1985 911 Targa (sold) 2001 996 Twin Turbo (sold) 2001 996 C4 |
||
|
04-16-2013, 07:29 PM
|
|
|
Registered

Join Date: Sep 2005
Location: Winter Springs, FL
Posts: 117
|
 Here's my '87 Targa Photo taken by my son on last years PCA Sunrise to Sunset Rally. He did a little bit of photoshop work to it 
__________________
Bill Kent https://www.facebook.com/#!/NoSweatPhotography 1987 Carrera Targa 1969 912 SWT #0053 |
||
|
04-21-2013, 03:16 PM
|
|
|
Registered
Join Date: May 2011
Posts: 7,245
|
Quote:
Matt, your car looks phantastic, better than new. But does your Targa not have the original color. Isn't that a two stage paint job with a clear coat finish? And the wet sanding did not hurt it?
__________________
79 SC Targa 72 T Targa Sold 68 T Coupe Sold 65 912 Coupe Sold 62 356B Coupe Sold |
||
|
04-21-2013, 07:26 PM
|
|
|
MikeF
Join Date: Aug 2012
Location: Newburgh, Indiana
Posts: 2
|
Weaver--Your 7's & 9's look terrific. Our 87 T has stock 15" Fuchs but we're looking to upgrade to 16"s at the next tire change. Any thoughts on a reputable source for 16" Fuchs? Thanks!
|
||
|
04-30-2013, 11:47 AM
|
|
|
Registered
|
I-75 south of Atlanta (closer to Valdosta):
 Chuck.H '89 TurboLookTarga, 351k miles |
||
|
04-30-2013, 01:23 PM
|
|
|
Registered User
Join Date: Aug 2012
Posts: 501
|
Quote:
). The car is its original color, garnet red metallic. The paint is a couple years old courtesy PO, and is a two stage w/clear coat. The finish was adequate; similar to a lot of new cars with a touch of orange peel. The wet-sand / polish brought it to something closer to a mirror finish. No problem with hurting it, as the clear coat was thick enough to withstand the sanding.A few posts above you will find my description of the process ... a bit long winded, but may help if you want to try it yourself. |
||
|
04-30-2013, 05:48 PM
|
|
|
Registered
|
 1980 911SC with 228,000+ miles on Medicine Lake Road (CA, just east of Mt. Shasta) |
||
|
04-30-2013, 06:41 PM
|
|
|
Registered User
Join Date: Aug 2012
Posts: 501
|
Beautiful car, wish I were there with mine!
|
||
|
04-30-2013, 07:32 PM
|
|

|
|
Registered

|
nice thing about having a beater is not giving a fuch. :P

|
||
|
04-30-2013, 08:38 PM
|
|
|
Registered
|
Quote:
Btw, if you have an idea what the PO spent to paint your beauty, would you please PM me: I'm considering a re-paint later this year or next (I've got some clear coat issues) and I'm beginning to assemble data points for negotiations with the body shop....thanks! |
||
|
05-01-2013, 05:09 AM
|
|


 SC Targa
 1984 BMW 633CSi
 s500
s500
 Red Rocket
 "Girlfriend"

 Karaya
 2014
2014 
 2010 Porsche Carerra 4S - Coupe
 1980 Porsche 911SC Targa
