|
|
|
|
|
| Author |
|
|
Registered
Join Date: Jan 2007
Location: Melbourne, Australia
Posts: 1,589
|
Replacing chain case cam seal - please help
Hi Guys,
Ok, due to a leak I need to replace the cam seal, I so far have removed the rear engine tin and chain case cover. Here is where the local Porsche mechanic was going to come over and help me do the rest but that was 5 weeks ago, he's a very busy man and just hasn't been able to make it. Anyway, can someone please help me with what's next? As far as I understand I need to somehow mark the cam timing before removing the chain tensioner (oil fed) and the gear off the cam. Any advice would be great. Oh and by the way I am doing this in the car, I know it would be optimal to drop it but access is pretty good anyway. Thanks everyone in advance.
__________________
'89 911 M491+Turbo '90 964 C2 '89 944 Turbo '88 928S4 |
||
 10-25-2008, 07:53 PM
|
|
|
Registered

|
As long as you don't move the cam or the engine after the chains have been removed, the timing should be OK. I did double check the timing after the chains were back on though.
How are you going to get the cam nuts off and on with the engine in the car. I did this last summer and I don't think it's possible to do with engine in car. Best of luck! Dave
__________________
Make sure to check out my balls in the Pelican Parts Catalog! 917 inspired shift knobs. '84 Targa - Arena Red - AX #104 '07 Toyota Camry Hybrid - Yes, I'm that guy... '01 Toyota Corolla - Urban Camouflage - SOLD |
||
|
10-25-2008, 08:25 PM
|
|
|
Registered
Join Date: Jan 2007
Location: Melbourne, Australia
Posts: 1,589
|
Thanks slodave, well the mechanic seems to think they can be removed and I have seen on the board a few have done it in the car so I'm hoping it's possible.
__________________
'89 911 M491+Turbo '90 964 C2 '89 944 Turbo '88 928S4 |
||
|
10-25-2008, 08:31 PM
|
|
|
Registered
Join Date: Jul 2006
Location: S. Florida
Posts: 7,249
|
You can do it with bumper off and undoing the rear motor mounts and lowering the engine down around 5-6 inches onto a cushioned jackstand supporting the center of the case.
Mark where the pins in the cam sprockets are with the #1 cyl at TDC before removing them. You'll need the cam holding tool, and the dial gauge with holder if you are going to check them and set them as good as you can. Waynes 911 engine rebuilding book is a big help too. |
||
|
10-25-2008, 08:36 PM
|
|
|
Registered
Join Date: Oct 2007
Location: Huntington Beach, CA
Posts: 574
|
subed......need to do the same seals on mine
__________________
Darren 1973 911 T MFI 2005 997 Carrera 2001 Toyota 4Runner |
||
|
10-25-2008, 09:17 PM
|
|
|
Registered

|
subscribed
__________________
'88 Coupe Lagoon Green "D'ouh!" "Marge - it takes two to lie. One to lie, and one to listen" "We must not allow a Mineshaft Gap!" |
||
|
10-26-2008, 09:17 AM
|
|

|
|
Somatic Negative Optimist
|
This is more involved than you think.
Make sure that the leak is really coming from the O-ring seal and not from somewhere else. Get Wayne's book on 911 engine building and read/study page 156-160. Observe the tolerances on the float for the thrust plate: max. 0.5 mm, very critical for a good seal of the big O-ring. Not having the engine out for this is a PITA for an inexperienced person. Even a partial drop gives only limited access plus you'll need some special tools like valve adjust feeler gauges, dial indicator, Z-block, cam holder P9191, 1/2"-drive torque wrench............ Re-checking the cam-timing is a must! You'll have to remove a lot of stuff to give yourself room. This is the right side, left side is similar; tensioner has to come off, cam sprocket assembly has to come off. 
__________________
1980 Carrerarized SC with SS 3.2, LSD & Extras. SOLD! 1995 seafoam-green 993 C2, LSD, Sport seats.  Abstract Darwin Ipso Facto: "Life is evolutionary random and has no meaning as evidenced by 7 Billion paranoid talking monkeys with super-inflated egos and matching vanity worshipping illusionary Gods and Saviors ". ")
|
||
|
10-26-2008, 10:21 AM
|
|
|
Registered
Join Date: Jul 2006
Location: S. Florida
Posts: 7,249
|
i did it in the car
just last week...
new cams, rocker arms and shafts, all 4 sprockets, chains, ramps, gaskets, o-rings, etc... i used a little hylomar on the gaskets and o-rings.... no leaks at all. it was easy doing it in the car with the engine lowered about 6" sitting on a jackstand. the jackstand with a piece of old carpet glued on top is right behind the B&B exhaust header slip joint in the picture. i have paper towels stuffed in below and above the lower part of the chain, in case i dropped the woodruf key or timing dowel pin, so it wouldn't go clinkity click into the case... that would really suck. the cam sprocket holding wrench handle will be straight up to clear the chain tensioner, and i bent the end of the hose connection for the left side heater hose inwards just a tiny bit for clearence. you can see that just to the right of the dial gauge. with #1 at TDC, and the keyways and little dots straight up i marked the cam sprockets with a sharpee pen so i can see that position with the bolt and big washer in place. after timing the cams to 1.26mm the sharpee pen marks are a little to the left of the dots/keyways. i have no place else to do it other than my driveway, and if a hurricane came along all i had to do is bolt the 2 rear motor mount bolts back up and tow the car to a safe place. here's a few pics while doing it in the car. other than getting a sore back from sitting, kneeling, etc. on the driveway behind the car alot it was really easy, just take your time and do a good job. edit: after removing the blobs of old epoxy sealent from the back side of the chain cases, use a thin layer of slow hardening JB weld epoxy to reseal those areas and keep the blobs of epoxy fairly thin or they will interfere/hit the cooling fins of the cylinder head behind it. that could cause distortion of the chain case while bolting it down or keep it from seating against the engine case correctly.   
Last edited by JFairman; 10-26-2008 at 11:36 AM.. |
||
|
10-26-2008, 11:18 AM
|
|
|
Registered
Join Date: Oct 2001
Location: San Carlos, CA US
Posts: 5,550
|
I have done this with a 3.2 and 3.0 in the car. So, I know it can be done.
You have to do the timing again. It is not as simple as marking everything and putting it back. This is not a toyota engine. But, it can be done if you have the tools, and a set of balls.
__________________
Porsche 2005 GT3, 2006 997S with bore-scoring Exotic: Ferrari F360F1 TDF, Ferrari 328 GTS Disposable Car: BMW 530xiT, 2008 Mini Cooper S Two-wheel art: Ducati 907IE, Ducati 851 |
||
|
10-26-2008, 11:48 AM
|
|
|
Registered
Join Date: Jan 2004
Location: Sacramento
Posts: 7,269
|
I belive it can be done without droping the motor based on conversation w my shop as I need the same.
|
||
|
10-26-2008, 01:06 PM
|
|
|
Registered
Join Date: Jan 2007
Location: Melbourne, Australia
Posts: 1,589
|
Thanks everyone!
JFairman, thanks for the pics and info, I'm really impressed! My Mechanic pretty much said the same thing, it's not very hard you just have to take your time. Blocking up the holes is a great idea. I'll do mine this week and post some pics.
__________________
'89 911 M491+Turbo '90 964 C2 '89 944 Turbo '88 928S4 |
||
|
10-26-2008, 02:48 PM
|
|
|
Somatic Negative Optimist
|
[QUOTE=JFairman;4262582]just last week...
new cams, rocker arms and shafts, all 4 sprockets, chains, ramps, gaskets, o-rings, etc... Very nice pictures and, yes, it can be done, it's just harder, go for it.  Re: new chain and 4 sprockets: A heads-up from an old ME: Unless you also replace the chain sprockets on the I-shaft, a new chain makes no sense. The sprockets on the I-shaft are the drivers, the cam sprockets are driven, and the idler sprockets just keep out the slack. From an engineering point of view, the important ones are the chain sprockets on the I-shaft, they wear more than the others. I know that a lot of people just use a new chain on used chain sprockets but in industrial application it's just not done. The pitch is the same but the wear in the sprocket doesn't allow the chain to seat properly; just wrap a new chain around an old sprocket and you'll see. When my engine was rebuild years ago, I assumed that the shop would do it right but found all the teeth-tips on the sump-screen after running ~10k Miles. The shop used new chains but didn't use new chain sprockets on the I-shaft! The engine had to be completely disassembled again to install new sprockets; what a disappointment.  I know of a few others.  The dual-chain doesn't really stretch. The wear in the link-rollers, and the wear in the sprocket teeth make it appear to stretch. With old sprockets on the I-shaft, you're better off re-using the old chain. If you use a new chain on old sprockets, the cam timing will also change over time. Check your sump after a while. Imagine what would happen if a broken tooth makes it past the sump screen and ends up in the oil pump? Read carefully: New chains without new sprockets? Read this!
__________________
1980 Carrerarized SC with SS 3.2, LSD & Extras. SOLD! 1995 seafoam-green 993 C2, LSD, Sport seats. Abstract Darwin Ipso Facto: "Life is evolutionary random and has no meaning as evidenced by 7 Billion paranoid talking monkeys with super-inflated egos and matching vanity worshipping illusionary Gods and Saviors ".
Last edited by Gunter; 10-27-2008 at 09:31 AM.. |
||
|
10-27-2008, 09:28 AM
|
|
|
Registered
Join Date: Jul 2006
Location: S. Florida
Posts: 7,249
|
i understand what you're saying about the chains and sprockets.
i looked in there when the chain cases were off and the intermediate shaft sprockets look really good. the tips of the teeth are squared off still and the valleys between them looked polished and not worn heavily at all. i've seen how sprockets wear from my motorcycle experiences. anyway, i got a great deal on all the parts and the motor was not coming out of the car and the origonal chain was worn while the cam and idler sprockets did not look real bad. i replaced the shafts the idler sprockets run on too. the chains i got in the deal were continuos so i had to carefully cut links out of the shains in the motor and the new ones i got and put in master links. looking at the shafts of the used chain links i cut out with an 8x lupe you can clearly see where metal has worn away resulting in the chain becoming longer with use... retarding the cam timing as it goes away. i wrapped aluminum foil around the chains and everything and taped off the all but the ends of the 2 links i ground down enough to remove them so no metal dust got into things. i thought about reusing the origonal chains but here are pictures of my left side chain box. look at the extension of the center section of the chain tensioner with the origonal chain and the same tensioner with the new chains, sprockets and idler sprocket shafts. when the origonal chain was in there the chain tensioners were extended almost as far as they can go to take up the worn chains slack, and with the new chains they are no where near as extended and look good. i also noticed when timing the cams there is enough clearance between the dowel pins and holes they go into on the cam sprocket and indexing sprocket behind it, that to really dial it in you have to redo it several times playing with that little bit of clearence and the amount of chain tension to get the cams right at the setting you want. i went for 1.26mm with freshly rewelded and reground webcam #40, or 964 grind cams in my 930. anyway, so far it's all working great. my intermediate shaft sprockets looked really good, very little wear, so i'm not too worried about it.  
|
||
|
10-27-2008, 10:32 AM
|
|
|
Registered
|
I just did same job with engine in, on my 930 - both sides. Finished couple of weeks ago. You have to pull even more crap off a 930 to get the cases out. A 911 should be simple (relatively).
To save myself some time, I figured I might mark the timing sprockets too. This is not as simple as it sounds - you need to pick up an inner sprocket mark as well as an outer one. The inner one locates the cam position, the outer one the crank position. It can be done - out of two reassembly attempts, I managed to get one side together back in the original marks without having to start from scratch. But it is not as foolproof or simple as it sounds. You cant let the cam rotate at all in the process. You really should be prepared to dial gauge the timing. The cost of getting this wrong is a lot more than the seal. Alan |
||
|
10-27-2008, 05:25 PM
|
|
|
Registered
Join Date: Jul 2006
Location: S. Florida
Posts: 7,249
|
sounds like we did this project about the same time.
looking at the exif data in my pics, that was on 10-10. i did both sides too. i'm breaking in a new rebuilt turbo along with the cams and rockers so i've been taking it really easy for the first 100 miles or so. using brad penn 20w50. |
||
|
10-27-2008, 06:41 PM
|
|
|
Registered
|
I did mine over a few weeks as spare time was scarce, and was working on my SC engine too. Finished about 2 weeks ago. Wasn't sure if it could be done with engine in - but figured all of what I was doing had to be done either way. If I got stuck, I'd pull the engine.
But undoing and torqueing the cam nuts was a bit of a trick. I have a home made tool. The special tool may work better. I was trying to fix an oil leak, which now looks like it may come from the cover, not the seal. Oh well. But I am back to my WUR issues now - dumping too much fuel at boost. Going for a run tonight with a few mods (waiting... waiting.. for a digi WUR). All a bit OT. But hopefully he can do it OK. Nice to see you blocked off turbo header - I had to fish a washer out from in there before I twigged to that. Regards Alan |
||
|
10-27-2008, 07:08 PM
|
|
|
Registered
Join Date: Jul 2006
Location: S. Florida
Posts: 7,249
|
haha, i'm fooling with my BL WUR too.
I also have a modified fuel head that is rich on boost. i havn't gotten into boosted runs yet, but i'm sure i'll be glancing at the AFR gauge and boost gauge during familiar entrance ramps... and adjusting... i'd like to have the digital wur and try a stock euro fuel head. that would probably be perfect for my car. i bought the cam timing tools here and they made the job easy. the handle and torque wrench are about side by side while doing it yourself. vertical up in the engine compartment on the left side and down at an angle under the car on the right side. i'll probably keep the tools in case i ever need to do it again. |
||
|
10-27-2008, 07:48 PM
|
|
|
Registered
|
My home made tool performed similarly - I had it vertical on the LHS, while I think the torque wrench was below. I had an extra pair of hands holding the sprocket tool for that side. On the RHS I was on my own, but found I could wedge the sprocket tool against the crank pulley or something nearby, and swing on the torque wrench.
Alan |
||
|
10-27-2008, 09:14 PM
|
|


 1984 Porsche Targa 3.2L
 1988 Porsche 911 3.2
 ME 262 (SOLD)
 Colibri
 Gas Mizer
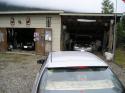 Mileage King
 Dog Bus

