|
|
|
|
|
| Author |
|
|
Registered
|
Quote:
Quote:
 Quote:
/b
__________________
1980, 911 SC. Ex-US car in Sweden since June 2010. Insta: @911scowner |
|||
 07-20-2012, 03:10 PM
|
|
|
Registered
|
Cleaned and checked
Today I've made a quick clean of the parts that might need replacement.
The sensor plate seemed find but needed a small adjustment to the rest height. One of the screws that hold the mixture control unit was a pain to get out and there was a bit or rust between the distributor and the housing, but other than that it seemed fine, the plunger was clean and moved freely.  The smaller, non-braided breather hose was definitely past it and the bigger one probably needs to be replaced as well. The other vacuum and AA lines are fine. The throttle housing was dirty (and still needs some more cleaning) but I could not see anything that was wrong. Is it possible to verify that the TPS is ok?  I also looked over the wires still in the car and the wires to the connector that goes on the back of the sensor plate housing looked slightly burned and not in a good shape. Is it possible to open the connector and replace the wires or do I need a new connector? So, seems that Peter was pretty much right on the money with his list: 6x intake manifold gaskets 6x intake runner/airbox sleeves 6x injector o-rings 6x injector sleeves 6x injector sleeve o-rings 1x thermostat o-ring 1x oil pressure switch (for the idiot light) 2x throttle lever (bell crank) bushings for the throttle linkage console on top of the engine 2x rubber bushings that secure the airbox brackets to the airbox (at cyl #6 & at the throttle lever console) 1x cold start injector o-ring 1x cold start injector spacer o-ring 1x throttle body o-ring 1x sensor plate housing gasket The only thing I will add are: 1x mixture unit o-ring 1x large breather hose 1x small(er) breather hose Is it possible/worthwhile to replace the crankcase breathing gasket? /b
__________________
1980, 911 SC. Ex-US car in Sweden since June 2010. Insta: @911scowner |
||
|
07-21-2012, 10:18 AM
|
|
|
Registered
|
Replacement hose
I've been on vacation the past week but my order from PP has cleared Swedish customs and should be here in a few days
 What I did not order was the crankcase breather hose and I'm now having second thoughts about not replacing it...so today I found a generic hose that might be suitable. My only concern is that it is only rated up to 100 deg C / 212 deg F, is that enough? I also have a question about the connector type that goes on the AAR, CSV etc, can they be opened to have the wires replaced? /b
__________________
1980, 911 SC. Ex-US car in Sweden since June 2010. Insta: @911scowner |
||
|
07-30-2012, 12:32 PM
|
|
|
Registered
Join Date: May 2008
Posts: 2,948
|
Quote:
Yes, he's a 914 guy, but I'm sure that he can answer your question. Regarding the plugs, if you look into their open end, you will see a tiny lock tab which must be bent toward the metal connector. After that you can push the connector/wire out of the plastic plug. Breather hose. Never used an after market breather hose; wouldn't risk it. Remember, it not only has to seal air, it must seal oil residue.
__________________
Keep the Shiny Side UP! Pete Z. |
||
|
07-30-2012, 01:13 PM
|
|
|
Registered
|
Progress report
Well, I'm halfway there I think. Almost all the CIS-parts are cleaned and checked over and the engine/engine bay is cleaner than in a long time. I'm also done with the while-you're-in-there stuff + some more. There is a picture on my blog - engine cleaned up and seals replaced
I've decided to make an attempt to glue the air box back together, we'll see how that works out... I hope to have it finished by Saturday so I can go to the Porsche meet on Sunday!
__________________
1980, 911 SC. Ex-US car in Sweden since June 2010. Insta: @911scowner |
||
|
08-05-2012, 07:23 AM
|
|
|
Registered
|
Quote:
The hose is oil/fuel rated so that is reassuring, but obviously an original part would be best. Thanks for taking the time to help out! /Björn
__________________
1980, 911 SC. Ex-US car in Sweden since June 2010. Insta: @911scowner |
||
|
08-05-2012, 07:32 AM
|
|

|
|
El Duderino

|
Quote:
I have been bumbling and fumbling my way along trying to understand the CIS system so the suggestions people were giving me would make sense as far as what they were intended to accomplish. I think I frustrated a few of the CIS experts on here in the process of my dumbness. (sorry fellas) The lightbulb was just not clicking for me. Then I read these two posts. CLICK. I have read a lot but I always felt like some piece of the explanation was missing. Now I think I get it. Thanks again, Peter! HUGE help for me.
__________________
There are those who call me... Tim '83 911 SC 3.0 coupe (NA) You can't buy happiness, but you can buy car parts which is kind of the same thing. |
||
|
08-05-2012, 07:55 PM
|
|
|
Registered
|
CIS back in, first start preparations
Last Saturday I began putting the CIS back in and it went well, it took about 3 hours.
 Unfortunately I sheared one of the banjo bolts in the process so that has held me up until today with the preparations before the first start. I've now checked the following: That there are no fuel-leaks. Cold system pressure: 4,9 - OK Cold control pressure: 2,5 (@ 20 degree C) - OK Cold residual pressure: 1,5 after 10 minutes - OK Spray patterns: All injectors spray and does not leak, but their patterns look a bit off although quite similar, I'm thinking I should replace all of them although they probably work for now (?). Ignition timing: Here I got a bit confused. The red marking just past the fan housing marking is the one marked with Z1, but why would there be a marking at 5 deg ATDC? Or is the other mark the TDC? I guess I can always pull the plug on cylinder one and see where TDC really is...  (Sry about the pic, it's shot off a pocket mirror)  I also need to check that the CSV injects as meant, but for that I need a helper so I will have to do it tomorrow. Any other ideas for stuff to check before turning the key for real? /b
__________________
1980, 911 SC. Ex-US car in Sweden since June 2010. Insta: @911scowner |
||
|
08-18-2012, 10:27 AM
|
|
|
Registered
|
First start
So, today I verified that the CSV is spraying and made the final adjustment to the ignition before taking a deep breath and turning the key
 The car fired right up and settled on a high idle. I had a quick look in the back but could not see anything worrying so I took it for a drive around the block. It was way more responsive than it has ever been and what was normal throttle input before was now way too much. Unfortunately I have commitments the rest of the day so I can't take it for a longer drive but it feels great to have running again. Many thanks to Peter Z for your advice and to the rest of you guys too! 
__________________
1980, 911 SC. Ex-US car in Sweden since June 2010. Insta: @911scowner |
||
|
08-19-2012, 08:37 AM
|
|
|
Registered

Join Date: May 2002
Location: Portland, Oregon
Posts: 12,701
|
Quote:
As the happy owner of a 1973.5 CIS car, I do have a pop off in my car. Sadly, it has been called to duty several times during my period of ownership since 2002. About 2 years ago, I had a back fire that caused the valve to be shot out of it's hole. I pushed it back in and verifed no air leaks and continued to motor on (I was on the road at the time). when I returned home, I decided to glue it back in but instead of using epoxy or urethane glue. I used a thin bead of of silicone sealant. Why? By my reasoning, it does not hold as well as some of the other glues but is adequate. In the event of the next backfire (which I typically notice when the car is very hot and then restarted), if the valve does not open, the glue may fail and allow the pop out valve to unseat. Since the silicone is soft, I figured it would allow me to reseat the valve and get a decent seal. I tested the box for leaks, found none and continued on my way. Since then, I have had maybe 3 backfire events, two of which unseated the valve. I merely pushed the valve back in, verified no leaks and drove off. While not ideal, I am not sure I truly have a better option given the year of my car. I have had my mixture and other settings checked by a local garage who seems knowleagable in CIS and all is in order. Sir, your thoughts?
__________________
Harry 1970 VW Sunroof Bus - "The Magic Bus" 1971 Jaguar XKE 2+2 V12 Coupe - {insert name here} 1973.5 911T Targa - "Smokey" 2020 MB E350 4Matic Last edited by HarryD; 08-19-2012 at 12:21 PM.. |
||
|
08-19-2012, 12:18 PM
|
|
|
Registered
Join Date: Dec 1999
Location: Novato, CA
Posts: 4,740
|
Quote:
Done it on a '74, so it should work on a '73.5 and make air box explosions a thing of the past. Cheers, Joe Last edited by stlrj; 04-02-2014 at 10:19 AM.. |
||
|
04-02-2014, 09:12 AM
|
|
|
Registered
|
Hello, An interesting read[for me]. I printed out Peter Zimmermann's article about the pop-off valve,[Damm I had just installed one].had ALL the CIS components replaced/re-conditioned.Never had a backfire BEFORE but that's about all I get now. long story will have to start a "thread" of my own when I learn how to.Michael.
|
||
|
05-01-2015, 10:26 PM
|
|

|
|
Registered User
Join Date: Oct 2014
Posts: 614
|
how big of a backfire must you get to crack the airbox? my airbox is supposedly cracked from some very very MINOR backfires, as if you were poping small bubble wrap. is that all it takes?
Ive pretty much disconnected everything and am ready to remove my motor to replace this airbox but these seem like so much of a hassle to replace everything. i have a set of 46mm PMOs on the shelf that I'm thinking of installing over the new airbox, because i don't want to blow the new airbox and be in the same position. i just want to be able to drive this thing while we have nice weather. |
||
|
05-14-2015, 07:09 AM
|
|
|
Coram Deo
|
Resurrecting an old, very helpful thread to add a little information. I'm in the middle of airbox replacement now. I have glued the halves of my backup box with 3M 8005, I have leak tested with water and stoppers (using lung pressure- I don't have compressed air handy), and am currently in the remove/replace stage. As help to those who come after, here is Peter Z's parts list, with numbers.
930 110 197 12 6x intake manifold gaskets 930 110 885 00 6x intake runner/airbox sleeves 999 701 423 40 6x injector o-rings 911 110 886 03 6x injector sleeves 999 701 446 40 6x injector sleeve o-rings 999 707 314 40 1x thermostat o-ring 900 123 101 30 1x oil pressure switch sealing ring (for the idiot light) 914 423 211 00 2x throttle lever (bell crank) bushings for the throttle linkage console on top of the engine 911 110 154 00 2x rubber bushings that secure the airbox brackets to the airbox (at cyl #6 & at the throttle lever console) 999 701 210 4A 1x cold start injector o-ring 999 701 395 50 1x cold start injector spacer o-ring 999 701 124 00 1x throttle body o-ring 911 110 394 02 1x sensor plate housing gasket I found I had to order 4 o-rings from my local dealer to ensure I had all I need. I also have the crankcase breather cover on hand, just in case. 930 107 791 02 Crankcase breather cover If I needed incentive for ITB/EFI, it's all these little hoses and gaskets and triple-jointed access required. But, one more try with the CIS....
__________________
Dru 1980 911SC Targa Petrol Blue Metallic Cork special leather Sport Seats Limited Slip 964 Cams SSIs Rennshifter 1990 250D Opawagen 1995 E220T Sportline Familienwagen 1971 280SE Beverly... hills that is 1971 Berlina 1750 Faggio |
||
|
04-09-2019, 02:47 AM
|
|
|
Coram Deo
|
OK, I'm 95% confident I know where the two identical connectors go, but that extra 5% would be really welcome. I saw this question on another thread, and the consequences for being wrong were fairly disastrous.
I say identical connectors, but that's only on the male end. On the female end, one connector is green and one is blue:  The green one has a brown and brown/red wire.  I think this is reflected in the 1978 factory wiring diagram trace 105, which shows brown and brown/black (as does the Bentley on 970-9), which would make this the air meter switch-component G19(associated with the fuel pump relay) The blue one has three (!) wires, yellow, yellow/blue, and red, though it's only a two-wire connector.  This is somewhat consistent with the wiring diagrams, which show yellow, yellow/red, and red on trace 111 component N17 (Bentley 970-11), cold start valve, associated with the starter and thermo switch. The colors aren't exactly the same, but neither are the wiring diagrams for my year (1980). So can someone confirm where the blue and green connectors connect too? Many thanks.
__________________
Dru 1980 911SC Targa Petrol Blue Metallic Cork special leather Sport Seats Limited Slip 964 Cams SSIs Rennshifter 1990 250D Opawagen 1995 E220T Sportline Familienwagen 1971 280SE Beverly... hills that is 1971 Berlina 1750 Faggio |
||
|
04-09-2019, 01:39 PM
|
|
|
Targa_PB_78_SC
|
Hi Dru,
I think you’ll find answers here. need help piecing together my CIS - 1981 I think the blue is cold start and is closer to cylinders 4,5,6 than the green one. Which best I recall. Seems if you get them reversed it will be obvious at run time per some other posts herein. Last edited by mike sampsel; 04-10-2019 at 08:27 PM.. |
||
|
04-10-2019, 04:19 PM
|
|
|
Coram Deo
|
Quote:

__________________
Dru 1980 911SC Targa Petrol Blue Metallic Cork special leather Sport Seats Limited Slip 964 Cams SSIs Rennshifter 1990 250D Opawagen 1995 E220T Sportline Familienwagen 1971 280SE Beverly... hills that is 1971 Berlina 1750 Faggio |
||
|
04-12-2019, 01:42 PM
|
|
|
Registered

|
either you're driving again and thus cannot post.
or it all blew up and you cannot post. any news?
__________________
Regards, Flo / 79 SC streetrod - Frankfurt, Germany Instagram: @elvnmisfit |
||
|
11-14-2019, 02:45 AM
|
|
|
Registered

|
sensor plate adjustment
i used cigarette rolling paper to fit the sensor plate back into the assembly, I was able to place them completely around the inside of the plate and that gave a perfect fit.. that was 7 or so years ago and my 75 runs great.
__________________
1975 911S Targa Silver Anniversary Edition |
||
|
11-21-2019, 12:21 PM
|
|


 The Varmint

 1983 Porsche 911SC Coupe
 2011 Mercedes-Benz E350 Cabriolet
 Bella Macchina
 Blue Bus
 Petrol Blue
 Damen (on to a new owner)
 Große Gurke (The Big Pickle) (on to the scrapyard)
 67 Datsun stroker 2000
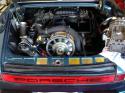 Porsche Targa 1978 SC
 Porsche 911
