|
|
|
|
|
| Author |
|
|
Straight shooter

|
Fuse Panel Swap - ATC Done under $35 total
Hello Folks,
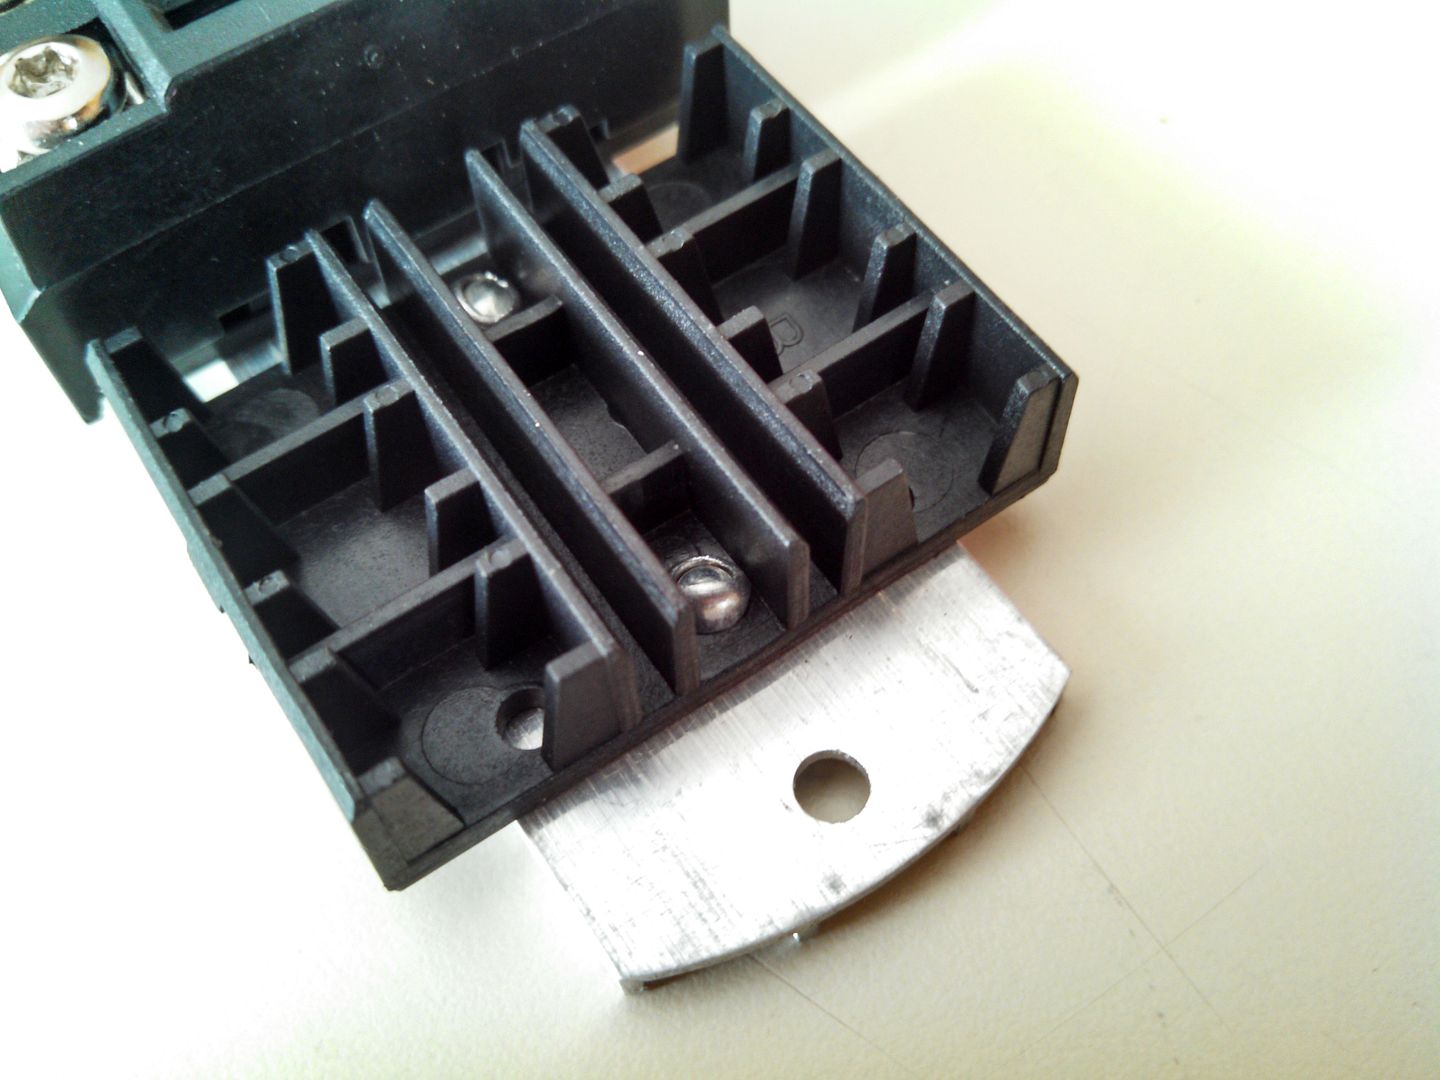
I had an issue with my brake lights which finally turned my attention to the ancient fuse panel. My 911 is of the 1974 flavor but this method should work for other years as well. I hate the old canister fuses and dreaded electrical gremlins that would inevitably greet me at an inopportune time. Fortunately it was while I was taking the car out of winter storage rather than sitting at a stoplight with a soccer mom texting her way up behind me at 55mph. If you're reading this then you know the same dread of ancient electrical systems that haunted me. I also know there are a lot of options in the market place with some very well thought out products but with price points that are a bit rich for those who are used to rolling their own. I've always been the DIY type - I find this saves a chunk of change often and it seems to have really delivered here. Enough text, here's pics of what shook out and how you can save a few hundred bucks to spend elsewhere: Here's my ugly old fuse panel with gremlins:  Although not pictured, I organized the wires by removing the top first and numbering with masking tape/marker each wire position (#1 Top, #2 top, #3 top, etc.) to ensure nothing would get mixed up. As I mentioned financial benefit of this choice, I chose the Chief ATC blocks; if you buy the 6 position blocks then this is by far the most economical way. Don't be tempted to buy their larger blocks as the cost is much higher. The 6 unit blocks are under $1 per fuse slot ($5.80/6 positions) and expect ~$10 shipping in the CONUS. Here's one with the cover popped off: 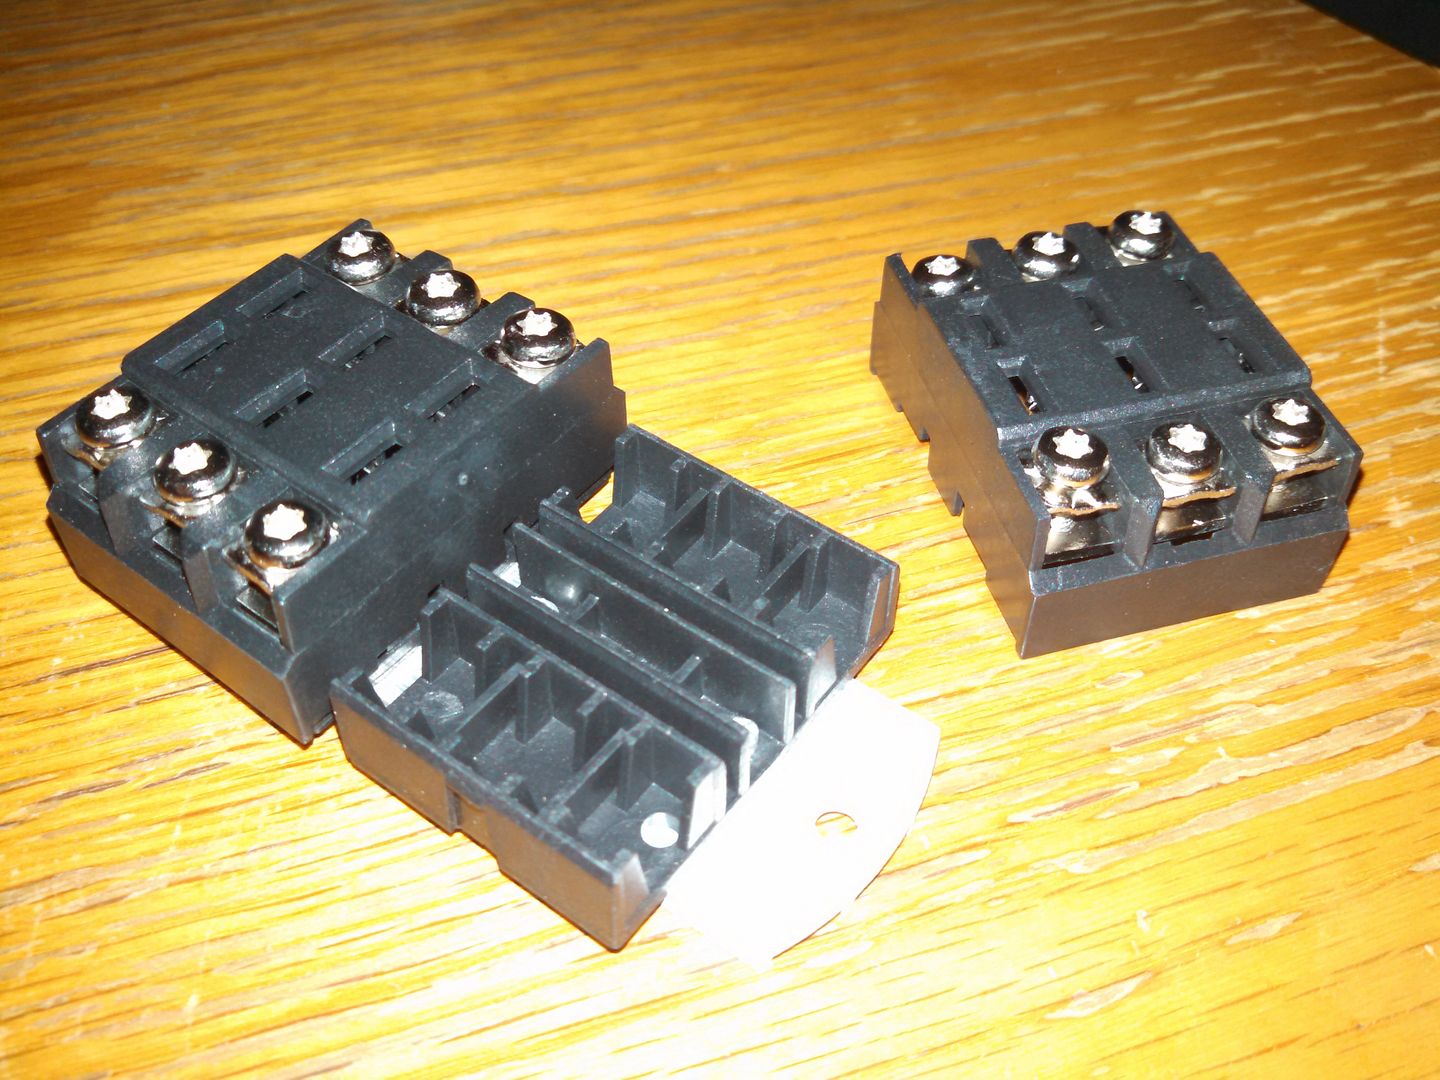 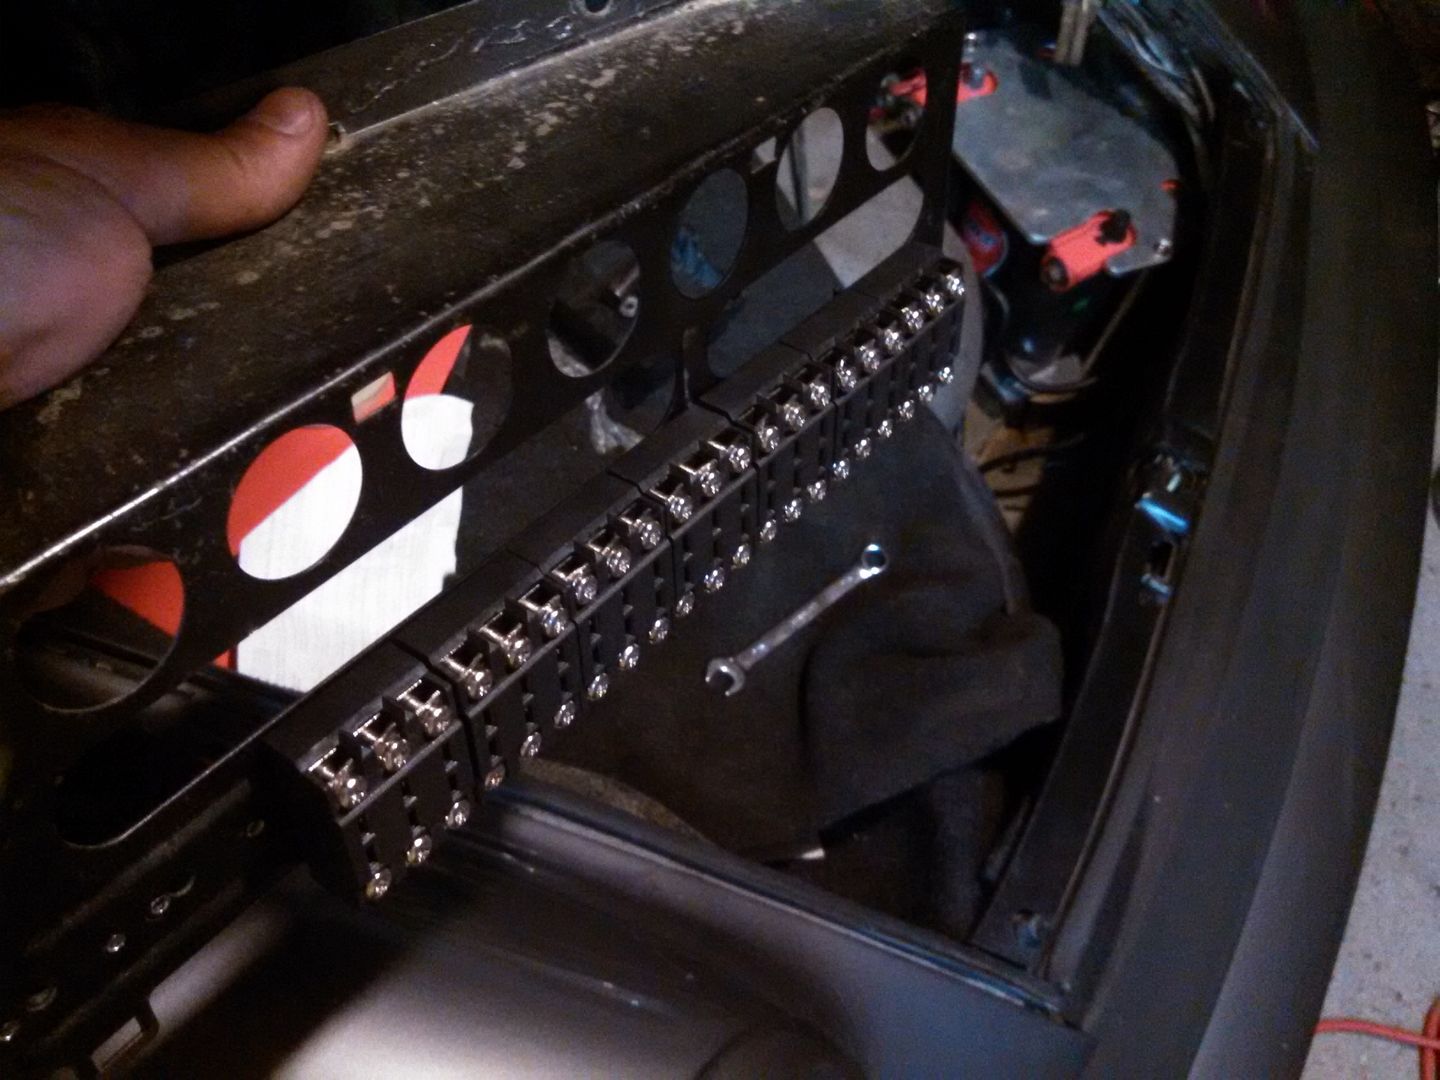 The quantity of slots is determined simply by the number of 3 pack units riveted to a strip of aluminum. 4 x 6 packs is enough including extra to do the 3 fuse block in the engine bay and providing a spare 3 slot expansion bay in the frunk. ***DO NOT USE A LEVER ON THE SCREW HEAD OR YOU WILL BREAK THE SCREW, GUARANTEED.*** I used my bare hands on the torx bit to tighten things down and this is more than sufficient. Give each wire a tug to confirm it's secure before moving on. To make these fit and not look funny with odd spacing, just pry the top off each 3 panel set and drill the rivets out on the back to remove the aluminum mounting panel. Then it's very simply mounting to the stock fuse panel bracket using a drill. I originally riveted the replacement Chief blocks to the Porsche bracket but quickly changed my mind. A rivet through plastic is a bad idea here... DON'T DO IT OR TRUST IT. I found the plastic block would easily work loose of even a properly sized rivet so I drilled all the rivets out (tuition) again and replaced with the trusty old friend, captain zip tie. The zip tie is far more secure looping around each 3 pack fuse block through the original hole and through the drilled holes in the Porsche bracket. The tie is out of sight once you snap the plastic top cover back on the backing panel. Snug as a bug in a rug. 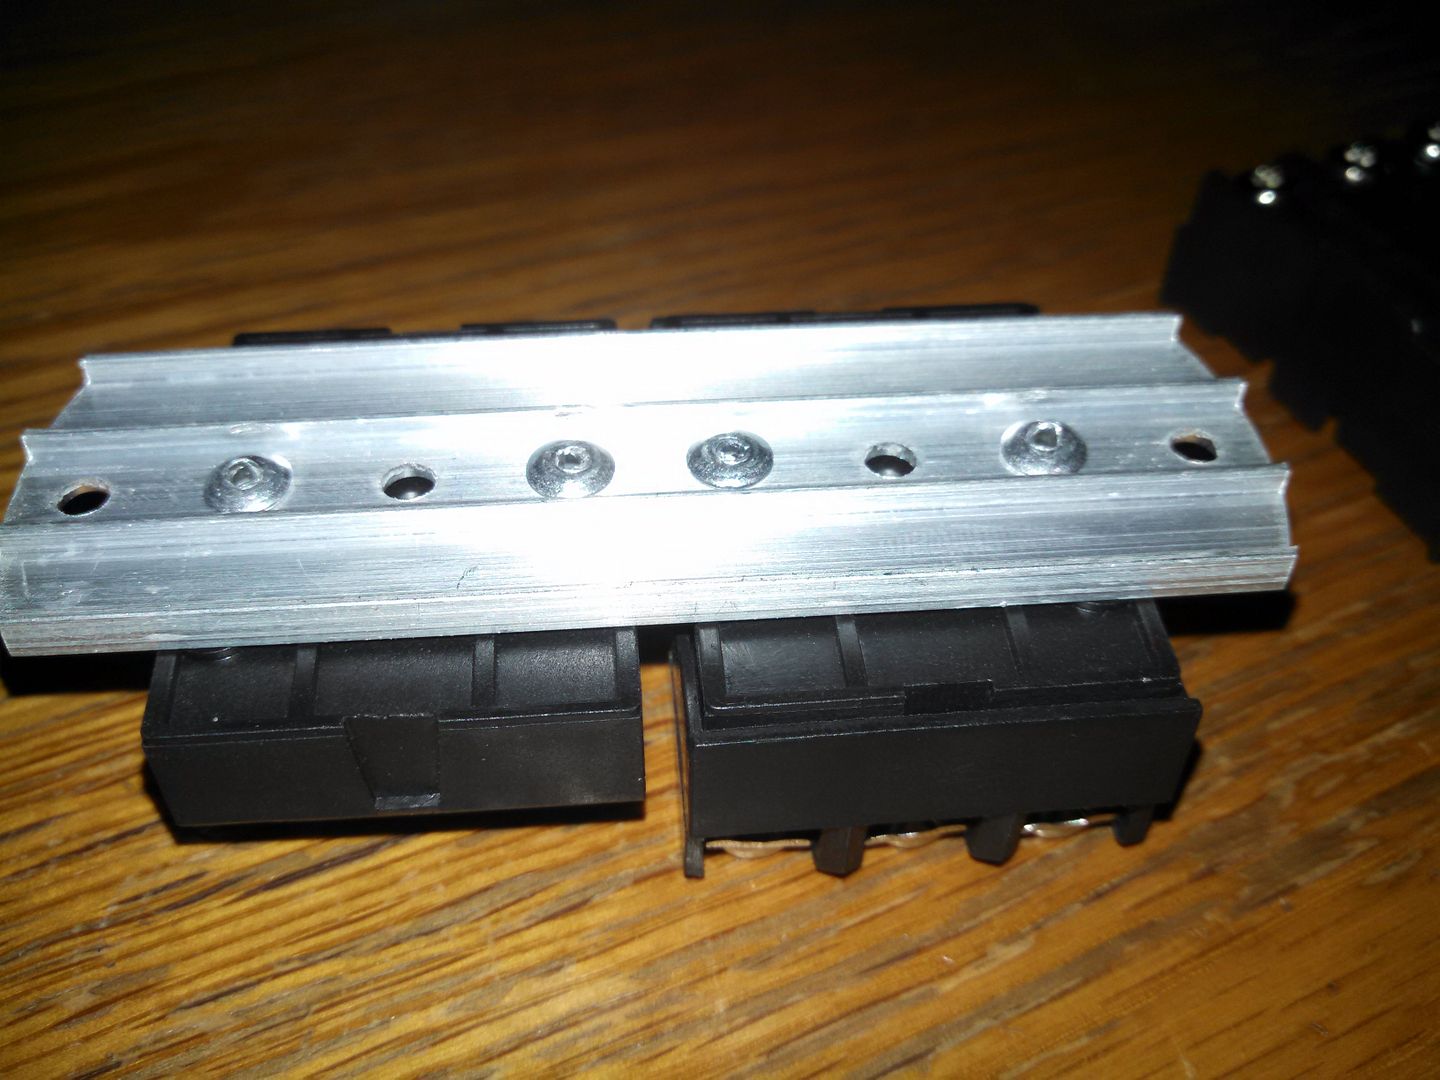 When connecting wires, I found that if multiple wires were connecting to the same position that they must be of the same gauge. If different gauge on the same position/screw then you must strip the wire back on the skinny side and fold it over itself to increase diameter to match the big fatty. Don't try stuffing a 10ga wire into the same position on one side of the screw with a 14ga on the other side as the 14ga will flop about in the breeze like a hotdog in a hallway... which is a fire risk. I ran an extra 10ga wire from battery to the constant positions for convenience rather than running the jumpers between positions on the panel- this was personal preference for a bit more work/materials but made the job better in the end in my opinion. More power capacity to the fuse panel isn't a bad idea. I ran an extra 3 position block to the frunk with constant power to the battery (positions 19, 20 and 21 pictured below). I have plans for this panel to include a fan for the oil cooler eventually... more to come on that in a future thread. Hopefully this helps someone else who dreads the fuse box area of their old 911. It's really not that bad of a job and a good piece of mind! Finished project: 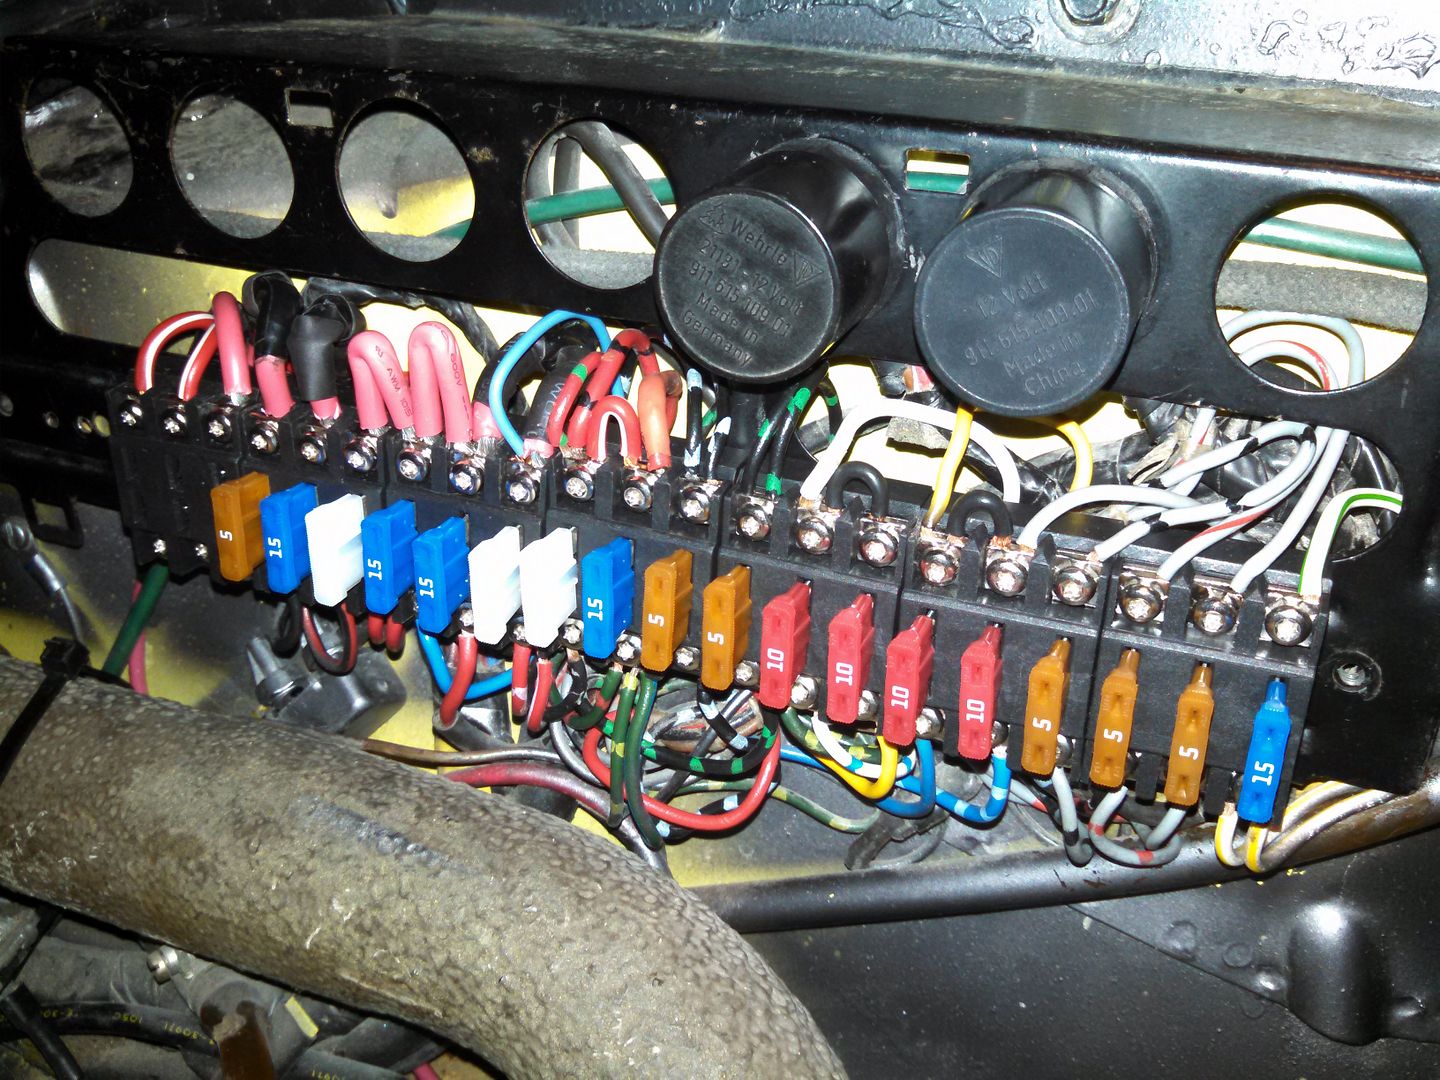 Total cost was under $35... I had shrink tube and other auto electrical materials on hand including extra fuses/wire. I feel much more confident with the new panel and fuses than the old. If you're on the fence, then don't wait... just do it.
__________________
Of the value traps, the most widespread and pernicious is value rigidity. This is an inability to revalue what one sees because of commitment to previous values. In motorcycle maintenance, you MUST rediscover what you do as you go. Rigid values makes this impossible. ― Robert M. Pirsig, Zen and the Art of Motorcycle Maintenance: An Inquiry Into Values Last edited by Lapkritis; 07-20-2015 at 06:37 AM.. |
||
 07-16-2015, 08:39 PM
|
|
|
Registered
|
Nice work.
Something that might be helpful for anyone else taking on a similar project. When I did something similar to one of my 911s, rather than using "jumper" wires between fuses, I used a thin strips of aluminium (with appropriate holes drilled in them) to make up "jumper" bars instead. I had to use my Dremel to remove a little plastic between the adjacent fuses so that the bars could be lay flat and be screwed down but, once done, it looked tidier. This also overcomes the issue of different size wires not being able to be used in any given hold down. Once the jumpers wires are removed from the equation, almost all fuses are single wire (or at least single size) connections. I also made up a a plastic cover so that the screws (some of which are "hot" - ie always supplied with power) were no longer exposed to stuff floating around the trunk. Finally, at the battery end - right next to the battery, I installed an extra block with a 4 separate 30 amp fuses. Two of these were to fuse the power supply cables that ran back to the ignition key and two were for the wires that ran to the main fuse box. Doing so ensures that there is a final fail safe for any short circuit.
__________________
Laurence 1998 Specbox racer / 1998 Boxster / 1984 RSR tribute 1970 911E Coupe / 1970 911E "speedster" / 1969 912 Targa 1963 356B T6 Coupe / 1962 356B T6 Cabriolet Current projects - 1955 356 pre-a Speedster / 1964 356C |
||
|
07-16-2015, 10:27 PM
|
|
|
Registered
|
Nice job. The fuel pump for 74 is not fuse (red/green) did you fuse your.
|
||
|
07-17-2015, 03:03 AM
|
|
|
Registered User
Join Date: Mar 2014
Location: Southwestern, CT
Posts: 411
|
Looks nice. Can you provide a link to the supplier for the fuse blocks? Thanks.
__________________
Wayne 1980 911 SC 1960 MGA 1600 |
||
|
07-17-2015, 04:09 AM
|
|
|
Vintage Owner
|
Does the fuse box cover still fit over these? It does look like a great upgrade, and I think the idea of making "jumper" strips is a good one as well.
__________________
84 Targa (sold) 70 914-6 (sold) 73 914-6 2.7 conversion (sold) 75 GMC Motorhome (sold) 2016 Cayenne |
||
|
07-17-2015, 06:00 AM
|
|
|
Straight shooter
|
Quote:
Part description is FP-ATO-S06
__________________
Of the value traps, the most widespread and pernicious is value rigidity. This is an inability to revalue what one sees because of commitment to previous values. In motorcycle maintenance, you MUST rediscover what you do as you go. Rigid values makes this impossible. ― Robert M. Pirsig, Zen and the Art of Motorcycle Maintenance: An Inquiry Into Values |
||
|
07-18-2015, 11:20 AM
|
|

|
|
Registered
Join Date: Dec 2008
Location: San Antonio, Texas
Posts: 3,591
|
I wouldn't use aluminum as a jumper. Brass, or copper would be more appropriate to avoid corrosion. You can't do it with house wiring should be no different here.
__________________
1973 911S (since new) RS MFI specs 1991 C2 Turbo |
||
|
07-18-2015, 11:26 AM
|
|
|
Straight shooter
|
Quote:
Yes, the factory cover fits back on without any adjustment or interference.
__________________
Of the value traps, the most widespread and pernicious is value rigidity. This is an inability to revalue what one sees because of commitment to previous values. In motorcycle maintenance, you MUST rediscover what you do as you go. Rigid values makes this impossible. ― Robert M. Pirsig, Zen and the Art of Motorcycle Maintenance: An Inquiry Into Values |
||
|
07-18-2015, 11:27 AM
|
|
|
Registered
Join Date: Dec 2008
Location: San Antonio, Texas
Posts: 3,591
|
Nice job
__________________
1973 911S (since new) RS MFI specs 1991 C2 Turbo |
||
|
07-18-2015, 11:27 AM
|
|
|
Straight shooter
|
Quote:
__________________
Of the value traps, the most widespread and pernicious is value rigidity. This is an inability to revalue what one sees because of commitment to previous values. In motorcycle maintenance, you MUST rediscover what you do as you go. Rigid values makes this impossible. ― Robert M. Pirsig, Zen and the Art of Motorcycle Maintenance: An Inquiry Into Values |
||
|
07-18-2015, 12:14 PM
|
|
|
Banned
Join Date: Aug 2011
Location: The Wet Side
Posts: 5,675
|
Wow, stellar job. I love the idea, and the execution. And the part where you save all that money. That part I really like a lot.
|
||
|
07-18-2015, 12:15 PM
|
|
|
Registered
Join Date: Apr 2010
Location: Los Angeles
Posts: 1,185
|
Thanks to your info I just finished mine this morning! Much appreciated.
 
|
||
|
07-18-2015, 12:20 PM
|
|

|
|
Banned
Join Date: Aug 2011
Location: The Wet Side
Posts: 5,675
|
Quote:
|
||
|
07-18-2015, 12:24 PM
|
|
|
Straight shooter
|
Quote:
Thank you for the note. I was not aware the pump is without fuse - yikes. I'll trace with a meter and add a fuse for safety; perhaps at a new position where capacity exists. My experience with other Bosch EFI systems indicates 20AMP would be appropriate for the fuel pump circuit. I'll share a photo of the fuel pump fuse once installed. -Andrew
__________________
Of the value traps, the most widespread and pernicious is value rigidity. This is an inability to revalue what one sees because of commitment to previous values. In motorcycle maintenance, you MUST rediscover what you do as you go. Rigid values makes this impossible. ― Robert M. Pirsig, Zen and the Art of Motorcycle Maintenance: An Inquiry Into Values |
||
|
07-18-2015, 12:24 PM
|
|
|
Registered
Join Date: Apr 2010
Location: Los Angeles
Posts: 1,185
|
Quote:
 The pair of 2 twelve gang buses just fit the stock fuse panel frame, but you need new mounting holes. You could just use nuts and bolts if you like but I wanted the extra project value and an excuse to break out the welder. |
||
|
07-18-2015, 12:53 PM
|
|
|
Straight shooter
|
I wasn't crazy about the cable tie idea either... if it nags me too much then I'll go back to rivets similar to what Chief Industries/manufacturer has on there. I need to look for taller 1/8" aluminum rivet that holds better than the regular off the shelf stuff from the hardware store. They just don't grab well enough to inspire a lot of confidence... cable tie is out of sight and will hold for a millennia.
__________________
Of the value traps, the most widespread and pernicious is value rigidity. This is an inability to revalue what one sees because of commitment to previous values. In motorcycle maintenance, you MUST rediscover what you do as you go. Rigid values makes this impossible. ― Robert M. Pirsig, Zen and the Art of Motorcycle Maintenance: An Inquiry Into Values |
||
|
07-18-2015, 12:57 PM
|
|
|
Straight shooter
|
Here's a better look at the original rivets that these use to connect to the aluminum mounting strip:
 These are pretty snug- I would be fine leaving these be and mounting the strip with bolts as done above. I chose not to keep the aluminum strips in my project which is where alternative mounting methods came in.
__________________
Of the value traps, the most widespread and pernicious is value rigidity. This is an inability to revalue what one sees because of commitment to previous values. In motorcycle maintenance, you MUST rediscover what you do as you go. Rigid values makes this impossible. ― Robert M. Pirsig, Zen and the Art of Motorcycle Maintenance: An Inquiry Into Values |
||
|
07-18-2015, 01:13 PM
|
|
|
Banned
Join Date: Aug 2011
Location: The Wet Side
Posts: 5,675
|
Quote:
|
||
|
07-18-2015, 02:23 PM
|
|
|
Straight shooter
|
For all that work just mount directly to the Porsche bracket I would think... what benefit is the aluminum strip going to do you?
I just took a few minutes and fused my fuel pump circuit as pors1968 recommended and snapped a few more pics as I put in another block. You can see the options to mount are going to be limited to strapping or rivets as a screw doesn't have any shoulder in here: 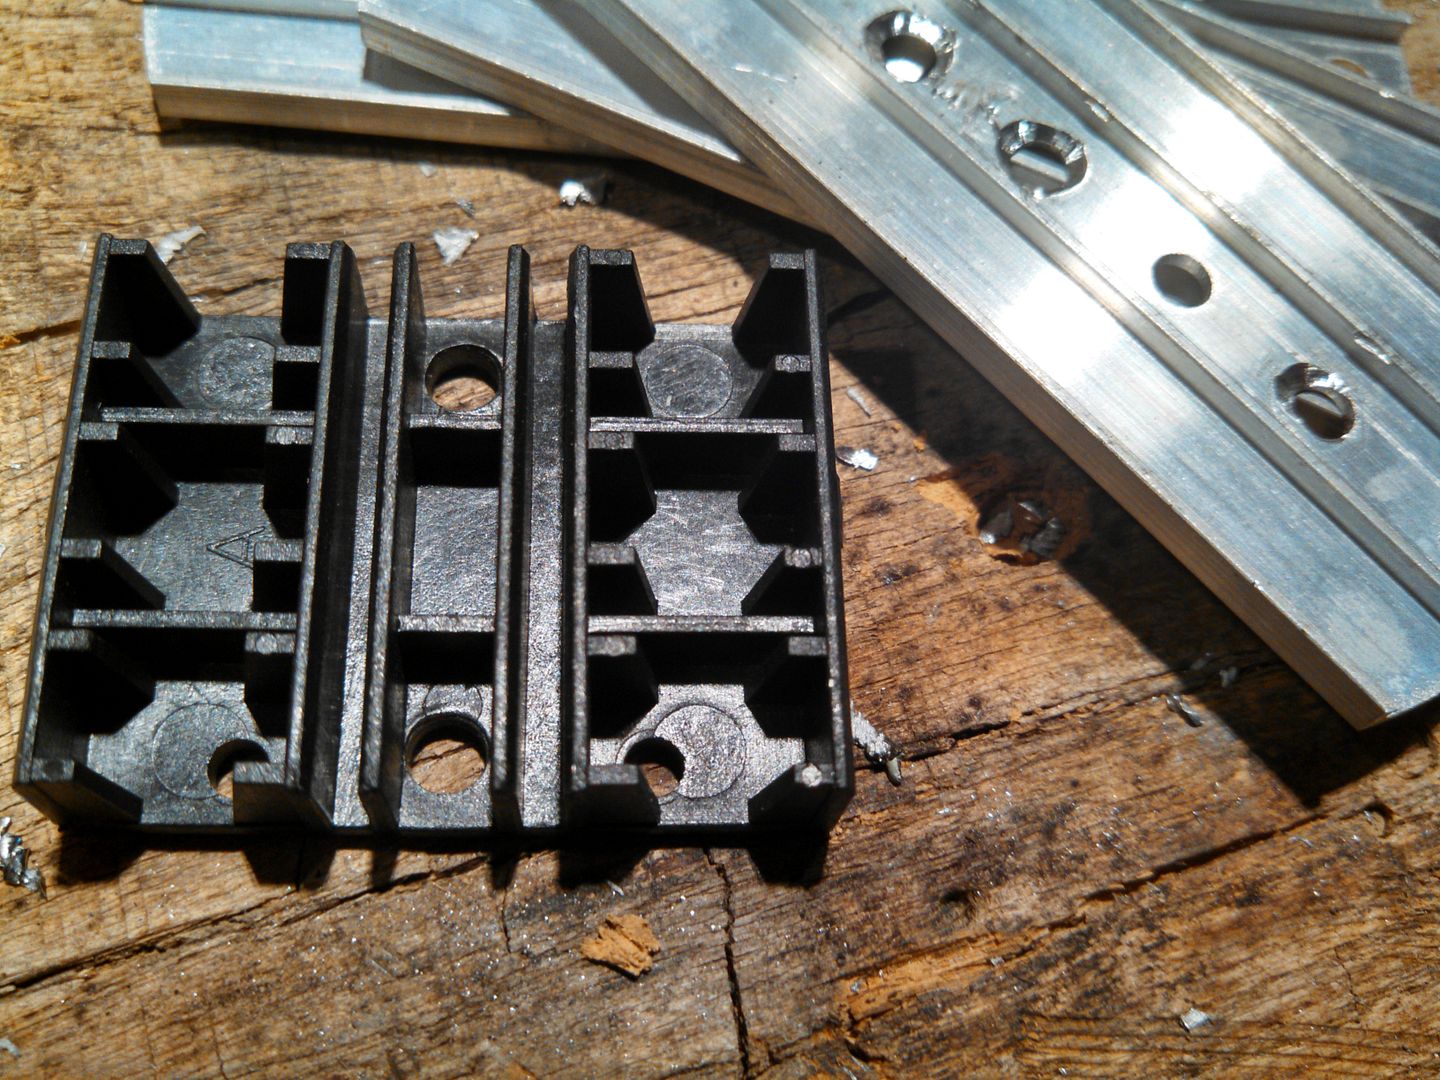 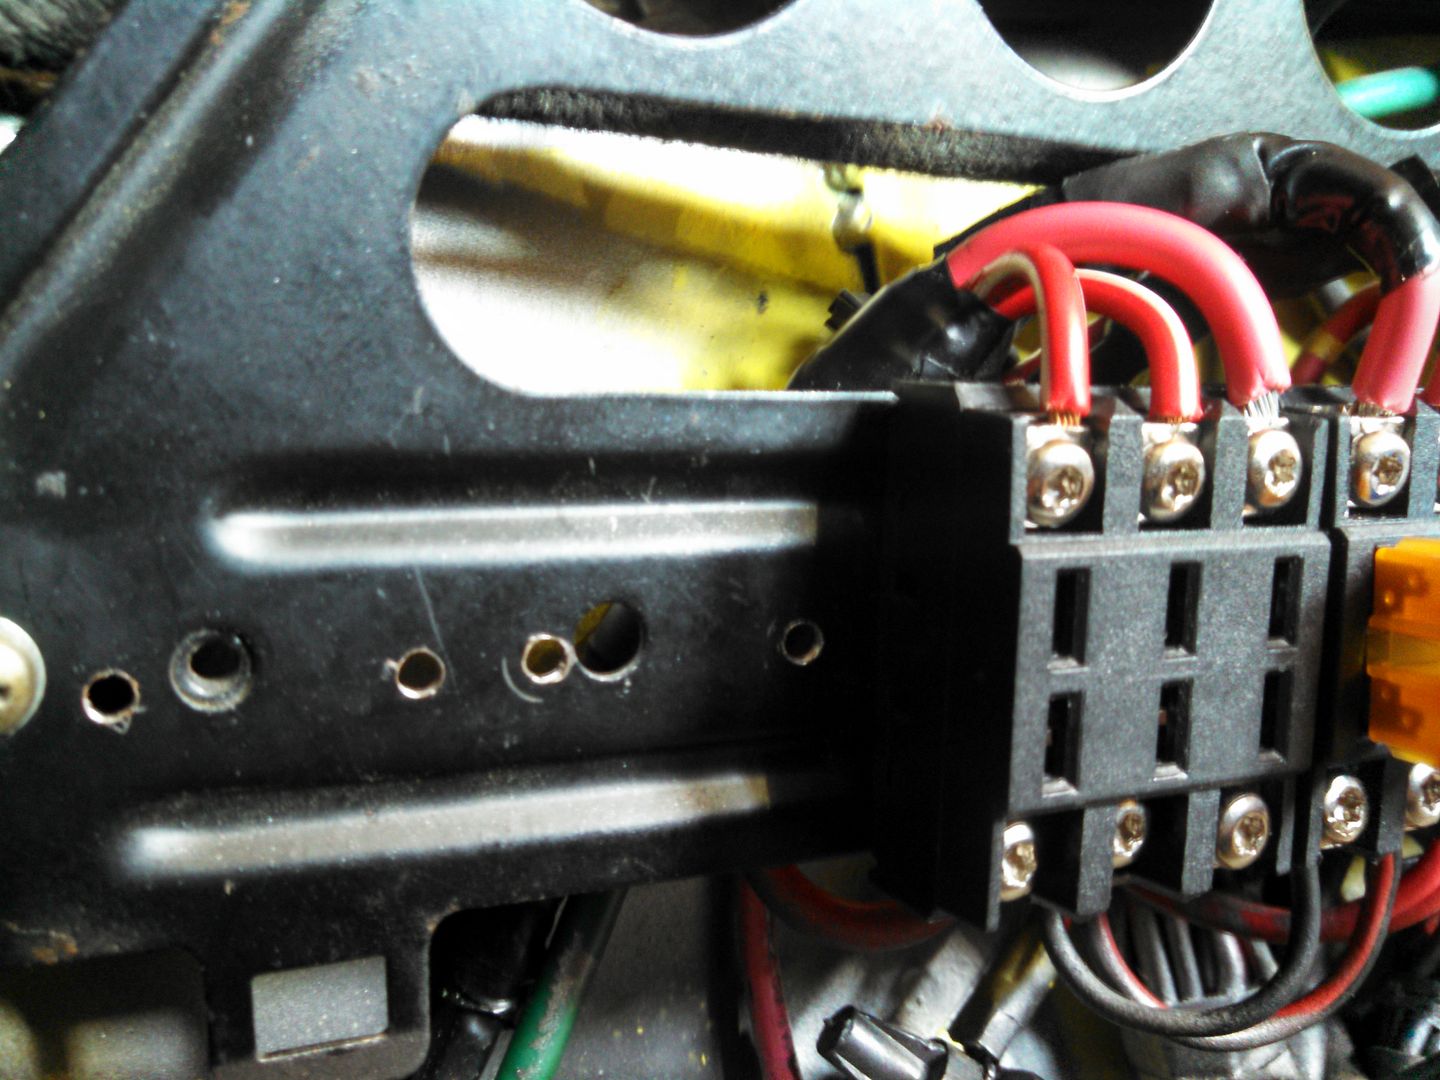 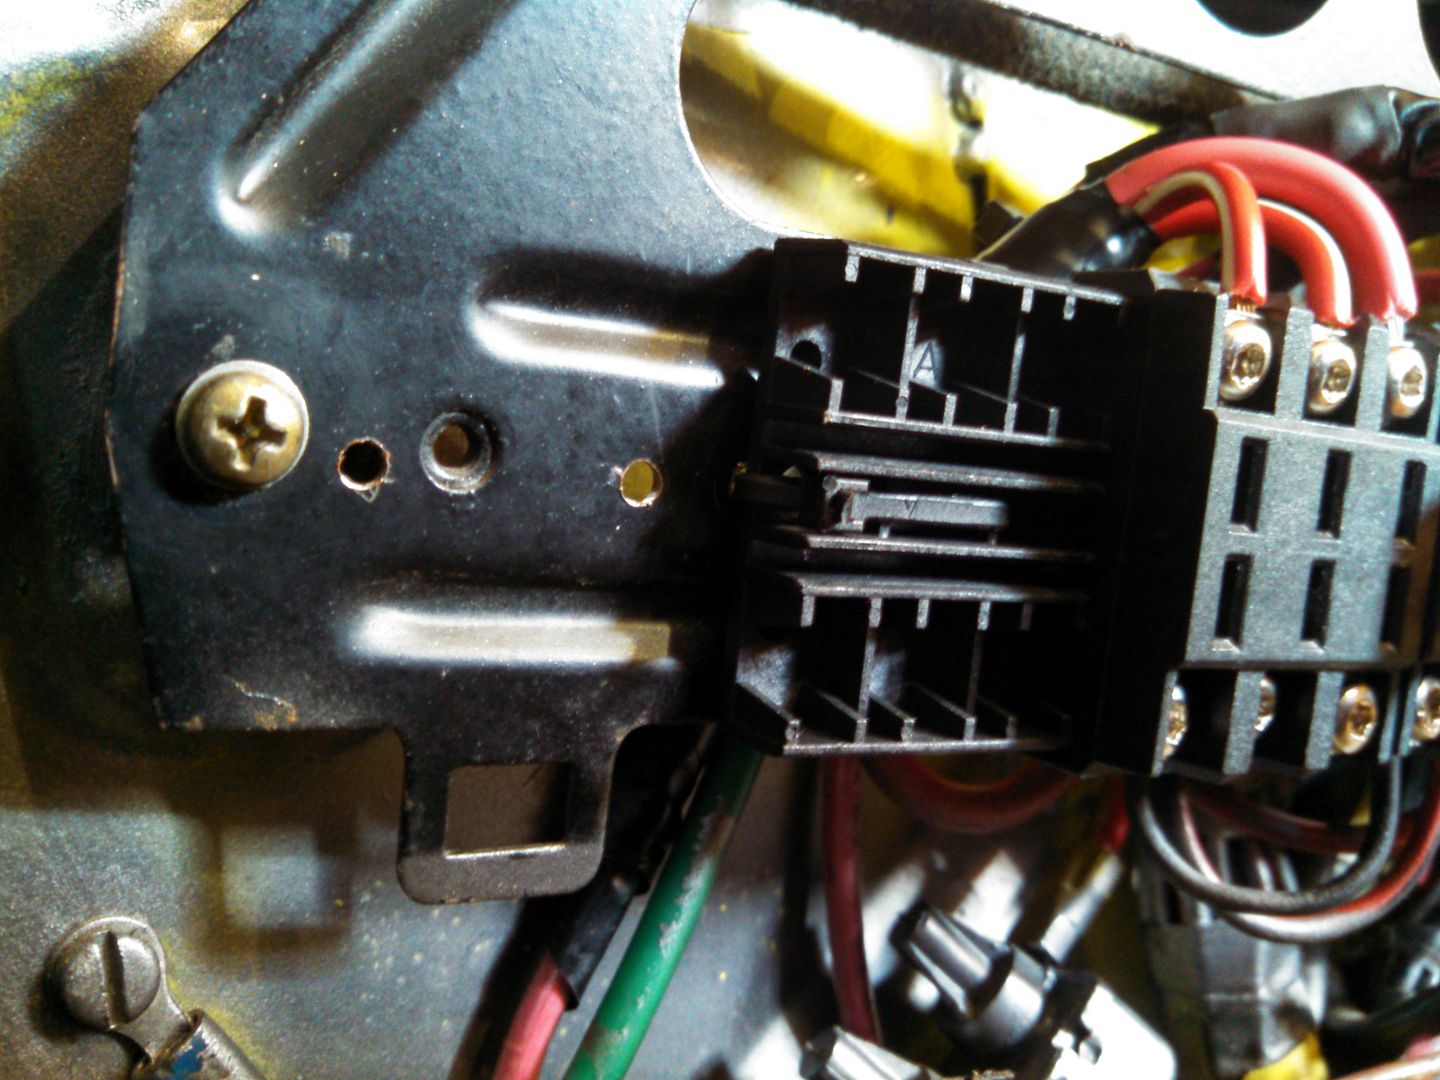 Had a correct color match/gauge match wire length on hand so it won't confuse the next guy: 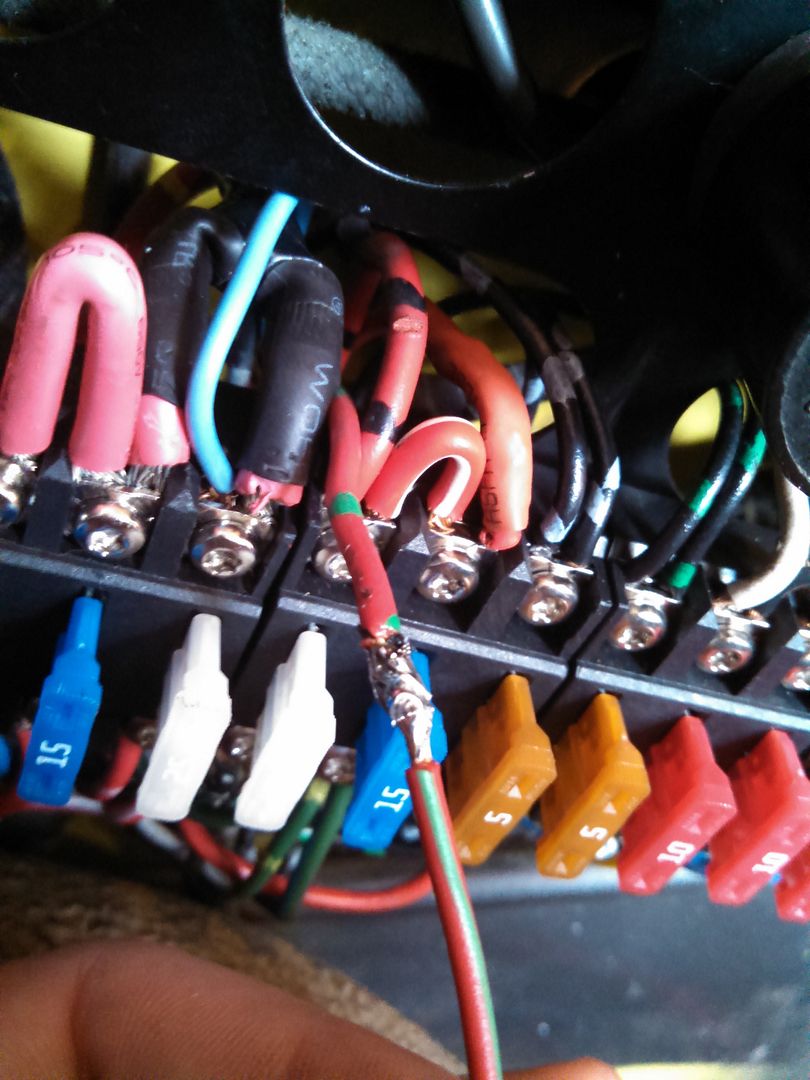 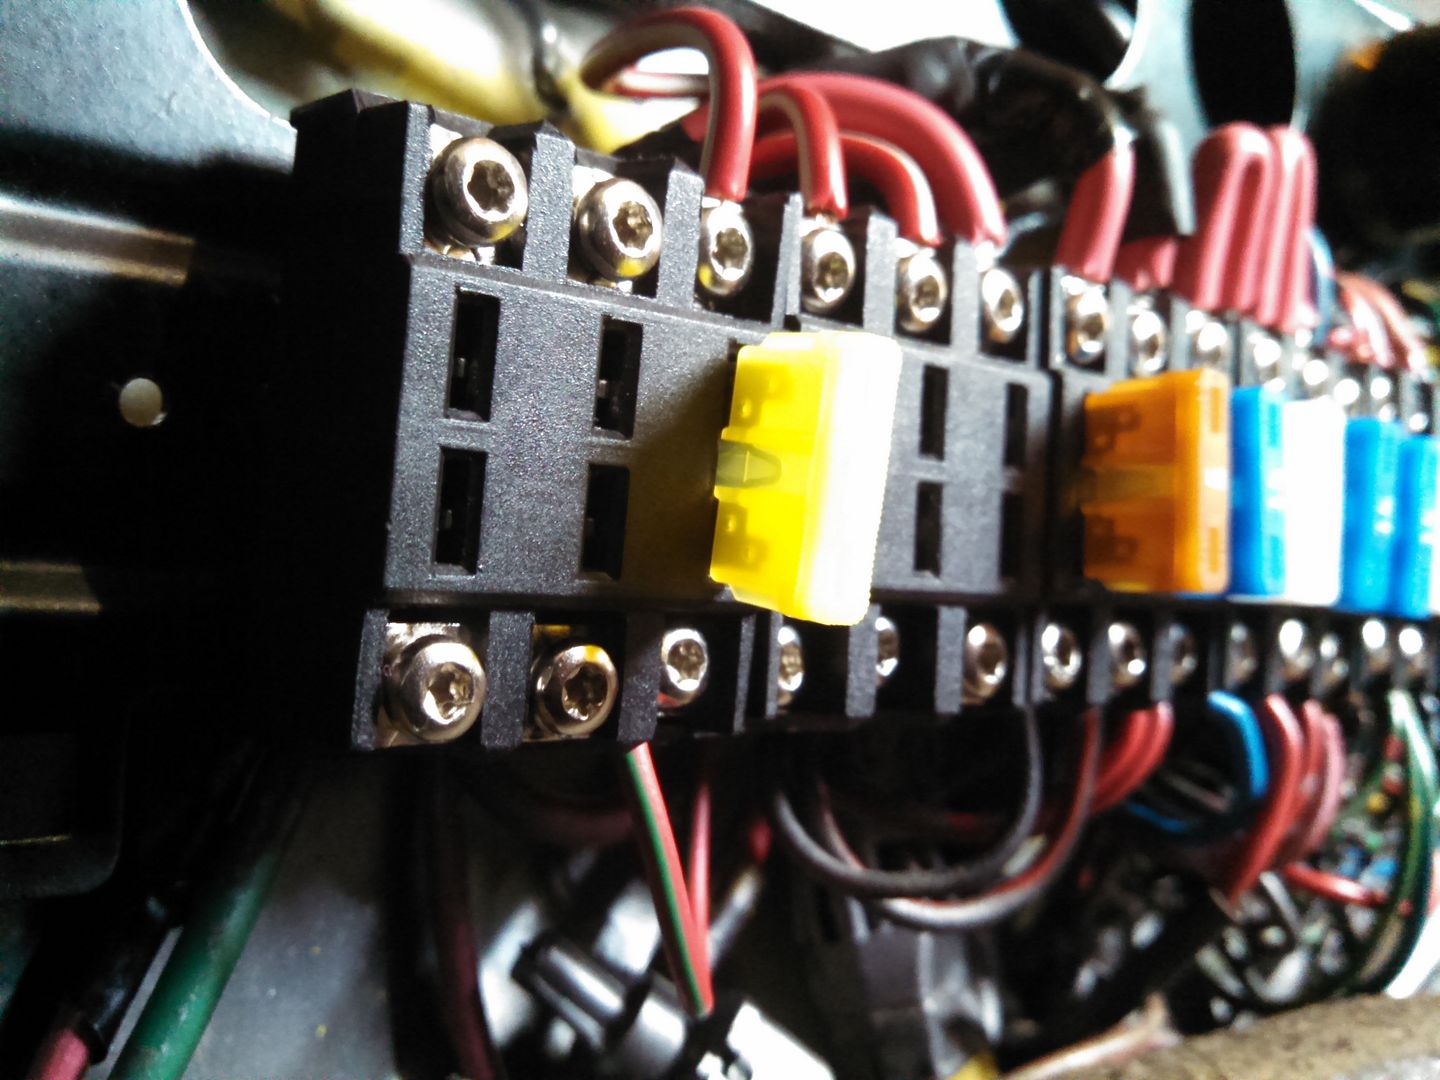 Cover fits in place perfectly: 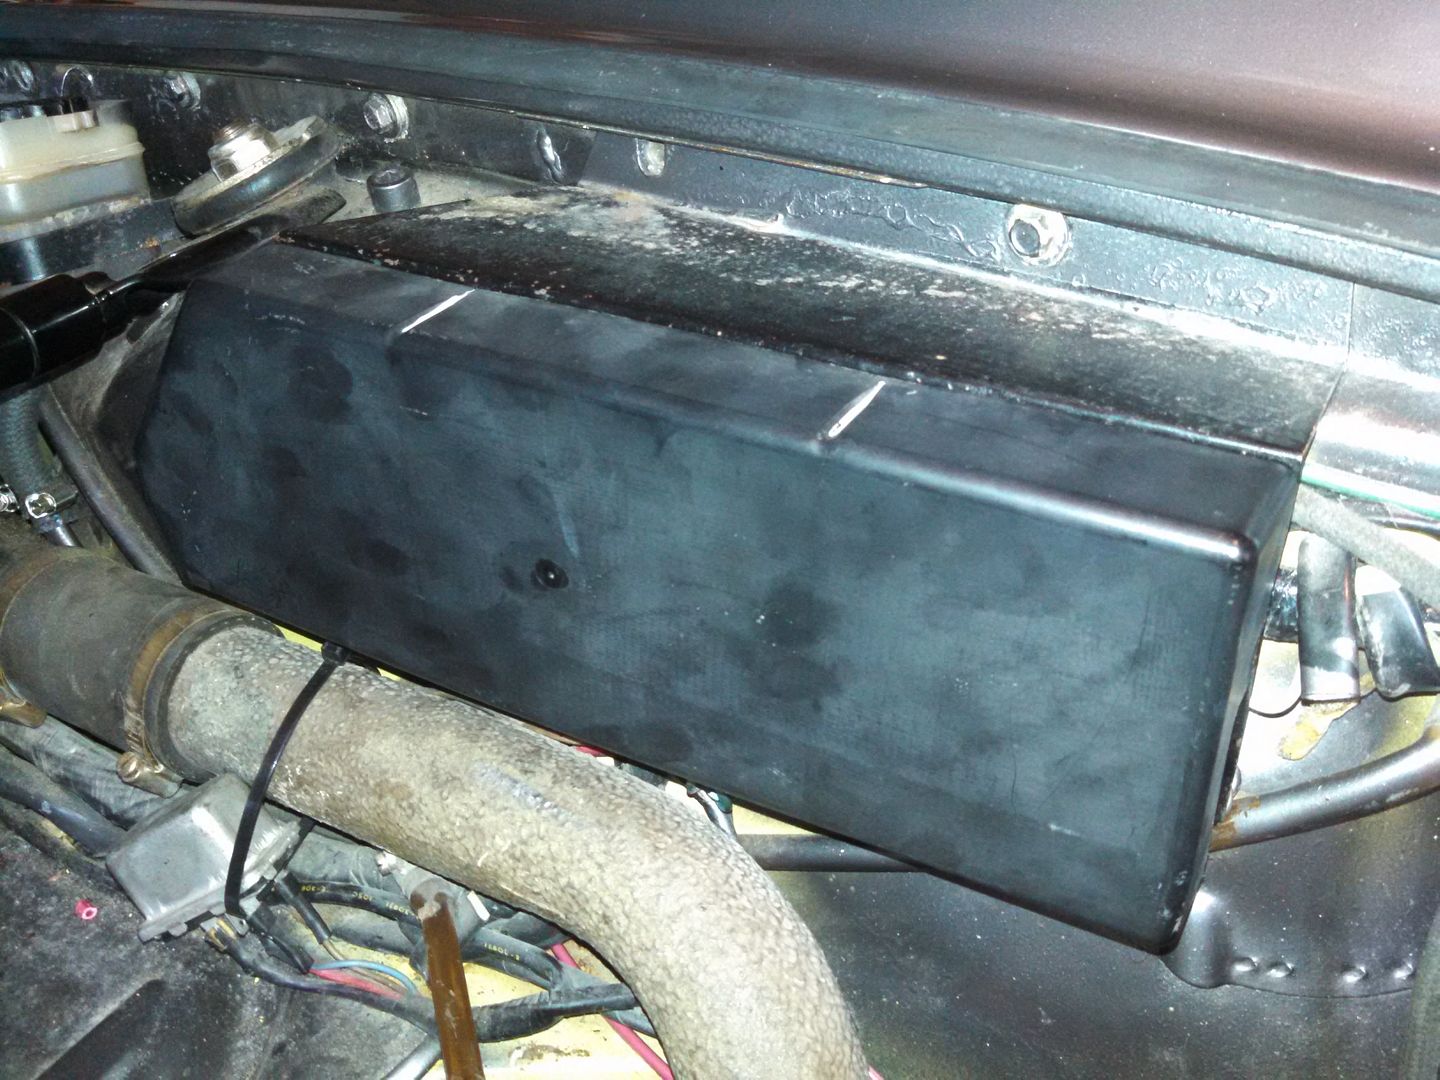
__________________
Of the value traps, the most widespread and pernicious is value rigidity. This is an inability to revalue what one sees because of commitment to previous values. In motorcycle maintenance, you MUST rediscover what you do as you go. Rigid values makes this impossible. ― Robert M. Pirsig, Zen and the Art of Motorcycle Maintenance: An Inquiry Into Values |
||
|
07-18-2015, 02:41 PM
|
|
|
Registered

Join Date: Jul 2013
Location: South East England
Posts: 1,708
|
Quote:
Careful. Remember that you need some 'headroom' in the current rating of the loom and fuse block to blow the fuse. I think the fattest Porsche wire (apart from starter/battery) is around 40 amps. E.g. A 40 amp fuse may not blow if in line with a 40amp wire. For the same reason, you should not fit 30A fuses in fuse holders rated 30A. |
||
|
07-18-2015, 03:31 PM
|
|


 P911
P911
 Gertrude (gone but still in the family)
 Jezzabel
 POJ
POJ Aria
Aria Ruby Tue
 Grumpy
 Truck named Sue
 Christ I hate this but it sure is handy
 911 Speedster
 1970 Porsche 914-6 (sold)
 1973 porsche 914-6 conversion (sold)
 1984 Porsche 911 Carrera Targa - sold
 GMC Motorhome

