|
|
|
|
|
| Author |
|
|
Straight shooter

|
Hi Johnny,
Exactly my concern and why these blocks aren't deployed as primaries off the battery. I'll add links there eventually but it's a different project, different scope.
__________________
Of the value traps, the most widespread and pernicious is value rigidity. This is an inability to revalue what one sees because of commitment to previous values. In motorcycle maintenance, you MUST rediscover what you do as you go. Rigid values makes this impossible. ― Robert M. Pirsig, Zen and the Art of Motorcycle Maintenance: An Inquiry Into Values |
||
 07-18-2015, 02:43 PM
|
|
|
Registered
|
My 70 has two parallel wires that run to the ignition key. I have each fused with 30amp and have had since 2008. Never had an issue.
__________________
Laurence 1998 Specbox racer / 1998 Boxster / 1984 RSR tribute 1970 911E Coupe / 1970 911E "speedster" / 1969 912 Targa 1963 356B T6 Coupe / 1962 356B T6 Cabriolet Current projects - 1955 356 pre-a Speedster / 1964 356C |
||
|
07-19-2015, 06:38 AM
|
|
|
Straight shooter
|
Interesting. 30amp on a 10ga; I think you could go higher with a proper block but sounds unnecessary.
5 mins to swap the rear block. Done: 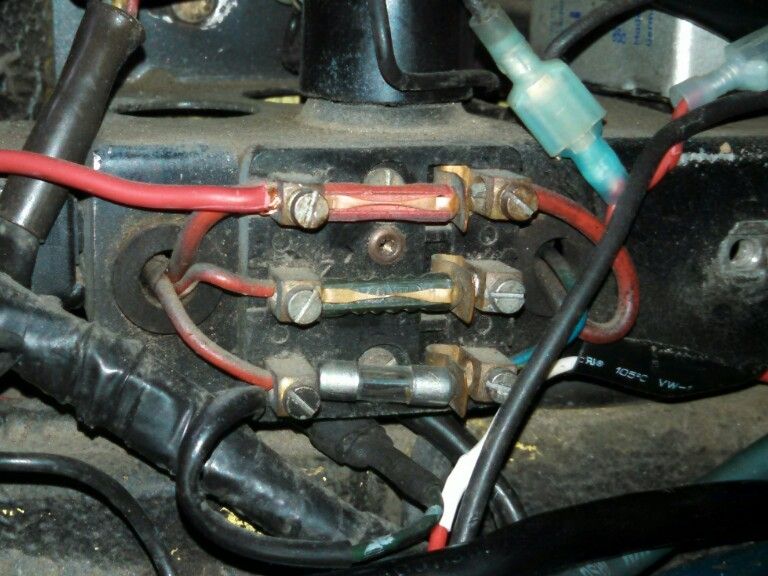 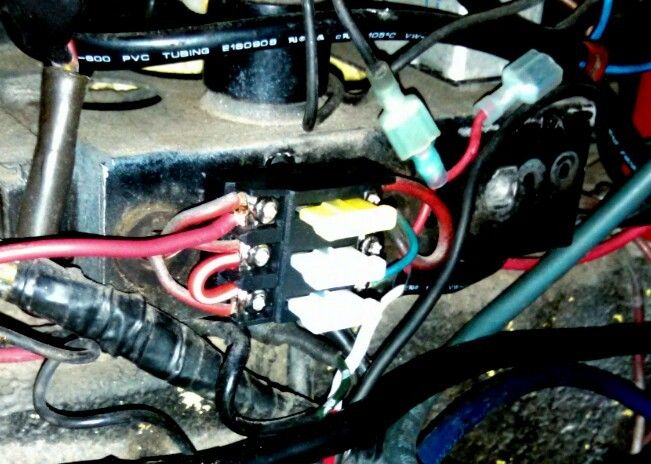
__________________
Of the value traps, the most widespread and pernicious is value rigidity. This is an inability to revalue what one sees because of commitment to previous values. In motorcycle maintenance, you MUST rediscover what you do as you go. Rigid values makes this impossible. ― Robert M. Pirsig, Zen and the Art of Motorcycle Maintenance: An Inquiry Into Values |
||
|
07-19-2015, 06:23 PM
|
|
|
Straight shooter
|
Drove the car around tonight and notice a couple things.
1) Power windows go up and down faster. 2) New hi-torque starter cranks over even faster... perhaps just cleaned the contact on the battery terminal when I added one more 10ga to the fuse panel. Things must have been a little resistance aged.
__________________
Of the value traps, the most widespread and pernicious is value rigidity. This is an inability to revalue what one sees because of commitment to previous values. In motorcycle maintenance, you MUST rediscover what you do as you go. Rigid values makes this impossible. ― Robert M. Pirsig, Zen and the Art of Motorcycle Maintenance: An Inquiry Into Values |
||
|
07-20-2015, 05:20 PM
|
|
|
Chain fence eating turbo
Join Date: Dec 2008
Location: Austin, TX
Posts: 9,142
|
Beautiful!
One of those projects IMO that is inevitable. |
||
|
07-20-2015, 06:11 PM
|
|
|
Straight shooter
|
Thanks - agreed, it is an upgrade that's low hanging fruit. If your wiring is in decent shape then the job is an afternoon of easy work.
__________________
Of the value traps, the most widespread and pernicious is value rigidity. This is an inability to revalue what one sees because of commitment to previous values. In motorcycle maintenance, you MUST rediscover what you do as you go. Rigid values makes this impossible. ― Robert M. Pirsig, Zen and the Art of Motorcycle Maintenance: An Inquiry Into Values |
||
|
07-24-2015, 02:57 PM
|
|

|
|
Registered

Join Date: Jul 2013
Location: South East England
Posts: 1,704
|
Just curious how you managed to bus the 42 amp fat feed wire to both adjacent terminals without having to put three heavy gauge wires in one terminal?
Although the solution is cost effective, the linking of the terminals is a real pain. We went to a tracked circuit board for this very reason. |
||
|
07-24-2015, 03:10 PM
|
|
|
Registered
|
Just curious, what is the combined load capacity for each of the 3 fuse blocks? If it is not 60 amps or so you might be overloading them.
__________________
FEC3 1980 911SC coupe "Zeus" 3.3SS god of thunder and lightning |
||
|
07-24-2015, 03:39 PM
|
|
|
Straight shooter
|
Quote:
Wire gangs and a second feed to the battery were part of my job pictured here. Why fuss with jumpers on the panel if you can gang and add wire as the harness terminates? I did use some jumpers where it would be a slight bit cleaner as you can see. 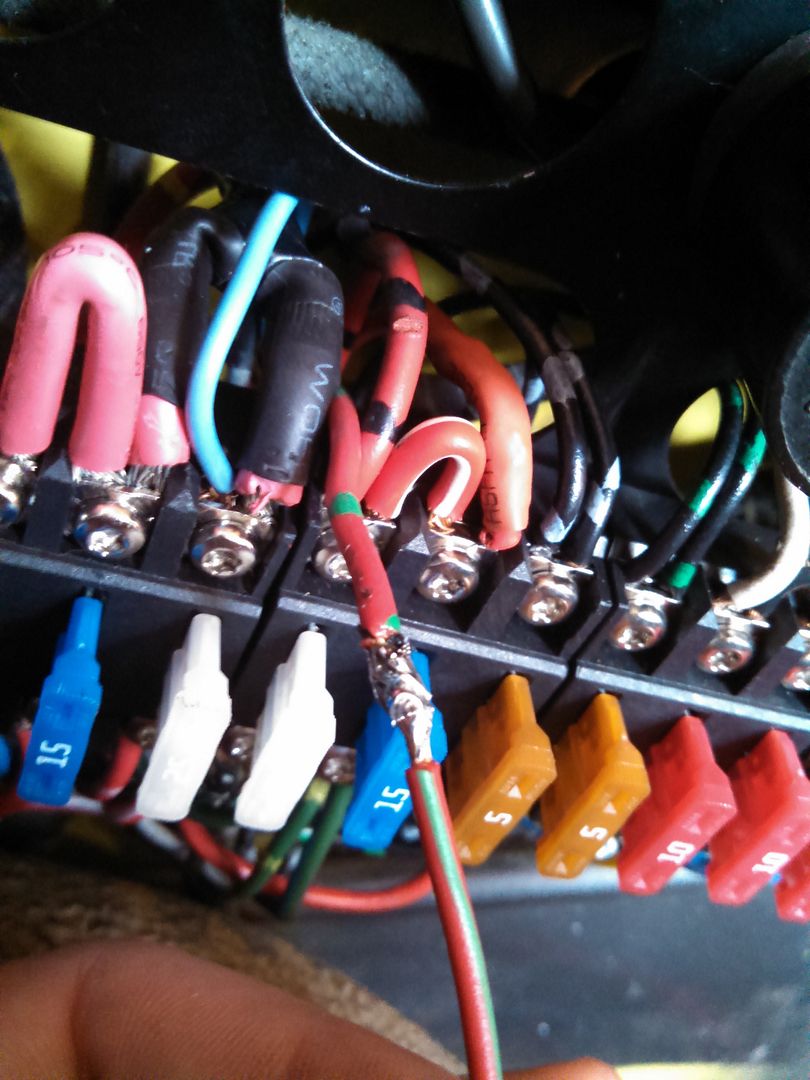 Example: 1 10ga wire feeds 4 fuse slots Why not gang and make the 1 10ga wire divided at the termination point to 4 10ga (or smaller gauge where appropriate) wires to feed the 4 slots? Materials required are only shrink tube, solder, spare wire. Concourse might not take to this approach but then again, concourse wouldn't be swapping fuse panels out either. Jonny - also want to state that your panel is also extremely well thought out and apparently very well engineered. I've been chewing through my toy budget each month with more than one summer car needing attention/repair so bargains are on the menu for awhile. I'm sure I'm not alone and wanted to share with those on a similar quest for the sensible over the sumptuous.
__________________
Of the value traps, the most widespread and pernicious is value rigidity. This is an inability to revalue what one sees because of commitment to previous values. In motorcycle maintenance, you MUST rediscover what you do as you go. Rigid values makes this impossible. ― Robert M. Pirsig, Zen and the Art of Motorcycle Maintenance: An Inquiry Into Values Last edited by Lapkritis; 07-24-2015 at 04:35 PM.. |
||
|
07-24-2015, 03:55 PM
|
|
|
Straight shooter
|
Quote:
Love your panel solution - a tad more elegant than this DIY approach. To answer your question, 90A per 3 fuse panel must be the total as each individual circuit is diverse and rated at 30A max: "Specications: Rating: 30A max per circuit Recommended wire size: up to 10 gauge Termination torque: 14 in lbs. Materials: Fuse panel housing-thermoplastic Screw and pressure plate-nickel plated steel Terminals-nickel plated 110 copper"
__________________
Of the value traps, the most widespread and pernicious is value rigidity. This is an inability to revalue what one sees because of commitment to previous values. In motorcycle maintenance, you MUST rediscover what you do as you go. Rigid values makes this impossible. ― Robert M. Pirsig, Zen and the Art of Motorcycle Maintenance: An Inquiry Into Values |
||
|
07-24-2015, 04:00 PM
|
|
|
Registered
Join Date: Jul 2013
Location: South East England
Posts: 1,704
|
Lapkritis,
I just wanted to bring it to folks attention that if you go down this route, the factory harness has to be cut and in some cases extra wire tails added to split the feed wires. You make the project sound very easy but that assumes people have a good understanding of electrics, wire ratings and such. It also requires lots of patience, note making and attention to detail. Soldering a harness in situ with the annoyingly short Porsche wires isn't easy either. For those reason I think describing this job as 'low hanging fruit' is trivialising it somewhat! I would say allow a whole weekend and be prepared to encounter foreign wires, PO modifications and other oddities. Even with our 'plug and play' panel, we still get plenty of calls for help. |
||
|
07-24-2015, 11:21 PM
|
|
|
Registered
|
Quote:
__________________
FEC3 1980 911SC coupe "Zeus" 3.3SS god of thunder and lightning |
||
|
07-25-2015, 02:06 AM
|
|

|
|
Straight shooter
|
Quote:
So with the harness uncut, I or anyone who has the skills to do the work could return this to OEM again by removing any wire gangs, and just adding shrink tube insulator where skinned for job. Rather than tossing my OEM fuse blocks, they went right in the bins that hold the CIS system that was removed for PMO carbs 24 years ago etc. The car is too far into hotrod to justify going back to OEM but previous owners and I have kept all parts thus far removed except for the steel removed for flares. Maybe someday, someone will think that to be a worthwhile endeavor. I do appreciate the trivialising comment - you're probably spot on as I didn't go into the finest details. I expect nearly each car to be different and didn't think it would be useful to go into what my car needed. Aftermarket alarms, stereos, fog lights, cb radios, neon underglow, and more are likely to be wired in on someone's 911. Questions are bound to pop up during the job but fortunately we have the forum resource to assist each other such as the case with adding a fused link for the fuel pump popped up here. I think what might help with expectations of the job is assigning it a scale rating. On a scale of 1 to 5 with 1 being easiest chassis electrical job (swapping bulb in interior light) and 5 being most difficult (rewiring entire chassis/harness r&r), I would give this a 2. Tools/materials to have on hand before starting: 1) Photographs of your existing panels with an inventoried list of wire colors in each position. 2) Labels/white masking tape and permanent marker for labeling wires with position as you disconnect the OEM panel. 3) Soldering iron of at least 30watts. 4) Rosin core solder. 5) Shrink tube of various sizes. 6) Electrical tape 7) Heat shrink ring terminals for 10ga wire if you plan to add an additional feed to the panel. 8) Drill with 1/8" bit. 9) Torx bit for terminal screws. 10) Plastic cable straps/zip ties(smaller size). The job itself is not a comfortable position to be working in. You'll be hunched over the fender or awkwardly in the frunk like a hen keeping her spare tire egg warm. Not every job is comfortable or easiest. It should be apparent to anyone that swapping a fuse panel in the front of a 911 is going to have inherent organizational skill requirements. If you don't label wires and expect to not need jumpers/gangs added then you're in for a rude awakening.
__________________
Of the value traps, the most widespread and pernicious is value rigidity. This is an inability to revalue what one sees because of commitment to previous values. In motorcycle maintenance, you MUST rediscover what you do as you go. Rigid values makes this impossible. ― Robert M. Pirsig, Zen and the Art of Motorcycle Maintenance: An Inquiry Into Values |
||
|
07-25-2015, 04:59 AM
|
|
|
Registered
Join Date: Jul 2013
Location: South East England
Posts: 1,704
|
^ Spot on, especially the bit about the working position!
[p.s. All original Porsche wires have ferrules crimped on the end which is why I assumed you'd cut them but of course it could have been a PO who did that] |
||
|
07-25-2015, 08:07 AM
|
|
|
Registered
|
Well said..............
Quote:
__________________
FEC3 1980 911SC coupe "Zeus" 3.3SS god of thunder and lightning |
||
|
07-25-2015, 09:07 AM
|
|
|
Straight shooter
|
I imagine someday, a young buck will be working on this 911 cursing me as a PO.
 I had thoughts about mitigating contact corrosion. A quick wipe of dielectric grease on the naked strands before assembly under the screw would to the trick.
__________________
Of the value traps, the most widespread and pernicious is value rigidity. This is an inability to revalue what one sees because of commitment to previous values. In motorcycle maintenance, you MUST rediscover what you do as you go. Rigid values makes this impossible. ― Robert M. Pirsig, Zen and the Art of Motorcycle Maintenance: An Inquiry Into Values |
||
|
07-25-2015, 06:07 PM
|
|
|
Straight shooter
|
Quote:
__________________
Of the value traps, the most widespread and pernicious is value rigidity. This is an inability to revalue what one sees because of commitment to previous values. In motorcycle maintenance, you MUST rediscover what you do as you go. Rigid values makes this impossible. ― Robert M. Pirsig, Zen and the Art of Motorcycle Maintenance: An Inquiry Into Values |
||
|
07-25-2015, 06:13 PM
|
|
|
Registered
|
Both my 69 and my 70 had no ferrules on the wire ends either.
__________________
Laurence 1998 Specbox racer / 1998 Boxster / 1984 RSR tribute 1970 911E Coupe / 1970 911E "speedster" / 1969 912 Targa 1963 356B T6 Coupe / 1962 356B T6 Cabriolet Current projects - 1955 356 pre-a Speedster / 1964 356C |
||
|
07-25-2015, 08:22 PM
|
|
|
DCR Rides
|
When I replaced my fuseblock all of the wires had ferrules on them. I only had to remove one when I had to cut back on the fuel pump feed wire that was cooked.
The ferrules are of a size on some of the larger wires that may be very difficult to fit under the new fuseblock terminals.
__________________
87 930 turbo coupe 3.3L , 4Spd 930 Trans w/LSD , mostly stock for now |
||
|
07-25-2015, 10:16 PM
|
|
|
Registered
Join Date: Jul 2013
Location: South East England
Posts: 1,704
|
Perhaps the ferrules were introduced in the mid seventies then? Pretty sure they were on a 1975 we supplied a panel for recently.
The ferrules on the larger wire feeds may have to be removed if you're going to use the Chief blocks. |
||
|
07-25-2015, 11:37 PM
|
|


 P911
P911
 Gertrude (gone but still in the family)
 Jezzabel
 POJ
POJ Aria
Aria Ruby Tue
 Grumpy
 Truck named Sue
 Christ I hate this but it sure is handy
 911 Speedster
 Zeus (god of thunder and lightning)
 MDR930
