|
|
|
|
|
| Author |
|
|
Registered
Join Date: Jul 2005
Location: Atlanta
Posts: 1,241
|
Quote:
__________________
No physical quantity completely explains its own existence |
||
 08-13-2018, 11:16 AM
|
|
|
Registered
Join Date: Jul 2001
Location: mt. vernon Wa. USA
Posts: 8,740
|
popping
Quote:
I typically proceed as follows: 1. get the idle dialed in at 12.5-13 ish at 1000-1200 RPMs....the ITBs like it in this range, but your results may vary. 2. while stationary, in neutral (no load on the engine), press on the accel pedal at a slow rate from idle to 2500-3000 rpm. log and/or watch the VE table while doing this and observe the path the accel takes thru the VE table cells and note if you are going lean or rich (try to keep it within 12-13.5 or so for now by adjusting the numbers in the cells.) Repeat this with medium fast accel and then with fast accel. mod the VE table until these are smooth. 3. Add load by driving a short distance (I use my driveway) and logging....do the same thing and mod the VE cells to try to keep in the 12-13.5 AFR range and get it smooth...repeat for medium accel and fast accel.....get these dialed in and smooth 4. hit the road and take it up to 5000rpm or so in all gears (while logging). try some regular driveing...taking off from stop signs and also some cruising at 2500, 3000 RPMs and some runs up to 5000rpm....review log and revise as required 5. repeat number 4, but increase the RPM to 6000 or so. 6. Get all that dialed in as smooth as you can and then start playing with VE table to optimize AFRs and smooth the transitions from cell to cell and then move on to the AE. regards, al
__________________
[B]Current projects: 69-911.5, Previous:73 911X (off to SanFrancisco/racing in Germany).77 911S (NY), 71E (France/Corsica), 66-912 ( France), 1970 914X (Wisconsin) 76 911S roller..off to Florida/Germany RGruppe #669 http://www.x-faktory.com/ |
||
|
08-13-2018, 11:19 AM
|
|
|
Registered
|
Quote:
The engine is now running quite well. Idle is 1100 and I'm starting to slowly smooth out the VE table. However, I've run into a problem: Since I'm using Tony's EFI kit (Bitzracing), I apparently have v1.01 of the MS1 code. It seems, that this does not have the Accel Enrichment Wizard code and does not have MAPdot threshold - only TPS. This basically means that I cannot tune accel enrichment? Or can I try to manually set Accelleration Enrichment Bins (pic below)  also: the TPSdot seems a little high (MS recommends 1.2) and the Accel time is very low (again MS recommends 1.0s)? I do have a MS2 on the shelf. Can I just switch to that and go from there? |
||
|
08-15-2018, 06:17 AM
|
|
|
Registered
Join Date: Jul 2018
Location: Lutz, FL
Posts: 237
|
subscribed! Contemplating doing the same to my 87.
__________________
Current Cars: 87 Carrera RS/IROC Tribute, 92 12V Jetta GLI, 07 Ford Explorer, 91 Miata track car Previous Cars: 00 Carrera, 01 996tt, 07 997tt, APR tuned 12 Beetle Instagram: @pdklol |
||
|
08-15-2018, 09:21 AM
|
|
|
Registered
|
I could ofcourse also upgrade firmware from the base code to MS1 extra - and loose the 'reverse fuelpump logic' that Tony built in. But does that really matter?
|
||
|
08-15-2018, 09:31 AM
|
|
|
Registered
Join Date: Jul 2001
Location: mt. vernon Wa. USA
Posts: 8,740
|
Accel enrichment
Quote:
https://www.diyautotune.com/support/tech/other/accel-enrichment/ regards, al
__________________
[B]Current projects: 69-911.5, Previous:73 911X (off to SanFrancisco/racing in Germany).77 911S (NY), 71E (France/Corsica), 66-912 ( France), 1970 914X (Wisconsin) 76 911S roller..off to Florida/Germany RGruppe #669 http://www.x-faktory.com/ |
||
|
08-19-2018, 08:30 AM
|
|

|
|
Registered
|
I'm using MAP for now - but will be changing to MS2 and TPS and adding ignition as well this winter.
One thing I've been battling with is the throttle linkage. It simply does not pull equal on both sides, which means that the engine response is not too good and tuning difficult below 2-3000 rpm. Above that it is very smooth and pulls hard. I can verify by Air flow that the flow is different from left to right bank at 1000-2500rpms It's been trial and error until now and I'm on the right track - but maybe some of you guys have a trick or two? |
||
|
08-21-2018, 10:52 PM
|
|
|
Registered
Join Date: Apr 2003
Location: Houston
Posts: 567
|
Ill work on updating the linkage adjustment guide with more details.
Balancing the left and right side is relatively easy to achieve after some steps and adjustments. There are many variables in the stock linkage from the pedal to the bell crank on the engine that affect the starting point of the ITB linkage and how far itll open up, but this too can be adjusted correctly with a few tricks. Ill try to work on updating the guide this weekend |
||
|
08-22-2018, 02:57 AM
|
|
|
Registered
Join Date: Jul 2005
Location: Atlanta
Posts: 1,241
|
Quote:
Great kit, love mine. I actually fabricated a morse cable arrangement from pedal to the engine for two reasons. Due to the rod from the engine to the trans bell crank, this linkage always leaves a bit of play from dead which made me crazy. Second reason is I could never get 100% throttle opening with the Triumph setup. The Morse cable set required I fabricate a couple brackets off the transaxle so the cable has a straight shot to the engine bellcrank, same at the pedal, but once that tricky bit was worked out it works great and there is zero dead pedal play, very solid. If I could add a couple suggestions to the linkage kit itself: 1) The rods connecting the two banks to the center swivel should be converted to a turnbuckle type with opposite threads on one end. This will make balancing the two sides infinitely easier as the rods won't have to be removed and turned umpteen times. Ferrari's 308 set for carbs does this and it's actually a very simple process getting the carbs sync'd. 2) the center swivel has a noticeable bit of play between the upright rod on which it swivels and the mounting hole on the piece itself. This bit of play makes just off idle running a bit ambiguous
__________________
No physical quantity completely explains its own existence Last edited by lvporschepilot; 08-22-2018 at 05:14 AM.. |
||
|
08-22-2018, 04:05 AM
|
|
|
Registered
|
Quote:
And I agree on both your points. Did you convert the connecting rods to turnbuckle type? And do you have pics? |
||
|
08-22-2018, 04:21 AM
|
|
|
Registered
Join Date: Jul 2005
Location: Atlanta
Posts: 1,241
|
Quote:
Below is the first iteration of the bracket I cobbled together just to get things working. Once the final iteration is fabricated I'll post maybe a 'how to' as all I am using is a standard 7' morse cable readily available for $25. The stock ball/socket hardware is standard and bolts right up as well. The final bracket will bolt to two studs on the diff plate. I do not have a pic at the front end! Will snap how I did that and report back 
__________________
No physical quantity completely explains its own existence |
||
|
08-22-2018, 05:25 AM
|
|
|
Registered

Join Date: Sep 1999
Posts: 944
|
Here is a setup supplied by Al for a friend of mine. An ex-factory trained wrench is putting it together for him. Engine is 3.0 with mild porting and "cams".
All wiring is hidden. Same gent also used to build custom motorcycles back in the heyday of all things Harley Davidson. He strives for a sanitary look in all things. 
__________________
R Gruppe #111 Early S Registry #235 res ipsa loquitur |
||
|
08-22-2018, 07:58 AM
|
|
|
New-ish 911SC Targa Owner

|
Ill say its hidden. Its completely missing judging from the coils and injectors! LOL
I've managed to put almost 4500 miles on my Triumph ITB/AEM Infinity setup since completing it maybe about 13 months ago! Still provides huge grins every single time.
__________________
'83 Targa 300k w/ freshened 3.0 with 930/52 case# 6770540 ARP and Raceware hardware - AEM Infinity 506, Triumph T595 ITBs, B&B headers, Dynomax muff, Fidanza FW, Alum PP-203whp |
||
|
08-22-2018, 12:10 PM
|
|
|
Registered
Join Date: Sep 1999
Posts: 944
|
Quote:

__________________
R Gruppe #111 Early S Registry #235 res ipsa loquitur |
||
|
08-22-2018, 01:04 PM
|
|
|
scumbag
|
Quote:

__________________
My first Porsche - http://forums.pelicanparts.com/porsche-911-technical-forum/989493-my-low-budget-dream-car-build.html AchtungKraft #009 - IG: @doktor_b |
||
|
08-23-2018, 04:25 AM
|
|
|
Registered
Join Date: Jul 2005
Location: Atlanta
Posts: 1,241
|
Quote:
__________________
No physical quantity completely explains its own existence |
||
|
08-23-2018, 06:26 AM
|
|
|
Registered
Join Date: Sep 1999
Posts: 944
|
Quote:
Thanks.
__________________
R Gruppe #111 Early S Registry #235 res ipsa loquitur |
||
|
08-23-2018, 09:34 AM
|
|
|
Registered
Join Date: Sep 1999
Posts: 944
|
Mascot of the deceased cousin found in the shroud during take down.

__________________
R Gruppe #111 Early S Registry #235 res ipsa loquitur Last edited by sithot; 08-23-2018 at 09:44 AM.. |
||
|
08-23-2018, 09:42 AM
|
|
|
Registered
Join Date: Apr 2003
Location: Houston
Posts: 567
|
I worked on the linkage adjustment DIY this weekend, but before I get into that, I want to clarify a few items.
My goal with the linkage kit, vacuum kit, manifold kit, etc. was to offer the most cost effective setup for the DIY crowd. I understand that the center pivot would be better with a ball bearing pressed in and that the linkage rods would be better with turnbuckle type rods with opposite threads on one end, however these items add cost to the kit and are not 100% necessary to operate. There are several things that could be changed to make the setup "better" but the the cost does not necessarily match the change in performance. I've updated the linkage adjustment DIY with the following: Adjustment & Balancing: A carburetor synchrometer, available from Pelican or Amazon (Part #: PEL-PMO-STE-BK), is used to measure the kg/h at each cylinder. 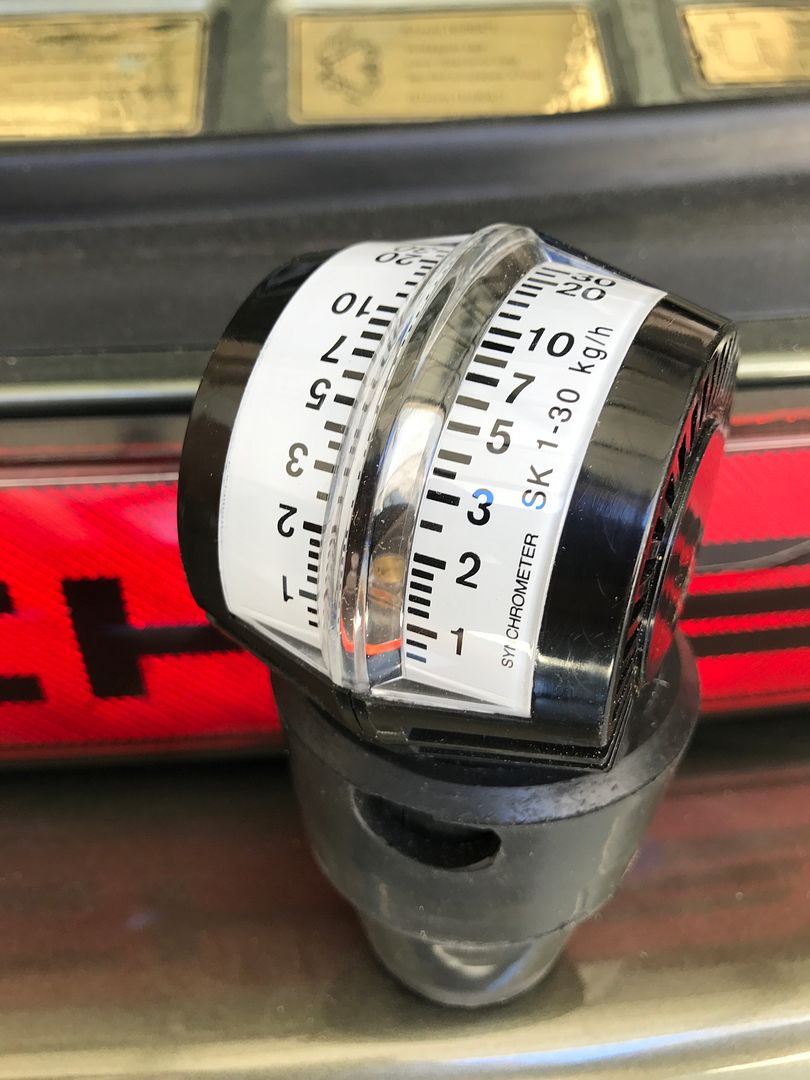 First, the 3 linkage rods must be left loose at the center pivot 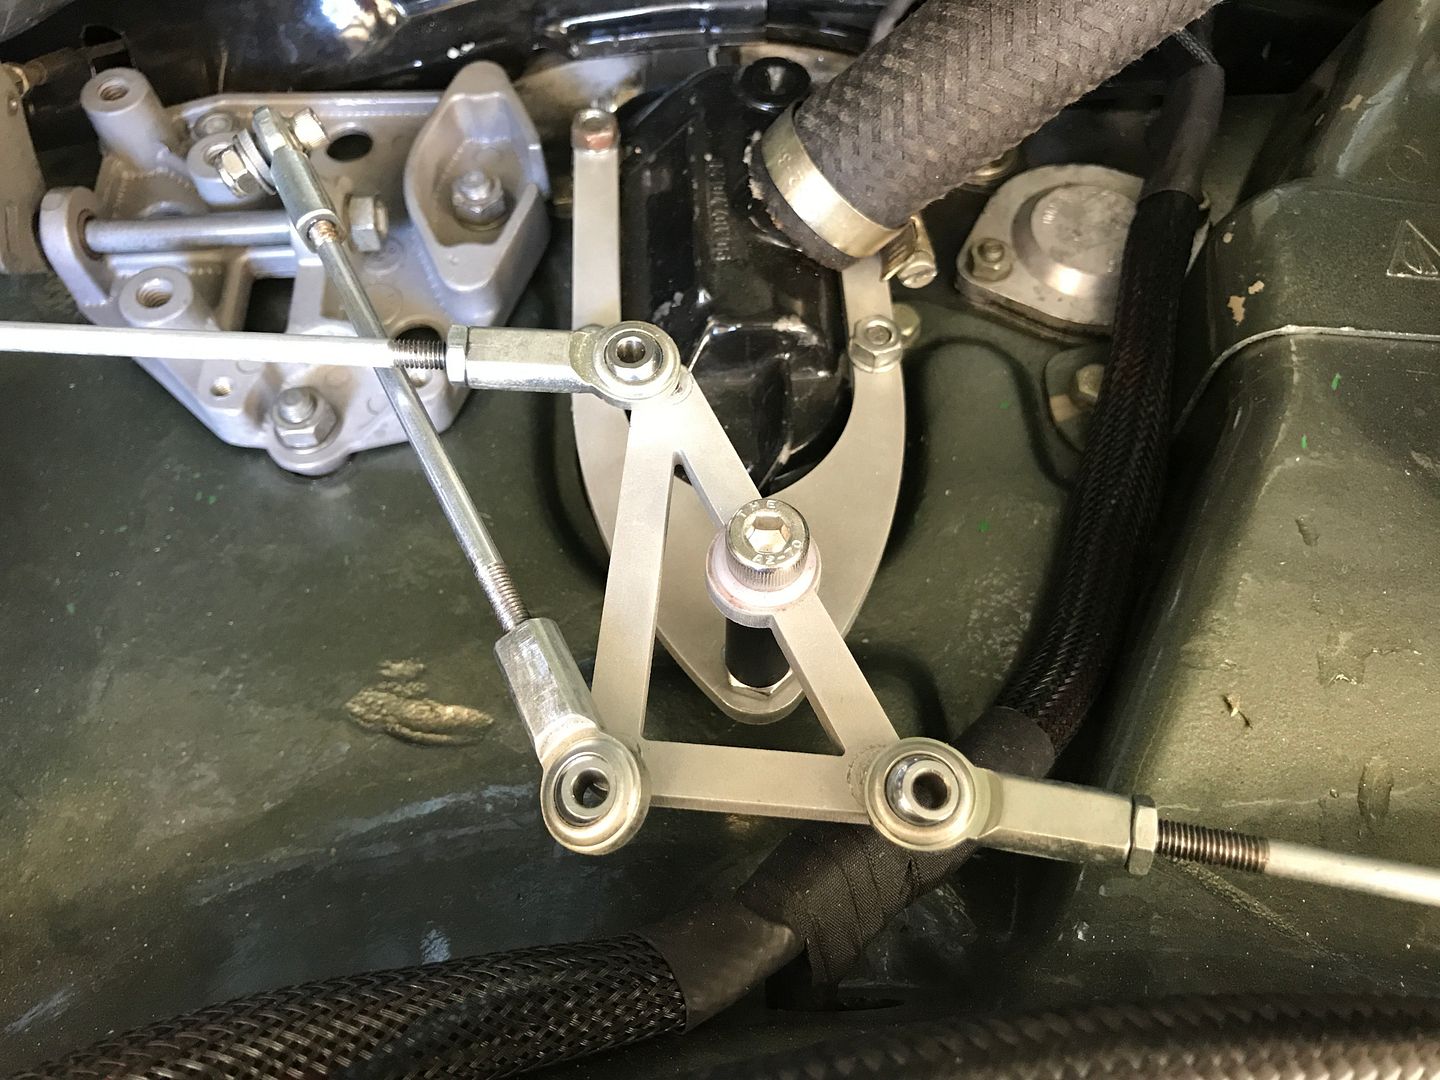 With the car running, likely roughly, start at cylinders #1 and #6. They are adjusted with the throttle stop adjustment screw. This is a 2.5mm allen head. Turn the screw in and out to get an kg/h reading of about 5-6 which should set the idle around 900-1000 rpm.   Once both idle stops are adjusted evenly, the engine should be running much smoother. Next up is to balance each bank, starting at cylinder #2 on the driver's side Using a phillips screw driver, turn in and out the adjustment screw between the first and second throttle body until the kg/h reading is as close as possible to cylinder #1. Check the readings between #1 & #2 as adjustments are made.  Then move to cylinder #3, turn the adjustment screw between the second and third throttle body to match the readings of #1 & #2. This one will likely be the furthest off as removing and replacing the linkage arm and spring throws this off. Check the readings between #1, #2 & #3 as adjustments are made.  Once the drivers side bank is complete, everything on that side should be very close to being even. Then repeat the process on the passenger side starting with #5. The adjustment screw is located between #6 & #5.  Lastly, adjust the screw between #4 & #5 to set the kg/h on cylinder #4.  Once each bank is balanced both to each other (1-3 and 4-6) and to the opposing bank (drivers vs passenger) the idle set screws can be adjusted to set the idle. The banks should be balanced, so you should not have to adjust the phillips screws, just the 2.5mm allen for the idle stop. Once the idle is set and everything is balance, the linkage rods can be connected. The length of the two rods should be as even as possible at approximately 9" eyelet to eyelet when the center pivot is parallel to the center-line of the car. Adjust by spinning the eyelet on the end when it's loose to the proper length.  Install the 2 ITB linkage rod bolts. There should be no change in idle with these connected, there should be a little play before the throttle is engaged. 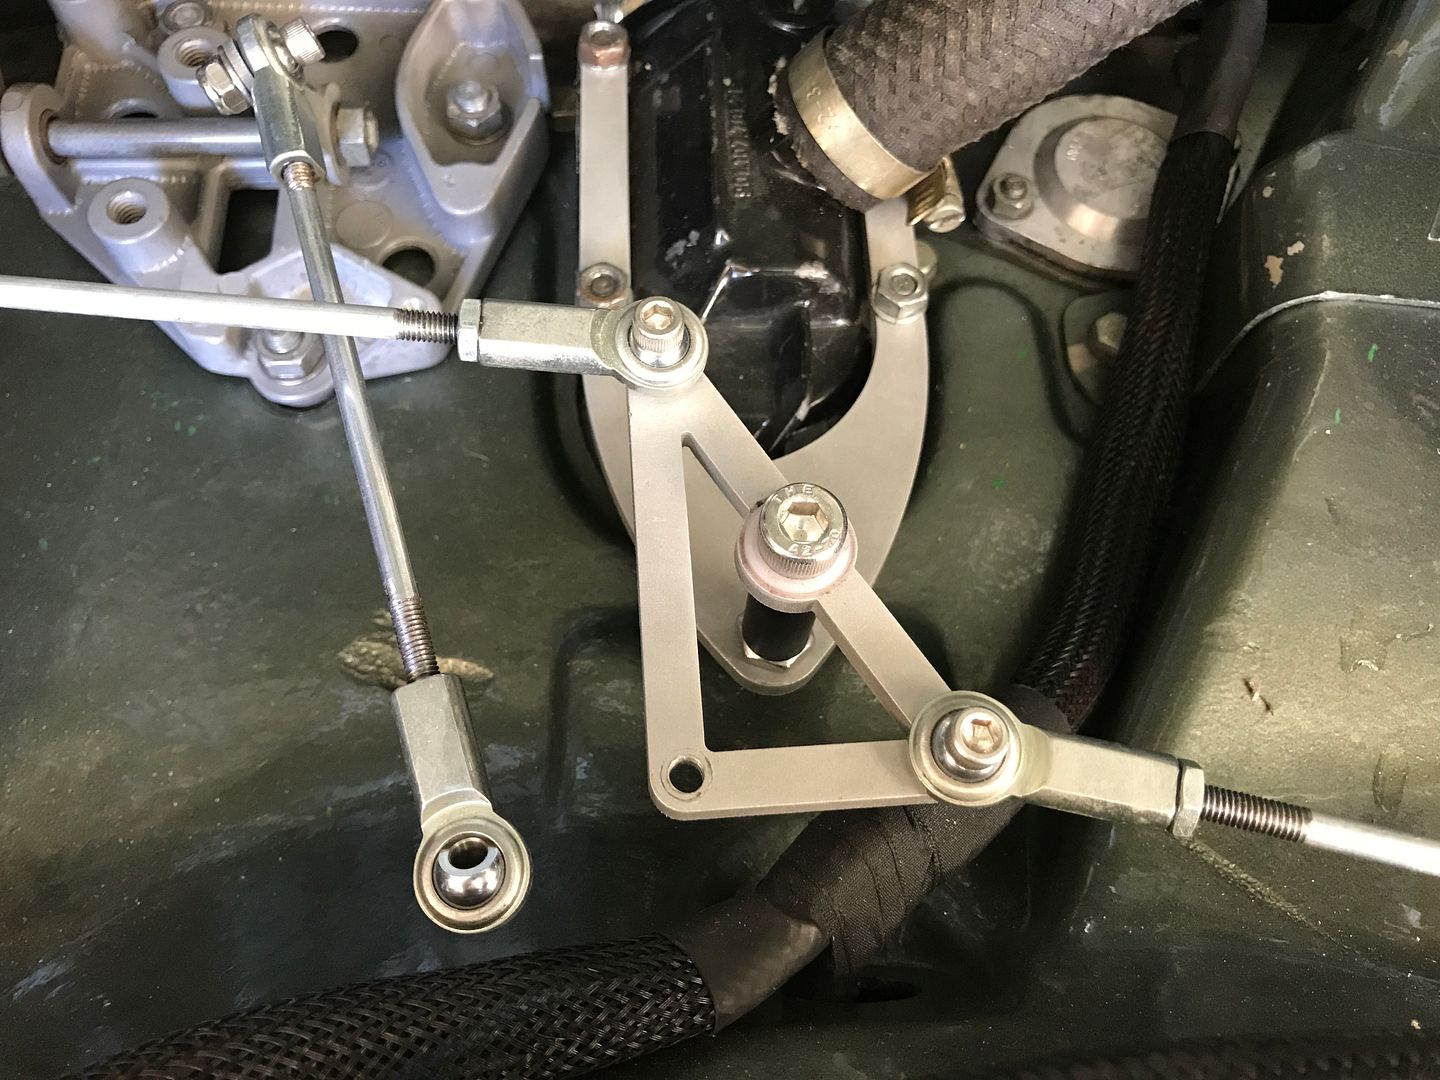
|
||
|
08-28-2018, 04:55 AM
|
|
|
Registered
Join Date: Apr 2003
Location: Houston
Posts: 567
|
With both linkage rods and bolts installed, the center pivot should twist freely by hand, both ITBs should open freely and complete, and then close completely and freely upon release. If this does not happen, it's likely due to the ITBs binding. The fix is to slightly loosen all the manifold nuts and bracket bolts, then open & close the ITBs a few times to relieve the binding, then re-secure the nuts and bolts.
 If they haven't been installed already, the linkage rods can be bolted to the ITB arms. 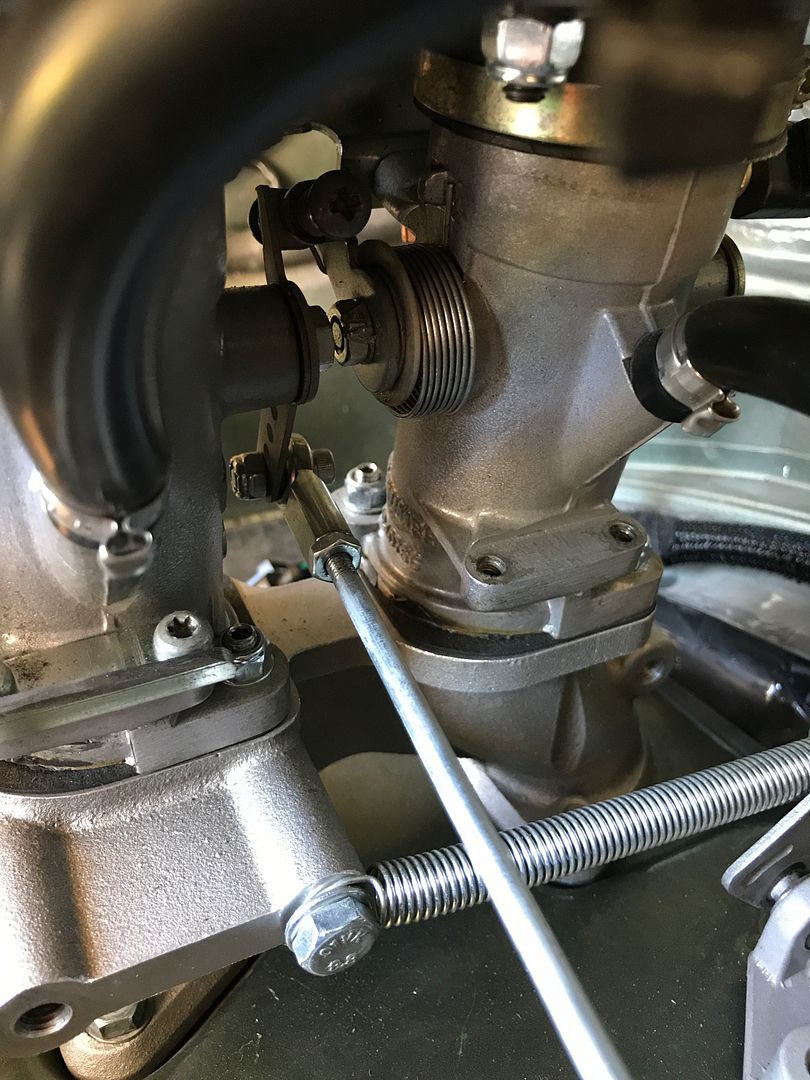 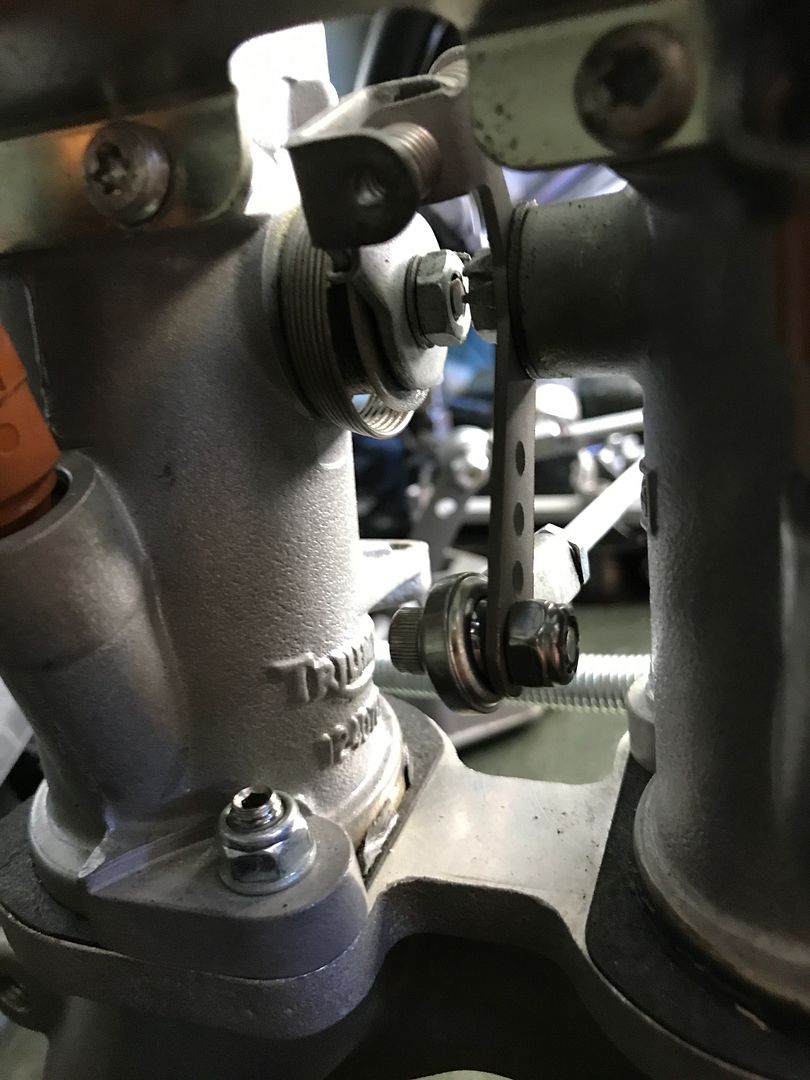 The ITB arm on the passenger side may need to be twisted slightly to achieve the correct linkage rod angle. 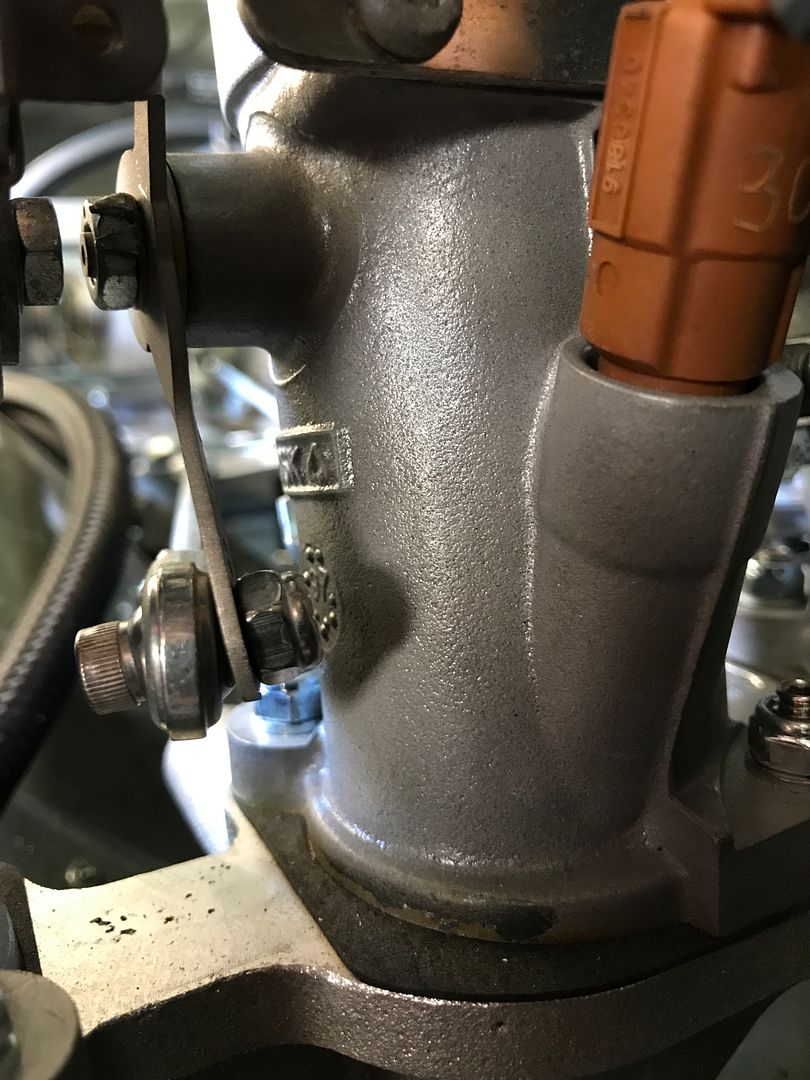 Last up is the bellcrank linkage rod. This should be approximately 6" eyelet to eyelet. The washer should go between the linkage eye and the center pivot to provide additional clearance.  Similar to the ITB linage rods, this one should have a very little amount of play and the throttle/idle should not be affected when adjusting the length. It should be just loose enough to not engage the throttle. All idle adjustment should be made by the throttle stop screws and not the linkage rods. This arm also needs to be twisted slightly to achieve the correct linkage rod angle. A spring can be used to help keep the 911 bellcrank in the up position during installation.   The short linkage rod length should be adjusted to allow the ITBs to fully open when the center pivot is opened completely. If you cannot get this adjustment, you may need to adjust the stock throttle linkage at the pedal or transmission to gain further adjustment.   
|
||
|
08-28-2018, 05:08 AM
|
|


 Jeanine
 1979 Porsche ROW 911 SC
