|
|
|
|
|
| Author |
|
|
Kartoffelkopf

|
Quote:
So...as you've probably read, just over a year ago I had the justification I needed, and found a really nice shop selling this type of machinery, a couple of brothers running the family business. Free cup of tea, some weapons grade rib digging and a chuckle, and they somehow manage to offload a tonne of stuff onto me each time! I do wonder how I ever lived without both the lathe and a drill with this level of solidity. Once the engines back in the car, I may be tempted to look at filling the void with a mill.... 
|
||
 01-15-2015, 12:52 PM
|
|
|
Kartoffelkopf
|
Not too much happening this evening - just a quick bit of machining for the clearance slots needed to accommodate the ABS sensors on the front hubs.
In case anyone's not familiar with them, this is what they look like; similar to modern hall effect units but a little more complex with their magnetic pickup. 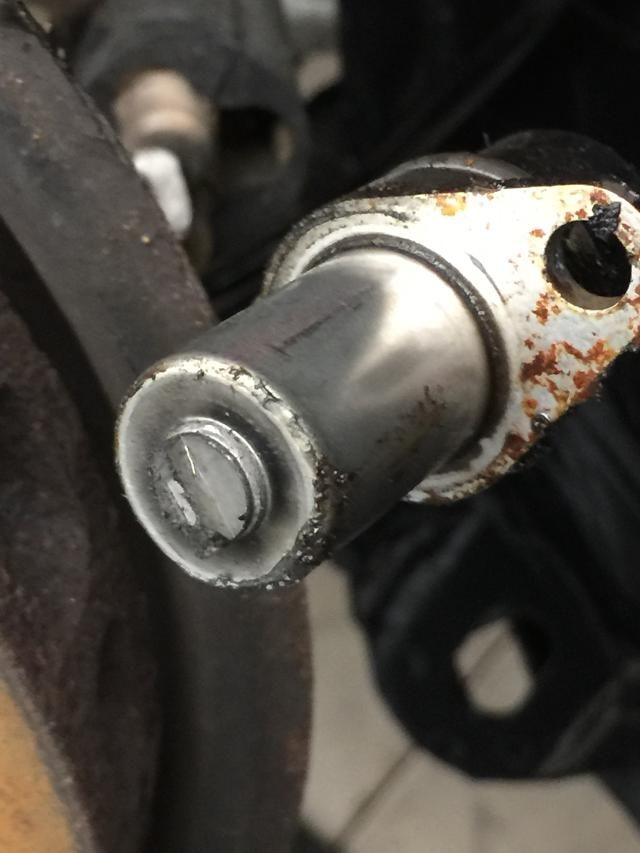  So, to accommodate and also allow for any twisting action that may be needed in future, a rather generous slot (20mm wide) is now in each top-hat. In addition, so that they can be correctly located in relation to the sensor (i.e. centrally) I quickly mounted each into the lathe and used a tool to scribe an indexing mark onto the OD.  Popping into Simon @ Sileck on the way home from a business trip the other day, we played about with the switch unit for TC and Boost control. It looks like it's all going to go together very nicely; retain the white plastic tubular housing, plus the ferrule that interfaces the knob to the switch itself, but remove the electric contacts and the triple plunge springs. 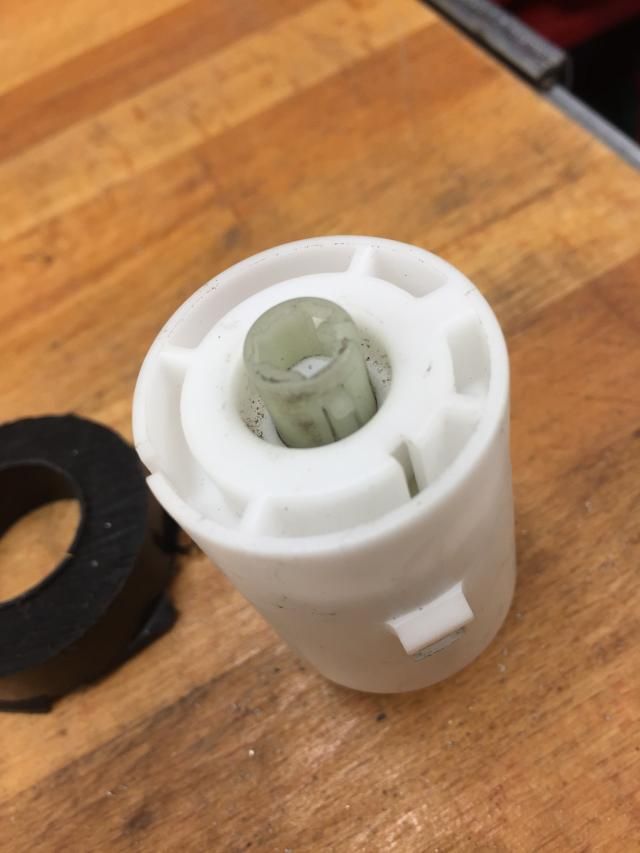 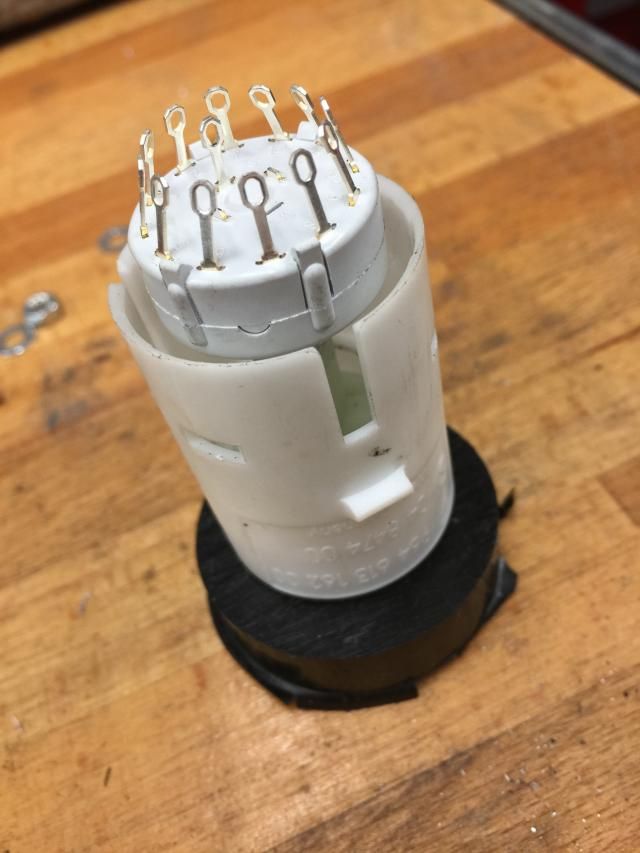 This is just an old switch Simon lent me for mocking up, but the one's we're using are dimensionally the same, dual-gang units. Next job is to make a couple of collars that mount the body of the switch centrally to the plastic tube. The real switches will sit lower down, this just happens to have an uncut spindle. Will need to either bond of grub-screw the ferrule to the spindle, as it's a snug but not a tight fit at present. We also found that we can have two LEDs to indicate the boost level and TC if it's disabled. Next to the printed legend of the 4WD pictogram, there's a warning light window, separated from the rest of the backlighting aperture. An LED in there will warn of the TC switch is set to "0". As mentioned previously, the LED sitting between the 2 x switches will be for boost; off for lowest setting, maybe orange for mid-range and red for max boost. |
||
|
01-15-2015, 03:31 PM
|
|
|
Kartoffelkopf
|
No more progress today in terms of building or making stuff, but I do have a load more parts:
The plated and anodised parts for the gearbox, speed sensor mounts, the M14x1.5 blanking plug for the chimney cover and some rear bumper fixings ---> 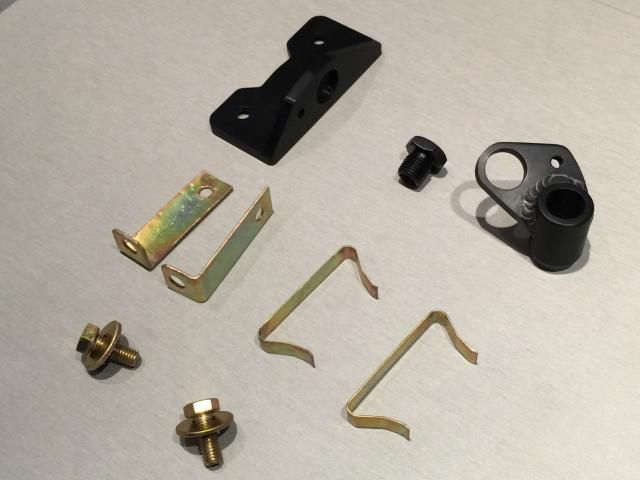 And this weeks order from Porsche Tonbridge. TurboKraft Chris, as usual, has been very helpful with some offline guidance and my bouncing around of random thoughts. Way back at the beginning of this project, you may remember I decided to order from Chris a new flywheel and clutch setup, replacing the stock dual mass flywheel for a 964RS single mass item. Apart from the 60-2 teeth configuration for the timing, it brings a massive rotational mass saving. In conjunction with this is a 997GT2-RS Sachs Competition clutch assembly - probably going to be heavy as hell to actuate, but some gym workouts will sort that (!) and I'm comfortable in the knowledge that we've spec'd this adequately for the torque we should be delivering. After reading the discussion on clutch release arms on RobT's excellent (and popular) 964 rebuild thread over on Rennlist, then consulting Chris, I've taken his advice and gone the same route and replacing my setup as well, for a few reasons: a) Mine was the same p/n as Robs (950 116 712 30), with the shorter fork contact patches but instead had the later plastic bushes, not the soft metal type that start/finish flush with the steel arm. Somebody's played with this previously and installed a new bush kit, perhaps? 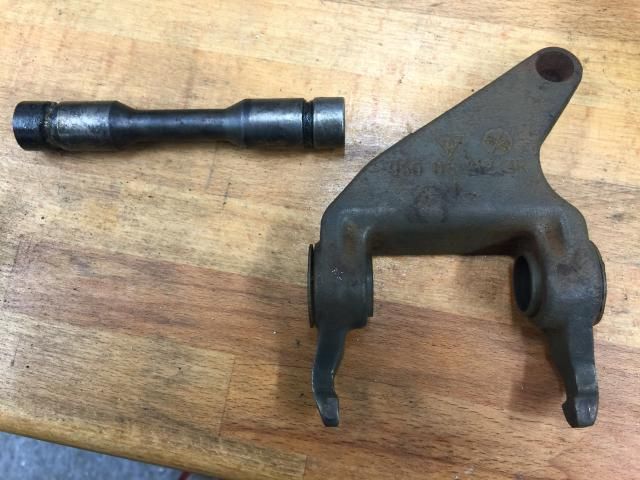 b) There was wear on the contact patches -->  c) Porsche looked to have superseded my unit at least twice in the interim, and now supply a 997 xxx xxx part...there's probably good reason why this has been done. c) Along with the LWFW and super-duper clutch setup, "in for a penny, in for a pound"... ...and to that end, I'm also replacing the shaft, the seals, needle roller bearing, bush, cover, bracket and bolt - basically everything in that assembly. 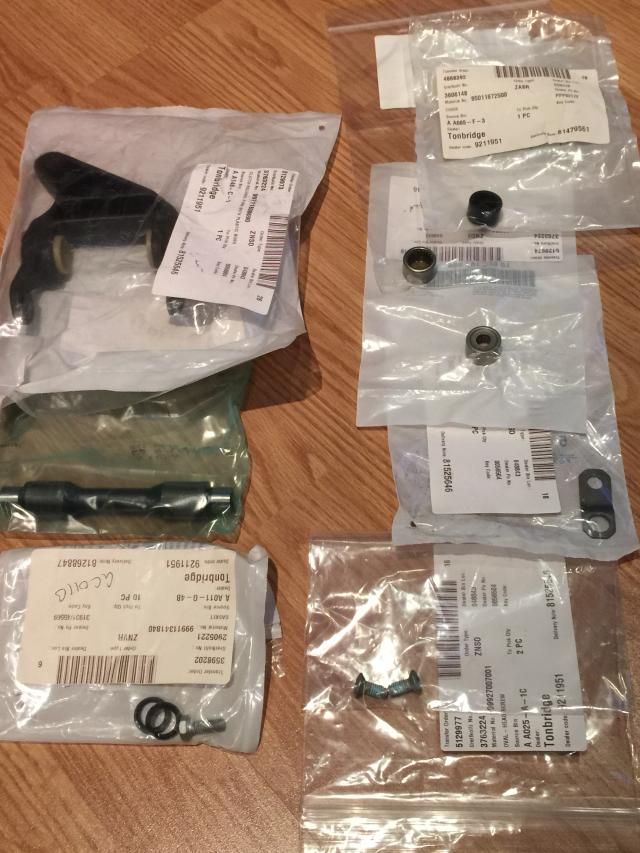 Re-visiting the reflector topic - confession time - I've cheated. I talked previously about attempting to repair the unit I already have - and that may be something I do when I have a spare few hours (?!...or it may get eBayed), but I want it looking absolutely perfect, and my fear is that being a beginner plastic welder, it may not be my neatest piece of work. I've also got to invest in a plastic welding kit, ascertain exactly the blend of plastic to use (and buy rods, if not part of the kit)....and invest the time. Now, being midwinter, we're not a million miles away from the 2015 race season starting; I really need to be getting the engine into the car, and getting Steve @ SBD booked to come and do the first fire-up, before he starts his own race season. Spending another couple of weeks experimenting with the reflector isn't the best use of my time, so I think it's wise to cough-up and buy a new one (especially as they're now being made again, available from stock in the UK and I got a discount from OPC Tonbridge )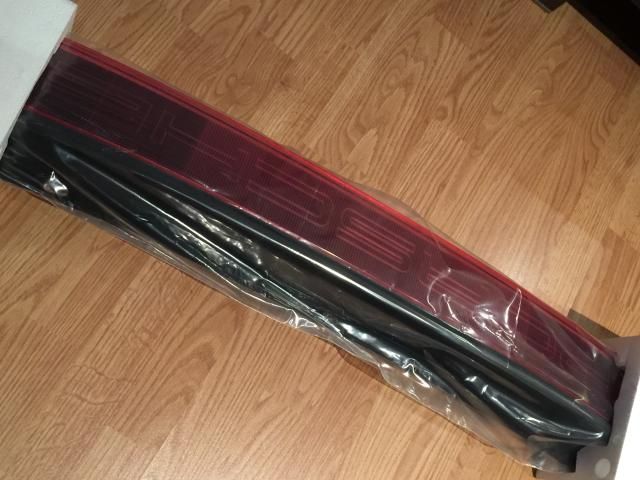 Some other sundry items, bumper fittings, reflector screws, etc ---> 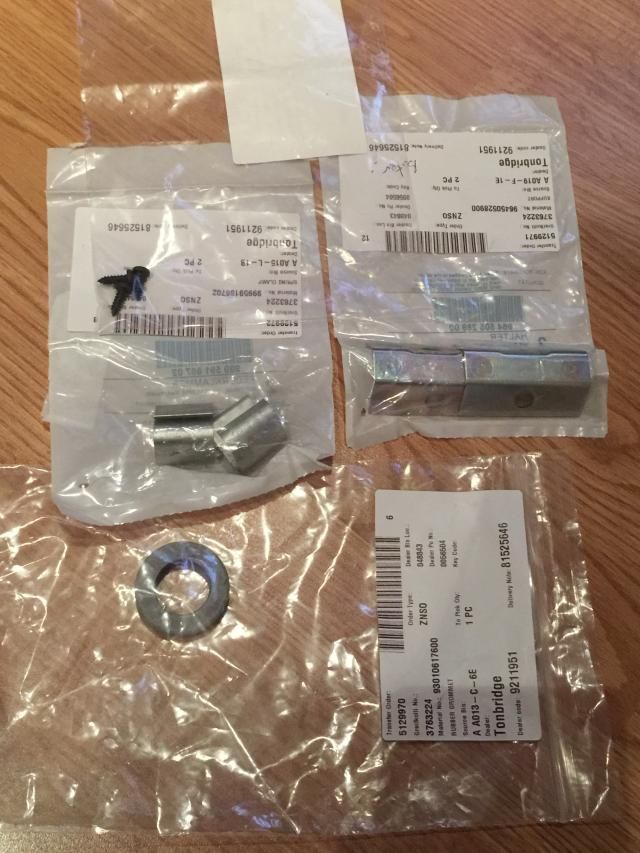 Not going to have much time until Monday evening to tinker, so I'll update again once I've made something or bolted stuff on. Last edited by Spenny_b; 01-18-2015 at 01:02 PM.. |
||
|
01-17-2015, 05:22 PM
|
|
|
Registered User
Join Date: Jan 2015
Posts: 4
|
Hey Spenny, busy, busy I see
 How many hours of sleep are you getting by on now? How many hours of sleep are you getting by on now?  Would you mind pinging me the details of the company doing your yellow zinc passivate? Can I send them the parts 'as is' and they perform the prep? I also need to talk to you about getting some ally welding done as I have some bracket parts for my coil packs that I will need welded. |
||
|
01-18-2015, 10:47 AM
|
|
|
Kartoffelkopf
|
Quote:
....about 4-5hrs sleep a night at the moment, not the best habit to get into.Sure, I'll send you the details of the plating company, by all means say you're a mate of mine. It always strikes me how good value it is; that little lot above was £20. Ok, so I didn't ask for the anodised parts to be to polished before they treated the parts - this would've added to the cost of course, but the resulting look with me hand finishing with Scotchbrite (red, then grey) is exactly what I want. The parts that need BZP and then gold passivate plating do need to be prepped first; I have delivered bags of nuts and bolts as-is before, and it's been a bit hit and miss. To be fair, I've never asked them to polish the steel items - at that point it's often cheaper to buy new fixings from Porsche. Parts with only light corrosion will clean up ok in their prep tanks and come up nicely. Other parts just look a bit patchy and dull, so I now try and give them items wire brushed as clean as possible to try and ensure a decent finish. I'll shoot you an email; lets chat about the welding....presumably this is for your "dowsing bird table"?
|
||
|
01-18-2015, 01:14 PM
|
|
|
Kartoffelkopf
|
Hmmppphh...in the interests of a fair and balanced build thread, there are the odd nights where things go a bit wrong!
Last night....started off ok, made the collars for the rotary switches to mount into the white switch tubes. Spot-on fit; not sure if we'll epoxy these or try and drill/tap to retain with a small M3 or M4 screw --->  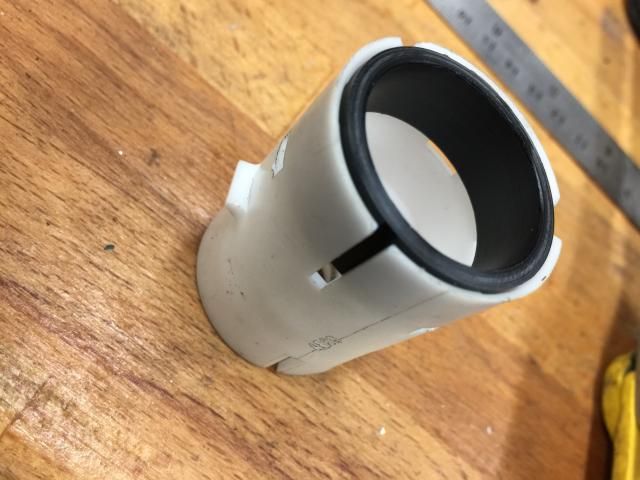 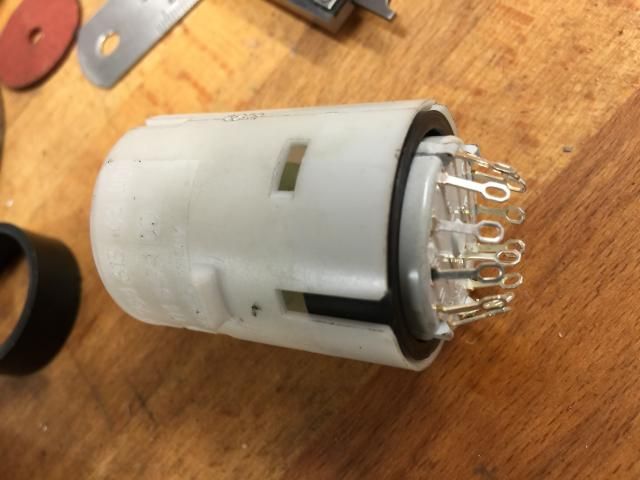 All good so far. Part two of the machining op is to shorten the ferrule that interfaces the rotary switch spindle to the switch knob. ---> 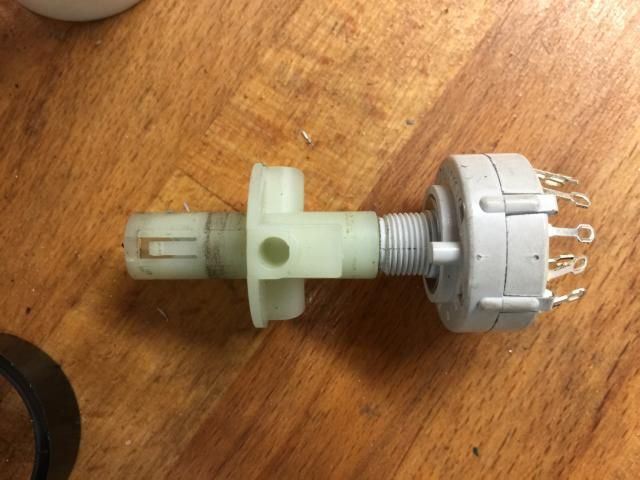 No problem, mount into the 3-jaw - carefully so not to crush it - easy...number 1 done --->  Doing the second one, nipped up the chuck (what I thought was) enough, went to part it off and it grabbed and flew out, snapping the locating and locking part that goes inside the knob. Bollocks. Still p****ed off about as I type. Retrieved the snapped part and have tried Supergluing it back, not yet gone and tested to see if it's held. Potentially going to be a $58 part, binning $57's worth of it to get the bit I need. Ok, time to change subject and install the chimney blanking plug - even that didn't go smoothly, stuff in the way, then a copper crush washer that snugged down off-centre (because of the thread undercut I had to do, as you can't cut the thread right to the head of the bolt)...ok, leave everything and call it a night. Also heard that the powder coating company have currently got electrical issues with their incinerator, no exact outlook for fixing as it's weather dependant (its outdoors and needs a complete teardown apparently), which is now holding up the tinware and bumper brackets, in turn preventing the dummy fit of the engine into the car. Sod it...off to read up on aquariums. Marine or tropical?....hmmm |
||
|
01-20-2015, 04:03 PM
|
|

|
|
Kartoffelkopf
|
A quick progress check-in, quite a productive day, although confess to being distracted (lazy) and watching the Daytona 24hrs.
After a much needed tidy-up in the workshop, I decided to get going on a trial fit of the engine into the chassis, so, car is now back up on the lift (this is of limited use, as the construction of the lifting mechanism prevents the engine and gearbox being bolted up and installed as a single unit). Retrieved the engine crane from a barn I have use of, removed the intercooler and intake pipe then used the lifting bar I bought from our host to get the engine off of the stand. 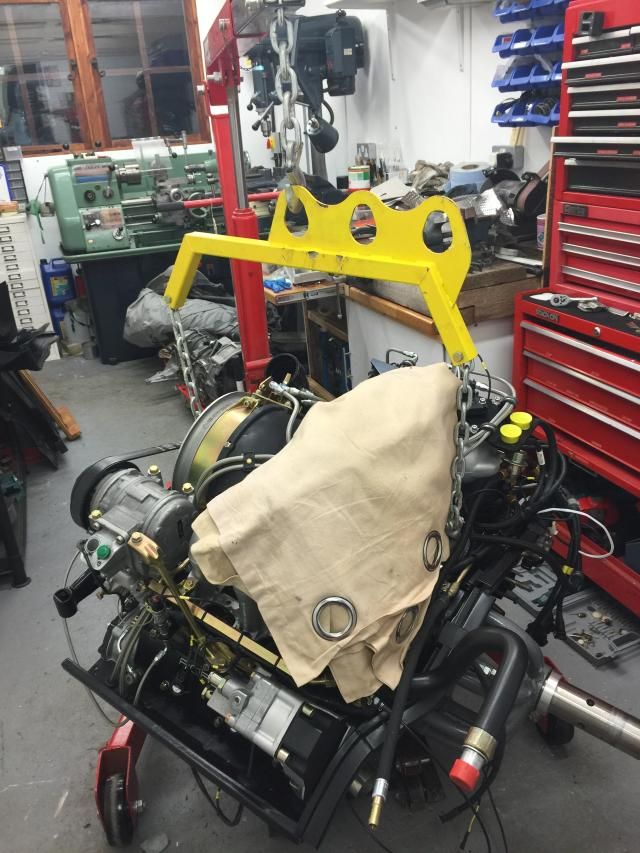  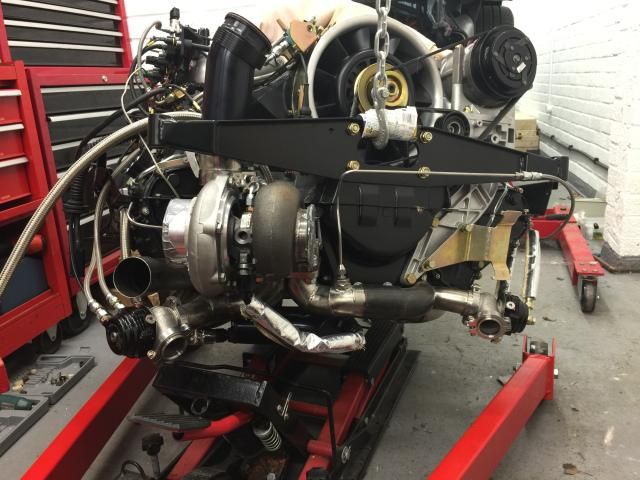 I know that to a lot of the guys here, engines coming on and off of stands is business-as-usual, happens numerous times per day - but for me, after this amount of time, it was quite a momentous occasion (and nerve wracking) to get it off the stand. With the basket removed, I can now fit the oil filter, the starter motor ring and clutch pack as well as the tinware that runs along the back of the engine. Can't remember how I used the ATV jack to remove the engine - it was almost 3.5yrs ago now - but this time I made a wooden cradle so that the crankcase is supported either side of the mating flanges. A few years ago when I fitted the 964RS flywheel, for some reason I torqued up all 9 FW bolts - and I can't remember why - but I needed to remove it again. I temporarily re-used the bolts, and even though they've only been torqued but not loaded, I always intended buying another set and replacing them. These arrived in the post from my OPC on Friday morning, so tomorrows jobs are:
Fingers crossed I'll get the tinware back next week; I heard from the powder coating company, incinerator should have been fixed on Friday. The next biggest job will be to (possibly) rework the AC lines; on the 964T they take a weird route around the intercooler, where the ally pipework doubles-back on itself. All seems a bit over complicated, and to clear the Carrera intake and TK intercooler, I reckon this will all have to be re-made. Simon @ Sileck, as luck would have it, also has the tools and materials to install AC systems. Need to identify a potential date where he can come over again and re-make them, but of course we need to have the engine installed to able to plan the routing. Back tomorrow.... |
||
|
01-24-2015, 05:14 PM
|
|
|
Kartoffelkopf
|
A little more progress during the day. Time to tinker with the flywheel and clutch.
First off, swap over the old-new (!) flywheel bolts. I don't know why it's taken me so many years to get around to making a flywheel locking bar, but it has...made one this morning and life got a whole lot simpler. So everything was cleaned up and the new bolts installed, and another item now removed from the To-Do list. Next, time to retrace my steps with the Sachs Racing clutch; when I received it a few (3?) years ago from Chris @ TurboKraft, I assembled the thrust bearing assembly onto the pressure plate with a single spacer shim. Now, what I can't remember is why I installed a single shim; it may have been on Chris's advice, or I may have read the workshop manual that does say for Carrera's it's 2 shims, for Turbo's it's just one. I wish my memory was better. Revisiting this, there's nothing Turbo left of the clutch assembly; guide tube, release bearing, LW flywheel.....so, given that, I've re-installed the 2nd shim. Thank God for the hydraulic press, it made the job a breeze.....but I'm quite prepared to remove it again if I'm reminded why it needs to go back to a single shim. 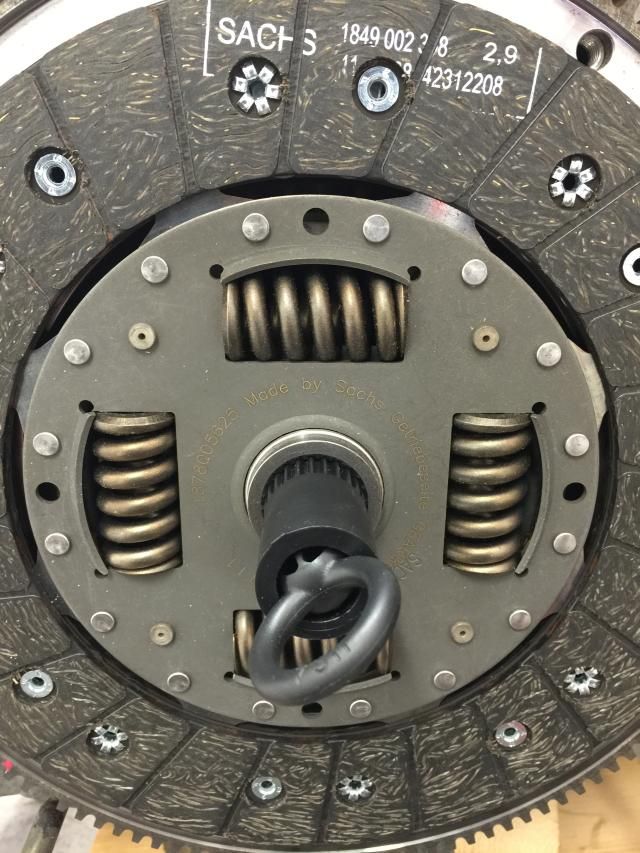 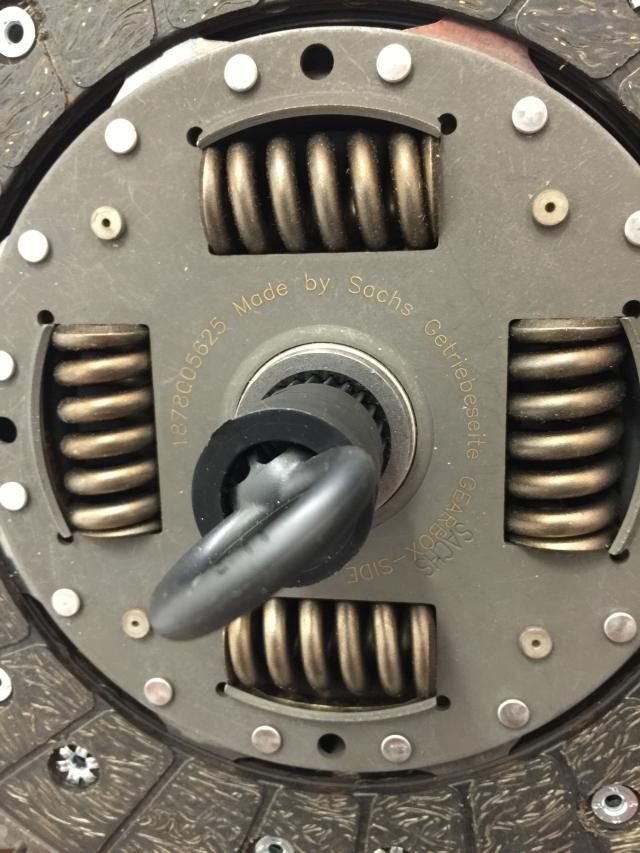 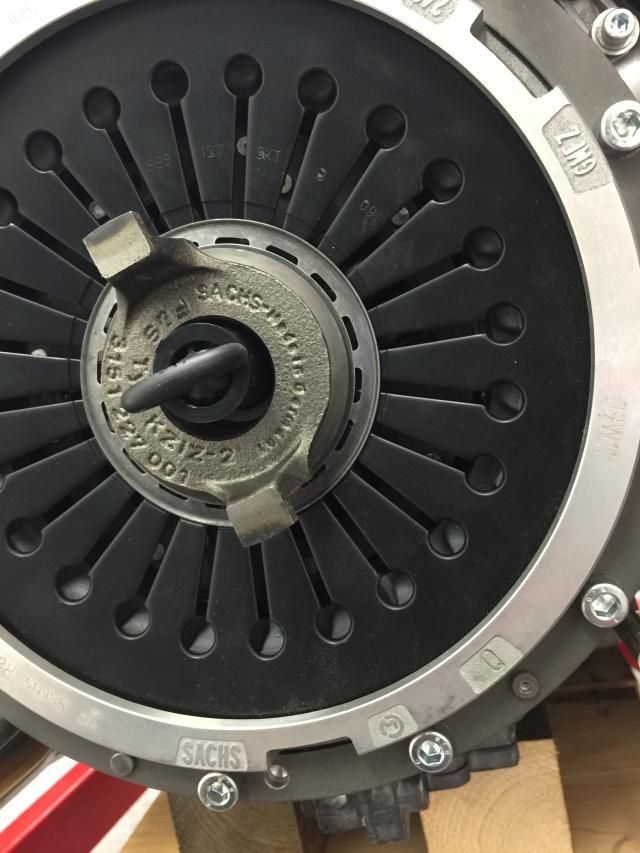 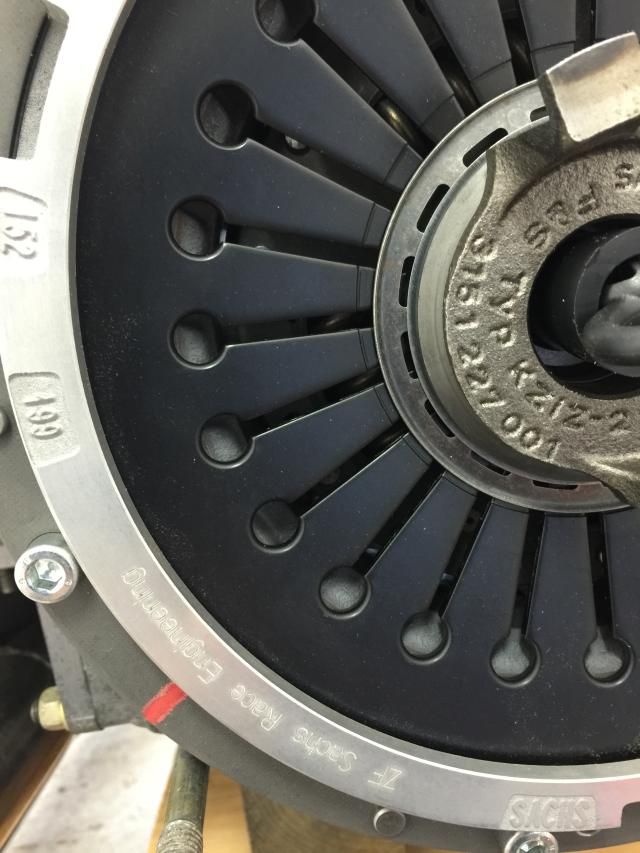 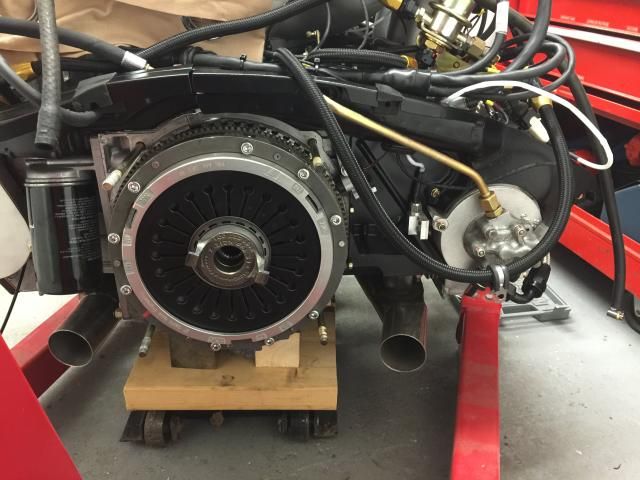 The tinware above the flywheel is now bolted in place and attached to its neighbouring tins. Another job I thought I'd do, with the good weather outside, was to clean up the structural member of the rear bumper, before I get the plastic back after re-painting. 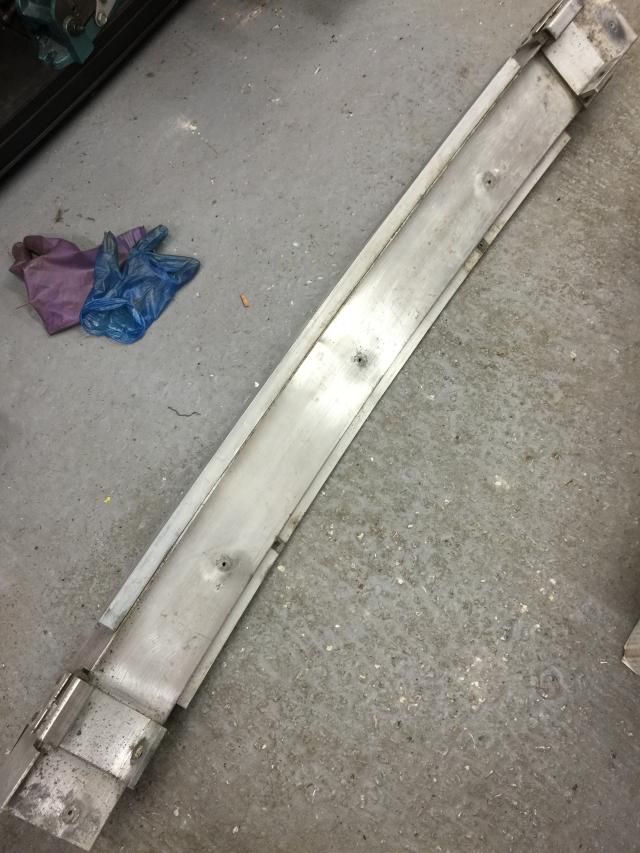 (clearly it's not finished yet) I thought it'd be a quick job.... But after spending a good hour-or-so with abrasives and Scotchbrite pads, I found that the mounting brackets are quite severely cracked. Now, speaking with my pal Brian who's seen more of these than I've had hot dinners, it's a common problem rather than accident related. Heat cycling, salty water ingress, etc, all conspire to eventually crack the brackets. The non-radiused corners won't be helping either.  Unfortunately, Brian doesn't have any good used items...and the price for a new one is $1,033 plus shipping, tax, import duty. So, this is going to be another job for Pete the welder; I'll clean it up and see what he can do. Each bracket can be removed from the main structure - they're riveted on - but it's quite a complex extrusion so making a new one is not the work of 5 minutes. A halfway-house option may be to carefully cut off the complex parts of the original bracket and re-weld them onto a new main section. Anyway, looks like I've got myself another sub-project, but better to find out now than if the structural integrity of the bumper is ever called upon... Last edited by Spenny_b; 01-25-2015 at 03:51 PM.. |
||
|
01-25-2015, 03:48 PM
|
|
|
Kartoffelkopf
|
Quote:
Another example of TurboKraft going above-and-beyond. Thanks Chris. Simple job to remove the shim, and mind is now at ease with the assurance I did it correct the first time. |
||
|
01-25-2015, 04:12 PM
|
|
|
3 restos WIP = psycho
Join Date: Feb 2005
Location: North of Exit 17
Posts: 7,665
|
We all have no life. What's makes you think Chris is any different? ��
__________________
- 1965 911 - 1969 911S - 1980 911SC Targa - 1979 930 |
||
|
01-25-2015, 07:00 PM
|
|
|
Registered
|
Awesome!!!
You deserve the best support with the effort you display. As well as the time you take to post your progress. Greatly appreciated. Quote:
|
||
|
01-25-2015, 11:37 PM
|
|
|
Registered
Join Date: Dec 2003
Posts: 53
|
A very common problem mine were severely corroded one of my friends fabbed up some 6mm alloy plate and re-riveted
Quote:
 
|
||
|
01-26-2015, 11:29 AM
|
|

|
|
Kartoffelkopf
|
Quote:
Quote:
|
||
|
01-27-2015, 03:18 PM
|
|
|
Kartoffelkopf
|
Quote:
I think we'll have a go at welding to start with - speaking with Chris, it appears even the ones from hot climates suffer the same fate. If it can't be welded, then nothing lost, time to drill out the rivets and get fabricating. Cheers S |
||
|
01-27-2015, 03:24 PM
|
|
|
Kartoffelkopf
|
Breaking News!!
Right - here we go....bombshell of the day; not a conversation I was expecting to have
 Spoke with Steve @ SBD earlier this evening; time for a significant change of plan. If you cast your mind back to the very beginning, I dyno'd the car immediately before pulling the engine, so we could baseline it. The intention being that we go back to the same dyno, known to be a no-BS and consistent set of rollers, and spend a few days mapping. About the most accurate way of getting that before and after view of the performance. However - for reasons that we won't go into here, this isn't perhaps going to be where the engine is going to be mapped. Instead, the engine is now going to go into an engine cell for mapping.....possibly in a few weeks time!!! I have to say, having had the first iteration of my Westfield engine mapped by Steve on an engine dyno many years ago, I was impressed. Apart from the accuracy of not having to consider atmospherics, the repeatability or calculate drivetrain losses, it's a hell of a lot easier to fix or adjust anything, especially in a 911. If there are any hiccups, then we're not into "pulling the engine out" territory. So, engine dyno'ing was something I've been pondering for a few years, but never progressed as I was fairly comfortable with Plan A. Actually, I'm extremely excited at the prospect of Plan B. What I don't yet know are a few things:
Cost is a little more per day, but we'll probably recover that by virtue of not haemorrhaging time with trying to sort niggles. It also means that we can run the engine in on the dyno easier, and change the running-in oil and filter far quicker. So....the plan to install the engine and gearbox into the car is now not the way forward. I'll need to quickly make an air intake pipe to mount onto the turbo inlet, something resembling the final design perhaps (although I guess it's not that important?). I'll have to fabricate the final design once the engine is in the car, as it looks as though it'll have to navigate quite a tight path near the LH engine mount. It also mean (face/palm time) that I'm going to have to extract the chassis half of the wiring loom. After all that effort to carefully remove and replace trim, routing it carefully...Argghh! Oh well, for the greater good. The time I'm saving by not having to book the rolling road a couple of months in advance more than offsets the time take to remove it. The initial fire-up that Steve and I were going to do here at my workshop is now not going to happen. This does concern me a little, as I'd hate to get everything/everyone booked, engine transported the other side of London, and then it won't bloody fire up! So, there you have it....we may be having some dyno numbers to share a lot sooner than planned. Not many finishing jobs on the engine to do, and apparently the engine dyno folk are pretty accommodating with juggling jobs (although it is silly season with everybody wanting their race engines done at the moment) Gulp. Last edited by Spenny_b; 01-27-2015 at 03:57 PM.. |
||
|
01-27-2015, 03:52 PM
|
|
|
Registered
Join Date: Dec 2003
Posts: 53
|
Your right spencer I didnt put the slot back on however I did use the square threaded washer that fits in the slot as it has a a spiky side that stops it from turning I had an additional issue that I was struggling for clearance from my twin outlet exhaust and not having the slot makes it easier for removal if I have to take the bumper off in the future.
Quote:
|
||
|
01-28-2015, 03:16 AM
|
|
|
Registered User
Join Date: Jan 2015
Posts: 4
|
Your brackets look identical to mine Gaaz.
Spenny, so you only fitted ONE spacer shim to the CRB? Did you come to an explanation of why? I have the RS LW flywheel and clutch and am 99.99% certain I used both, as instructed. Just interested really. |
||
|
01-28-2015, 04:07 AM
|
|
|
Forced Induction Junkie
|
Spenny,
Do you mind explaining the purpose of the shim on the thrust bearing? Is this done on all G50 hydraulically assisted clutches? Thanks.
__________________
Dave '85 930 Factory Special Wishes Flachbau Werk I Zuffenhausen 3.3l/330BHP Engine with Sonderwunsch Cams, FabSpeed Headers, Kokeln IC, Twin Plugged Electromotive Crankfire, Tial Wastegate(0.8 Bar), K27 Hybrid Turbo, Ruf Twin-tip Muffler, Fikse FM-5's 8&10x17, 8:41 R&P |
||
|
01-28-2015, 04:21 AM
|
|
|
Kartoffelkopf
|
Quote:
Quote:
For a traditional 964 RS cover, N/A, we (well, Chris - I can't take any credit for this) suspects that the fingers are perhaps lighter, thus thinner, therefore needing 2 shims to take up the slack. WERK I - not sure if all G50's will have this setup - I'd suspect so, but a quick compare of the PET part listing will likely reveal if that's the case. Perhaps not the most accurate answer, as both Rob and I have found that a number of the parts used in this areas have been superseded with 997 part numbered items, so it is a bit of a Heinz57 of items required these days. |
||
|
01-28-2015, 02:00 PM
|
|
|
Moderator

Join Date: Dec 2001
Posts: 9,569
|
Spencer-- engine dyno is a LOT better approach. Plus we get the red-hot turbo photos in focus!
Here was my experience-- Assembling 1966 901/05 Engine: Phase V- The Final Exam I think that several weeks of planning the dyno session is required in order to get the most out of it. First you have to get it running and stable so it will idle with a basic fuel map. Then some break-in running. That could probably be done on an engine stand ahead of the Dyno itself. When you go to tune it you won't want a bunch of oil blowing by and throwing off the measurements. That will also get you familiar with adjusting the EFI control unit with the software on the fly, loading different maps, etc. Then the pulls. . . I would have a plan for every pull-- and a flow chart of what you're going to do, how you're going to iterate, based on what the AFR and curves show you. This is where expertise comes in (which I certainly don't have) Maybe Chris can chime in on the sequence and planning for Dyno break-in and setup.
__________________
'66 911 #304065 Irischgruen 96 993 Carrera 2 Polarsilber '81 R65 Ex-'71 911 PCA C-Stock Club Racer #806 (Sold 5/15/13) Ex-'88 Carrera (Sold 3/29/02) Ex-'91 Carrera 2 Cabriolet (Sold 8/20/04) Ex-'89 944 Turbo S (Sold 8/21/20) |
||
|
01-28-2015, 02:50 PM
|
|
 |
|
|
| Tags |
| 964 c4/c2/turbo , efi conversion , life racing , syvecs , turbokraft |


 1993 Porsche 911 (964) Turbo 3.3
 2006 Lotus Exige Cup 240 (#45 of 50)
 BMW M2 Competition
 BMW R1250 GS Rallye HP
 Ducati 748R


 1985 Porsche 930 Fac. Slantnose 3.3l
