|
|
|
|
|
| Author |
|
|
Kartoffelkopf

|
...on a more positive note, I bought one of these today --->
 Wasn't planning on buying one just yet, but it came up on FleaBay, secondhand but unused (in fact the hydraulic pump was still boxed up and dry, no fluid ever filled), for significantly less than new price. Rude not to. All part of the garage project - I'd been considering building a pit into the floor, but in the UK we need Building Consent to do it (red tape hassle), the water table is only about 1ft below the floor in this part of the country, and it worked out more expensive. Then, when you add in the potential safety risks (I have a young daughter) and the fact I really want the car "up" to work on suspension, a pit isn't the best answer in this case. The plan for this, is to dig a recess into the garage floor, just a little deeper than the height of the unit so that I can cover it with panels/frame+chequerplate/whatever. It lifts to a height where the bottom of the wheels are about 1m off the ground, can lift 2500kgs and is one of the hydraulic types (not one of the later pneumatic ones show above) and runs off of single phase 240v. Adjustable outriggers, with deep rubber pads (again, different from above), perfect for lifting under the aluminium floor of my Westfield. So, chuffed with that little bit of perfect-timing!  Not collected it yet, but I have a feeling that my pondering about doing a suspension renovation will be decided now I have a new toy to play with. |
||
 09-09-2012, 04:35 PM
|
|
|
Kartoffelkopf
|
Evening folks, am now back from NYC with toys in hand!
The intercooler arrived perfectly from TurboKraft up to the hotel where I was staying, and JESUS is it big! Huge thanks to Chris @ TK for taking the time to not only get the finish exactly as I was after, but also packing it up REALLY well for shipping. So good in fact, that it made no sense to use and re-pack into the new rigid suitcase I bought and took over to the US empty, we just re-packed it up again and checked it as additional luggage. It was like Christmas morning in the hotel room when we arrived. Suffice to say, it's a really nice bit of kit, and when placed next to the stock unit, you can see the difference (although I don't think the pics do it justice): 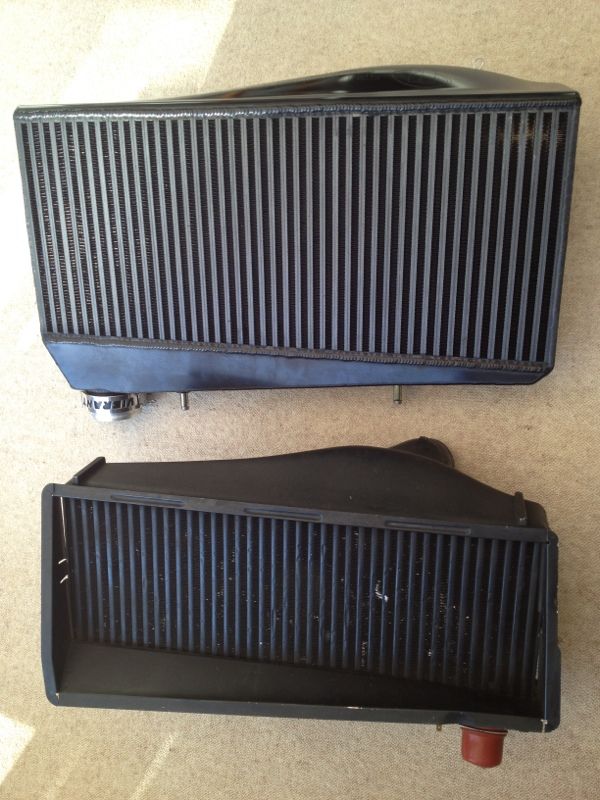 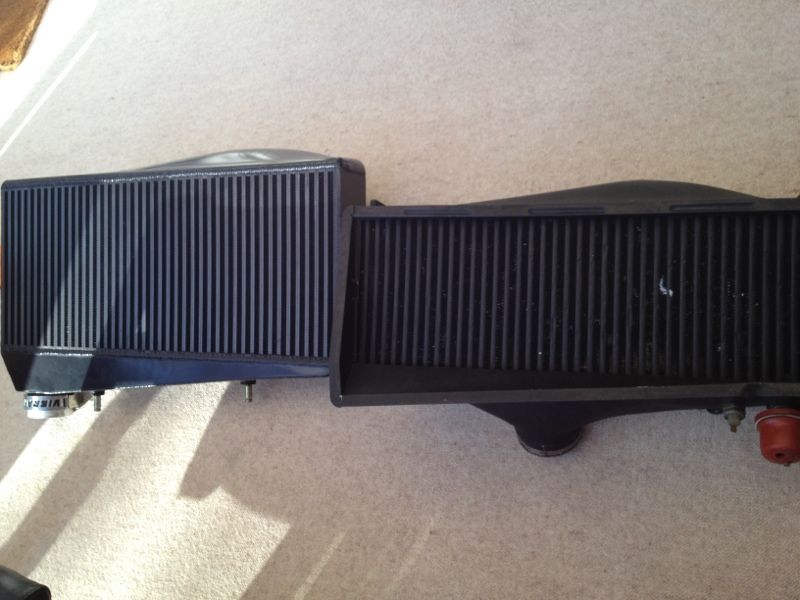  The mounting brackets that bolt onto the Carrera intake, then house the lugs on the back of the I/C to locate:  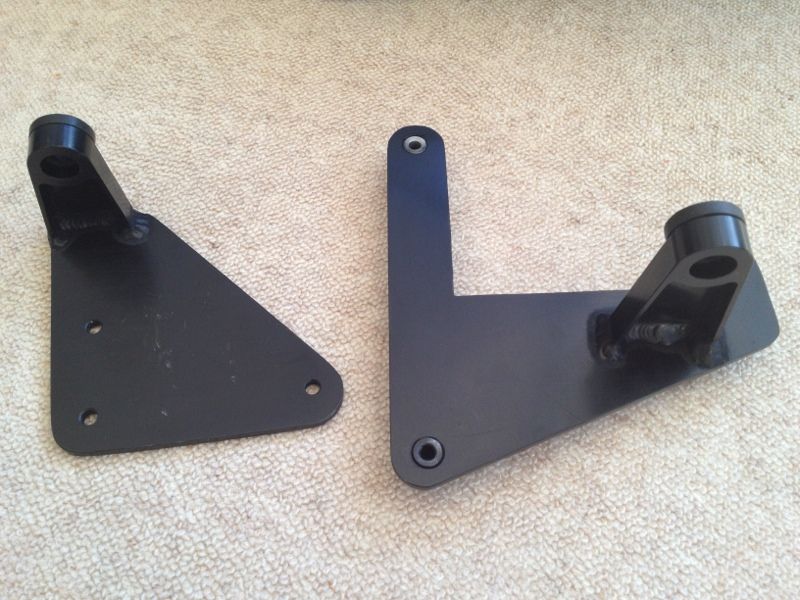 Along with the IC itself are some 90deg aluminium pipes so that I can fabricate the feed pipes with, along with take off boss for the I/C pressure sender (to be remotely mounted).  Also now have another set of 6 Denso CoP's, plus a new TurboKraft performance G50 gearbox tail mounting.  Lastly, the oil feed line for the turbo, and of course the quick-release clamps for the I/C supply/outlet pipes and the turbo compressor housing > exhaust silencer. Now I'm back and have taken a few weeks off from the project, I have to say it's all looking a bit daunting again now. So much to do, loads of fabrication, more powdercoating to get done and thats before I even think about new oil lines and how I plumb in the water cooling circuit...hmmm. Also a big thanks to John ("304065") over in NYC (hey John!), for his great hospitality on Sat night....a cracking evening out at the Hofbrau Munchen with me and my Brother, some great German bier and a good few hours chatting "car" . A lovely waitress there as well....pity I couldn't take her home in that empty suitcase 
__________________
1993 (MY92) 964 Turbo 3.3 - Horizon Blue - Follow my 964 Turbo project here... http://forums.pelicanparts.com/911-engine-rebuilding-forum/626572-964-3-3-turbo-efi-conversion-using-syvecs-life-racing-engine-management.html On Instagram (along with other stuff) as @spenny_.b #spennybengineproject |
||
|
09-27-2012, 03:24 PM
|
|
|
Kartoffelkopf
|
Just a small update; finally got some order back in the garage this evening and have been mocking-up the I/C...fits nicely I reckon.
  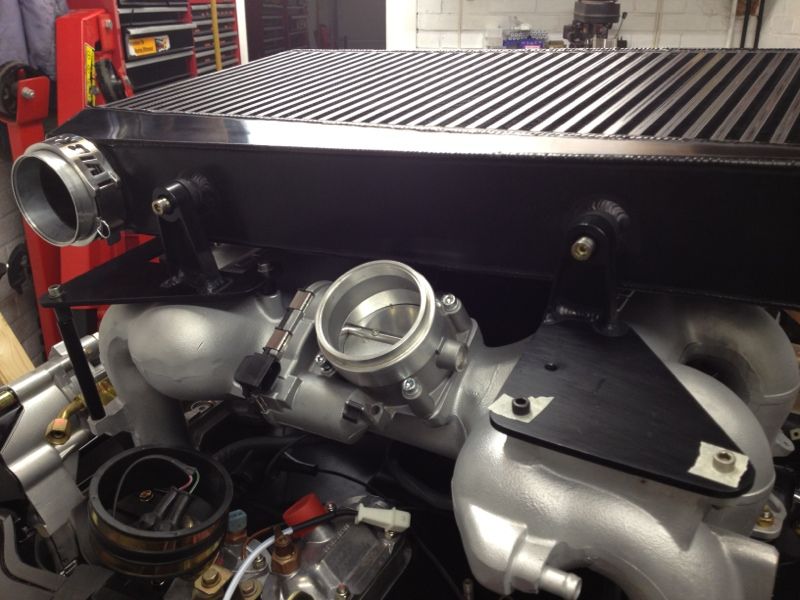 Next job is to fabricate the turbo > IC pipe....going to be "interesting" with the slight offset (the conical tube will be shortened) --->  Front mount sits well, re-using the coil mounting bracket which I'll get re-plated. Will also use this to accommodate a clip for the turbo oil feed pipe --> 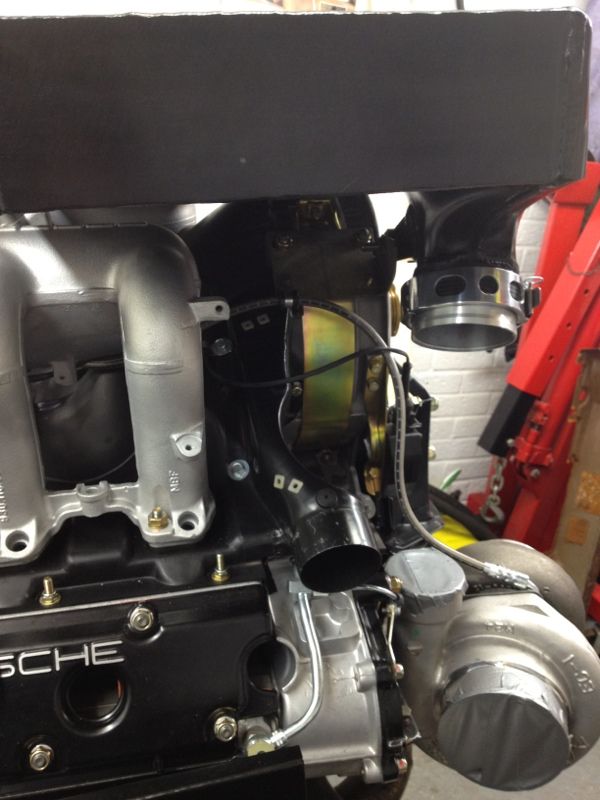
__________________
1993 (MY92) 964 Turbo 3.3 - Horizon Blue - Follow my 964 Turbo project here... http://forums.pelicanparts.com/911-engine-rebuilding-forum/626572-964-3-3-turbo-efi-conversion-using-syvecs-life-racing-engine-management.html On Instagram (along with other stuff) as @spenny_.b #spennybengineproject |
||
|
10-02-2012, 05:52 PM
|
|
|
Moderator

Join Date: Dec 2001
Posts: 9,569
|
Looking great Spencer! Pure automotive art if you ask my humble opinion. Makes one appreciate the packaging challenges that Porsche faced in an effort to fit new components into a 40-year old chassis!
How will you fab the inlet pipes, I guess mock everything up and then have it welded?
__________________
'66 911 #304065 Irischgruen 96 993 Carrera 2 Polarsilber '81 R65 Ex-'71 911 PCA C-Stock Club Racer #806 (Sold 5/15/13) Ex-'88 Carrera (Sold 3/29/02) Ex-'91 Carrera 2 Cabriolet (Sold 8/20/04) Ex-'89 944 Turbo S (Sold 8/21/20) |
||
|
10-04-2012, 02:53 PM
|
|
|
Kartoffelkopf
|
Quote:
It certainly does make you stand back every so often, and think "where the heck did they even start?!?" Yup, the plan with the I/C pipes is exactly that, cut them, then get my welder mate to come over one evening with a portable TIG welder, tack the various sections together whilst in-situ, then take them back to the shop for the "proper" welding....see below Cheers! S
__________________
1993 (MY92) 964 Turbo 3.3 - Horizon Blue - Follow my 964 Turbo project here... http://forums.pelicanparts.com/911-engine-rebuilding-forum/626572-964-3-3-turbo-efi-conversion-using-syvecs-life-racing-engine-management.html On Instagram (along with other stuff) as @spenny_.b #spennybengineproject |
||
|
10-06-2012, 12:53 PM
|
|
|
Kartoffelkopf
|
Intercooler pipework - fabrication time.....
A good days work today...after a week or so mulling-over how best to tackle the fabrication of the inlet/outlet pipes to the I/C, I took the plunge earlier and made that nervous first cut.
Some careful and unusually for me, "patient" (!) work, and now we have both sets of pipework cut to length ready for tack welding. Have to say, am rather pleased with my efforts...the angles are all good, it's nice and tight to the I/C and should weld up very nicely. The silicon hose joining the conical section will be cut shorter, it's just plonked on to hold everything in place for the photo.  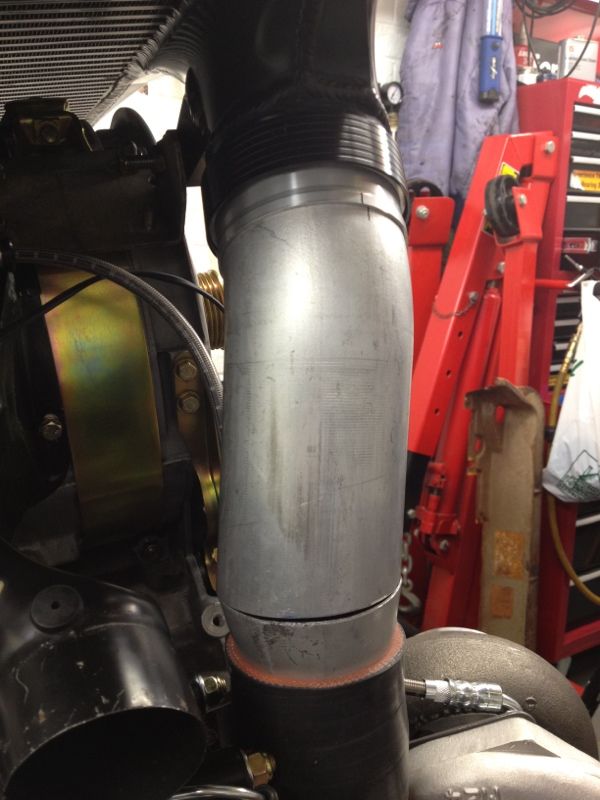 And then the outlet pipes that feed the throttle body...clearly I can't hold both and take a picture, but you get the idea. 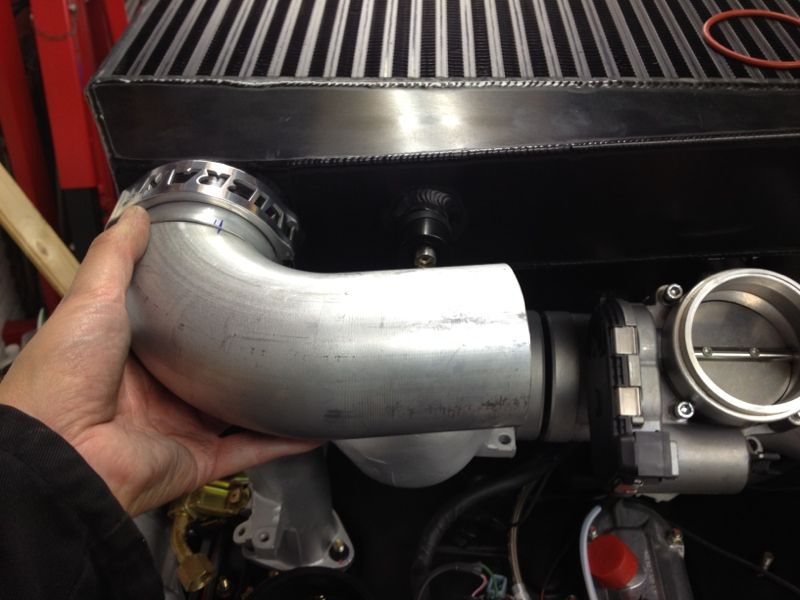  Next job this weekend is to position the wastegates again, and fab the feed pipes for them...should be dead easy by comparison.
__________________
1993 (MY92) 964 Turbo 3.3 - Horizon Blue - Follow my 964 Turbo project here... http://forums.pelicanparts.com/911-engine-rebuilding-forum/626572-964-3-3-turbo-efi-conversion-using-syvecs-life-racing-engine-management.html On Instagram (along with other stuff) as @spenny_.b #spennybengineproject |
||
|
10-06-2012, 01:03 PM
|
|

|
|
Kartoffelkopf
|
Was thinking about positioning of sensors the other day, looks like I may have to sacrifice the exhaust sensor mounts that have (so far) been used for my Zeitronix AFR/EGT monitor, and instead use them for the engine management....not decided on this yet, but if so, then I investigated a Windows tablet that I could use to run the MBE mapping s/w....Windows only, no Android or iOS port...and it just so happens that a mate of mine at work (complete gadget guy) had an almost brand spanking new Acer 10" tablet, running Win8 on beta..
 ...collected yesterday, with Windoze 7 re-installed. It's quite a nice bit of kit really...not the fastest, and definitely suffers from running a full-fat OS instead of a mobile optimised one, but *it's not bad* (and as a self-confessed Apple fanboy, I feel dirty saying that). Installed Easimap v6, and it seems to run very well. It has 2 x USB ports, so will interface via an MBE985 into the ECU's CAN bus loop, and from there I can buy something like this car mount and have a ricer special electronic dash! Not intending it to be used all the time, but whilst running in the engine and for the first "xxxx" miles, it'll be very useful to see the same data that the MBE is seeing, in realtime, and be able to set alarms that I can't miss when driving. The MBE "dash" is fully customisable to place on there only the parameters I want to monitor, but being a fully fledged instance of the mapping application, I can in theory use this to tweak various settings rather than drag out a laptop and try and balance it on the passenger seat. 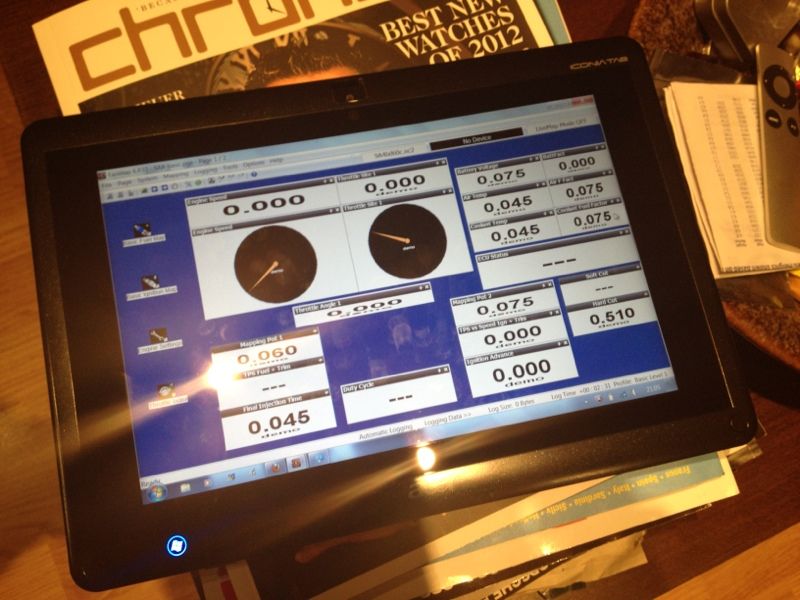
__________________
1993 (MY92) 964 Turbo 3.3 - Horizon Blue - Follow my 964 Turbo project here... http://forums.pelicanparts.com/911-engine-rebuilding-forum/626572-964-3-3-turbo-efi-conversion-using-syvecs-life-racing-engine-management.html On Instagram (along with other stuff) as @spenny_.b #spennybengineproject |
||
|
10-06-2012, 02:10 PM
|
|
|
Moderator
Join Date: Dec 2001
Posts: 9,569
|
SSD? Or wil the read/write head dig a chunk out of the platter when you get on the loud pedal? Not hard to convert to SSD.
__________________
'66 911 #304065 Irischgruen 96 993 Carrera 2 Polarsilber '81 R65 Ex-'71 911 PCA C-Stock Club Racer #806 (Sold 5/15/13) Ex-'88 Carrera (Sold 3/29/02) Ex-'91 Carrera 2 Cabriolet (Sold 8/20/04) Ex-'89 944 Turbo S (Sold 8/21/20) |
||
|
10-06-2012, 05:34 PM
|
|
|
Kartoffelkopf
|
Quote:
__________________
1993 (MY92) 964 Turbo 3.3 - Horizon Blue - Follow my 964 Turbo project here... http://forums.pelicanparts.com/911-engine-rebuilding-forum/626572-964-3-3-turbo-efi-conversion-using-syvecs-life-racing-engine-management.html On Instagram (along with other stuff) as @spenny_.b #spennybengineproject |
||
|
10-06-2012, 05:53 PM
|
|
|
Kartoffelkopf
|
Steady progress....it all seems very pedestrian, but then again, this is the tricky fabrication part, with lots of "if's, but's and maybe's"...many mugs of tea and scratching head. I think Chris used the term "welcome to my world"...I can really see where the cost of a bespoke engine project comes, and believe me, worth every penny.
After spending far too many hours deliberating, I'm finally getting somewhere. Thermostat housing now vapour blasted. Will test the thermostat insert, then re-assemble over the weekend: 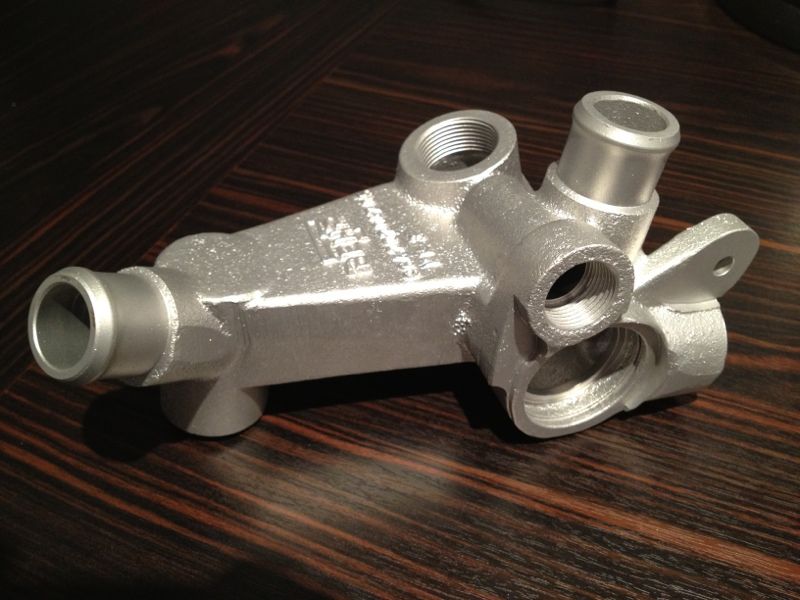  Metric fittings for the fuel lines now bought from Think Automotive...what a helpful bunch. I'm sure the items can be bought cheaper elsewhere, but for the guidance and patience they give, it's a no-brainer to go there, all the pipes, turbo, waste gates, etc in hand, and get it nailed in one go. New fuel lines (which they made up for me exactly to the same lengths as the original hoses), as part of the service. Very pleased with the subtle look with the black/gold fittings.: 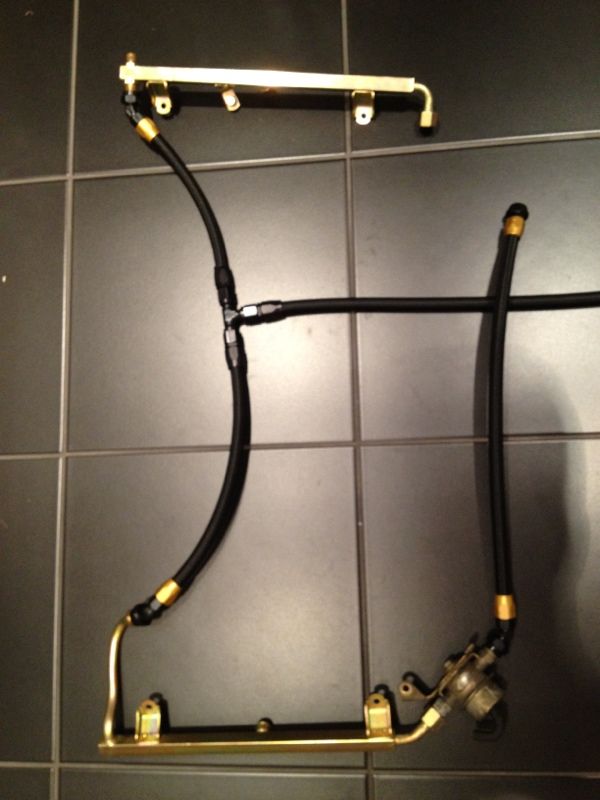 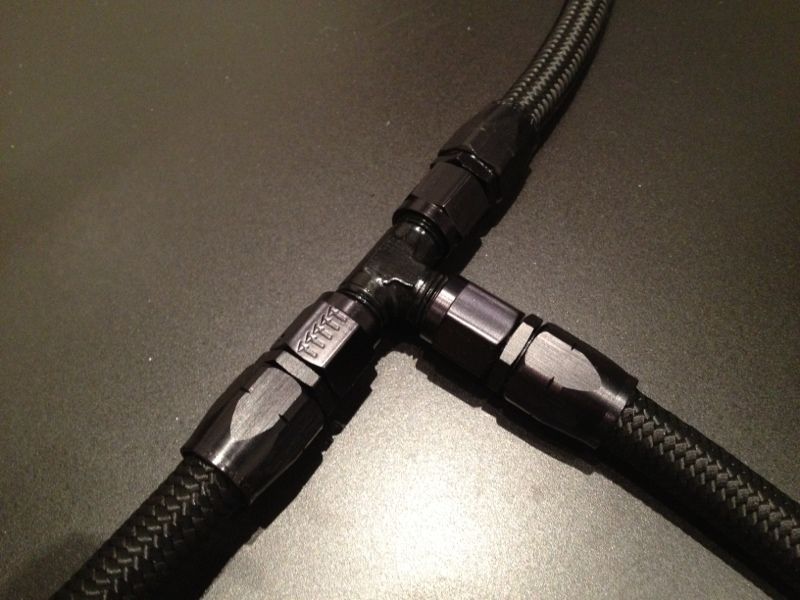  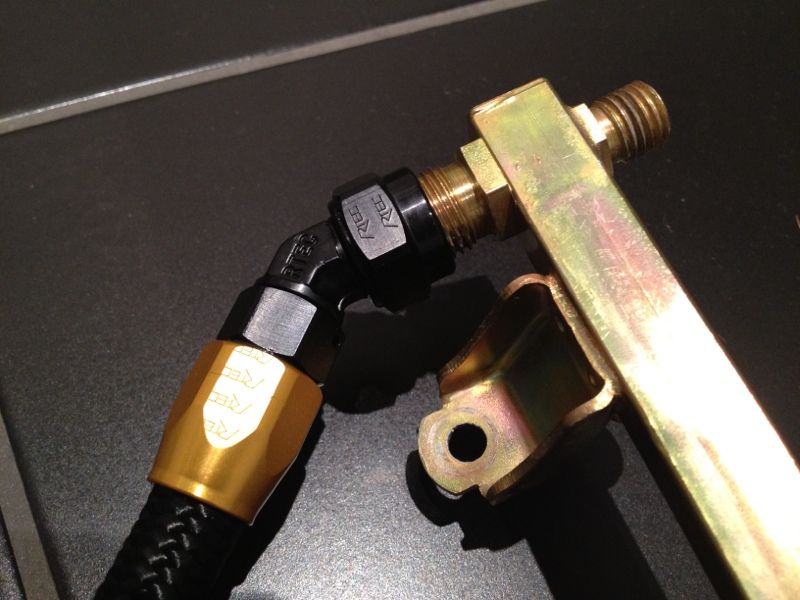 Still need to buy a few more fittings to plumb up to the filter and pump(s), but will do that once everything's in situ. Water cooling circuit fittings bought for the turbo, along with new couplings for the main oil lines from thermostat -> oil cooler, plus some shiney new male/male adapters to go into the oil cooler.  A company over here call Pirtek specialise in industrial hydraulic hose manufacture and repair...went along to my local branch one lunchtime this week, and so happens the guy there's a car nut and more helpful than most. He has all the bits needed to replace the flexi sections that pass over the top of the front inner wheel arch down to the cooler. We're also re-hosing the part rigid line from the aux oil scavenge pump that returns to the dry sump tank, once the pipe and barbed section have been re-plated. It's a perfectly neat way of plumbing this line in, no reason to go for the expensive option and make a custom hose that then needs fixing along its length. 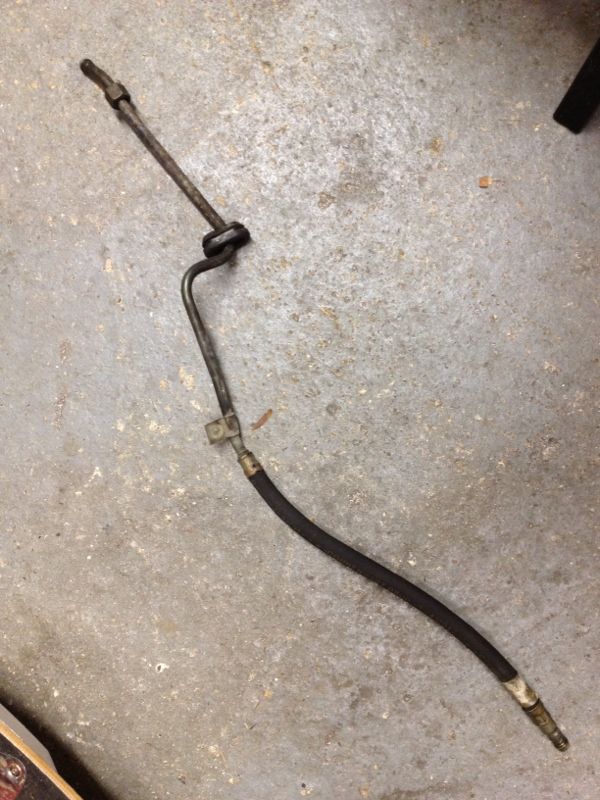 Tomorrow evening, it's time for my welder pal to come over and tack the charge pipes to/from the I/C, whilst they're in place. I've also made some of the parts to fabricate a turbo support frame in stainless. This will triangulate from the closest load bearing crank pulley cover bolt (M12 from memory), across to the two rear bolts on the T3 flange. Hopefully we'll get that welded up as well.
__________________
1993 (MY92) 964 Turbo 3.3 - Horizon Blue - Follow my 964 Turbo project here... http://forums.pelicanparts.com/911-engine-rebuilding-forum/626572-964-3-3-turbo-efi-conversion-using-syvecs-life-racing-engine-management.html On Instagram (along with other stuff) as @spenny_.b #spennybengineproject Last edited by Spenny_b; 10-18-2012 at 04:58 PM.. |
||
|
10-18-2012, 04:48 PM
|
|
|
Kartoffelkopf
|
Finally, spent a lot of time last night modifying the original oil drain tank ("ODA"...Chris...
 ). I have considered making one from scratch, and that's still a great Plan B, as I've got a fair amount of 3" ally tube left over that would be ideal....however...the OE part mounts so neatly in the corner of the crankcase, plus it hooks up directly to the aux pump scavenge line. However, the oil drain outlet from the turbo is in a different location. Some chopping, shortening and then re-brazing will address that, and I'm going to use a couple of -10AN weld on fittings, plus a female->female coupling, to hook the drain up. The outlet doesn't need to be -10AN, but the -8AN weld-on fitting is smaller that the OE drain tube diameter, -10AN is a nice neat size. ). I have considered making one from scratch, and that's still a great Plan B, as I've got a fair amount of 3" ally tube left over that would be ideal....however...the OE part mounts so neatly in the corner of the crankcase, plus it hooks up directly to the aux pump scavenge line. However, the oil drain outlet from the turbo is in a different location. Some chopping, shortening and then re-brazing will address that, and I'm going to use a couple of -10AN weld on fittings, plus a female->female coupling, to hook the drain up. The outlet doesn't need to be -10AN, but the -8AN weld-on fitting is smaller that the OE drain tube diameter, -10AN is a nice neat size. Looks rough now, but once brazed it'll go for powder coating. The breather outlet also interfered with the new turbo, so that needed removing and "attention" : 
__________________
1993 (MY92) 964 Turbo 3.3 - Horizon Blue - Follow my 964 Turbo project here... http://forums.pelicanparts.com/911-engine-rebuilding-forum/626572-964-3-3-turbo-efi-conversion-using-syvecs-life-racing-engine-management.html On Instagram (along with other stuff) as @spenny_.b #spennybengineproject |
||
|
10-18-2012, 04:58 PM
|
|
|
Kartoffelkopf
|
Quite a productive weekend.....also frustrating (!) but in the end, got quite a bit sorted.
Unfortunately, we didn't get around to tack welding the charge pipes and tinware on Friday...we were both too busy, but that worked out for the best, as we can now also tack up the hanging bracket and wastegate feeds, hopefully one evening during this week. Will post pics when it's all tacked, but really quite pleased with being able to cross off some items on the "To Do" list.
__________________
1993 (MY92) 964 Turbo 3.3 - Horizon Blue - Follow my 964 Turbo project here... http://forums.pelicanparts.com/911-engine-rebuilding-forum/626572-964-3-3-turbo-efi-conversion-using-syvecs-life-racing-engine-management.html On Instagram (along with other stuff) as @spenny_.b #spennybengineproject |
||
|
10-21-2012, 05:28 PM
|
|

|
|
Moderator
Join Date: Dec 2001
Posts: 9,569
|
The definition of success is measureable progress toward a worthwhile goal!
For the vapour-blasted items, you may want to consider a sealer to block oxidation. I have had great success with a product called ZoopSeal, which bascially goes into the pores in the aluminum so corrosion cannot take hold. It is completely transparent and doesn't change the surface dimensions perceptibly, although you will want to avoid getting it in threaded holes. ZoopSeal is no more evidently but there is an equivalent product called Shineseal which looks like the same thing. ShineSeal.com ::: Protect Your Products :::
__________________
'66 911 #304065 Irischgruen 96 993 Carrera 2 Polarsilber '81 R65 Ex-'71 911 PCA C-Stock Club Racer #806 (Sold 5/15/13) Ex-'88 Carrera (Sold 3/29/02) Ex-'91 Carrera 2 Cabriolet (Sold 8/20/04) Ex-'89 944 Turbo S (Sold 8/21/20) |
||
|
10-23-2012, 07:01 AM
|
|
|
Kartoffelkopf
|
Right, getting a few more jobs crossed off of the "To Do" list.
Small job; bracket to support the chimney breather pipe return is now made, and inlet manifold drilled/tapped: 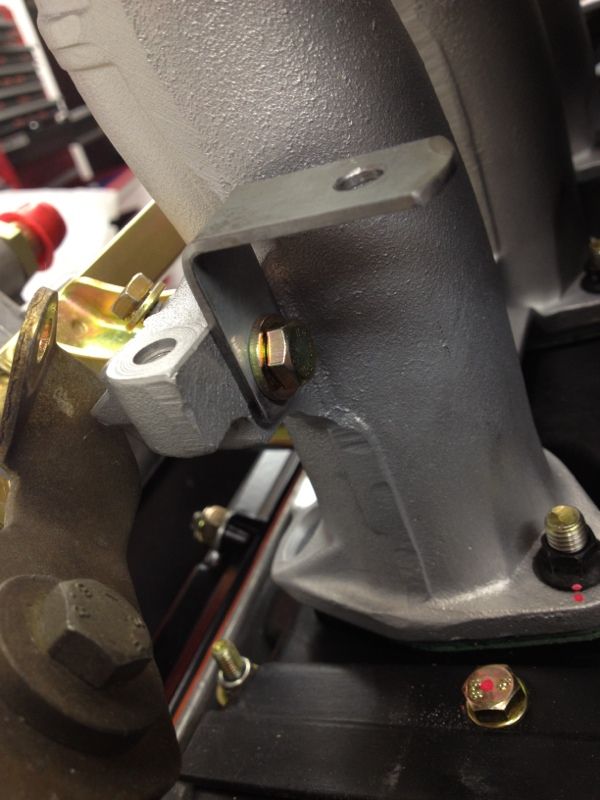 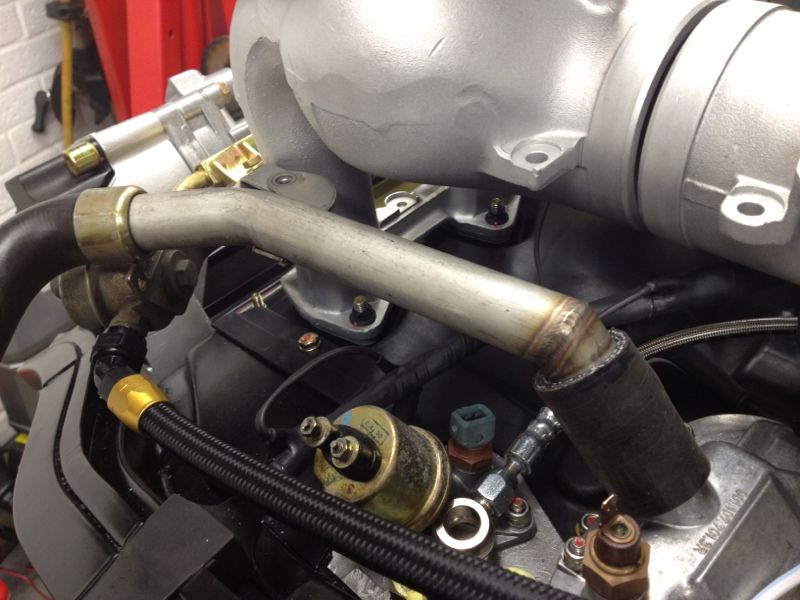 Moving on to the second phase of butchering the exhaust headers, the whole system was assembled so that positioning of each wastegate could be finalised. Header for cyl 1-3 was first to be modified (God I love my new air sabre saw!), tidied up with the die grinder. Wasn't too pleased to see rather untidy welds on the inside of the secondaries....the EGT boss was done by a 3rd party just after I bought the car, to hook up to the Zeitronix AFR. The swarf etc on the rest of the pipework, hmmmm, time to clean up, and rather glad I saw this before firing up the engine, would've made a mess of the turbine impeller. 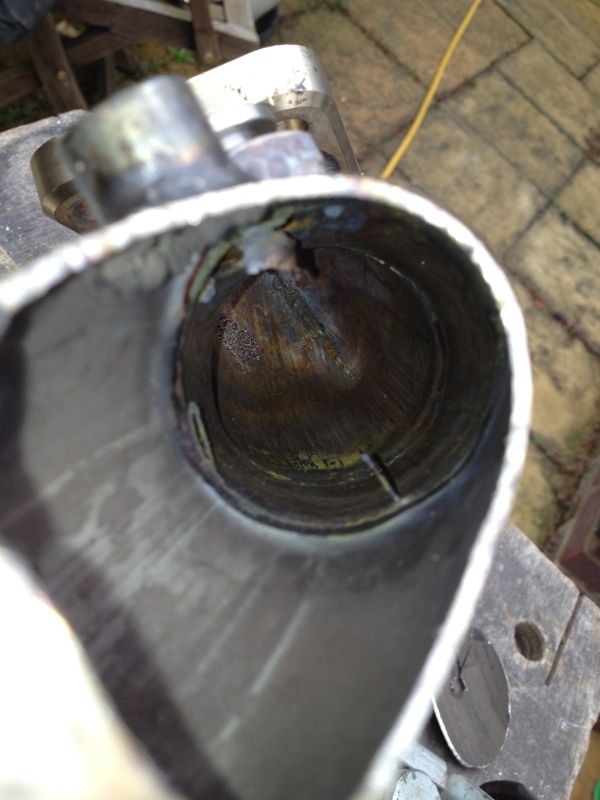  An hour or so later with the die grinder, and it's looking a whole lot tidier, along with smoothing the welds that join the secondaries to the T3 flange. 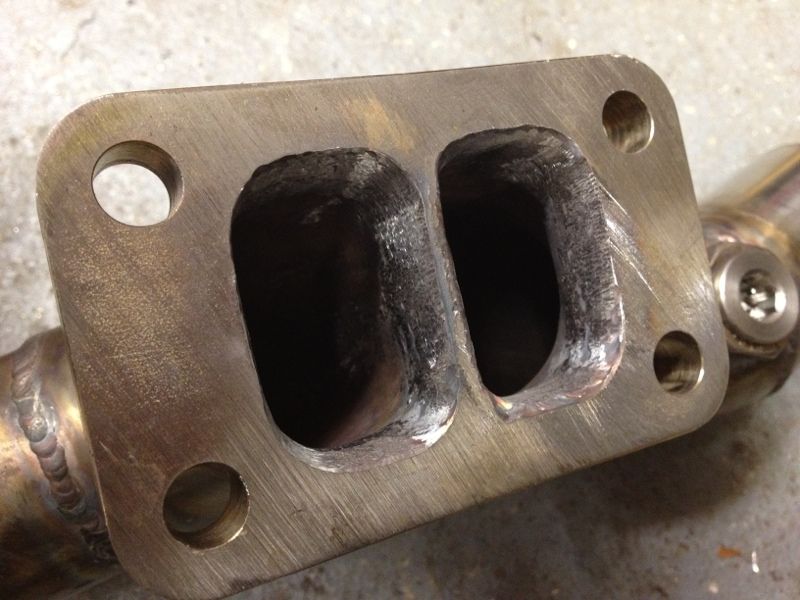 Then today, quick lunchtime visit to Fabweld in Deal to tack the wastegate necks in place, along with W/G QR flanges. Fingers crossed it's all in the right position and the W/G's don't foul any other part of the exhaust system. The RH one for cyl 4-6 is really tightly situated between the hot air duct and the silencer, but I was really keen to keep the neck as short as possible, with their position on the apex of the air flow, and the same distance from the merge collectors from primary>secondary. According to the Turbosmart documentation (even though I'm using Tial), my positioning is just about spot-on! Pics to follow later this evening. 
__________________
1993 (MY92) 964 Turbo 3.3 - Horizon Blue - Follow my 964 Turbo project here... http://forums.pelicanparts.com/911-engine-rebuilding-forum/626572-964-3-3-turbo-efi-conversion-using-syvecs-life-racing-engine-management.html On Instagram (along with other stuff) as @spenny_.b #spennybengineproject |
||
|
10-23-2012, 10:04 AM
|
|
|
Kartoffelkopf
|
Quote:
Liking that Shineseal product, thanks....I never knew such stuff existed. I've just emailed them to investigate whether they have a UK disti. The amount of effort (and mileage) thats gone into this engine, I want it looking this nice for a very long time! Cheers mate S
__________________
1993 (MY92) 964 Turbo 3.3 - Horizon Blue - Follow my 964 Turbo project here... http://forums.pelicanparts.com/911-engine-rebuilding-forum/626572-964-3-3-turbo-efi-conversion-using-syvecs-life-racing-engine-management.html On Instagram (along with other stuff) as @spenny_.b #spennybengineproject |
||
|
10-23-2012, 10:17 AM
|
|
|
Kartoffelkopf
|
It all fits, bang-on the money, first time of asking. Chuffed.  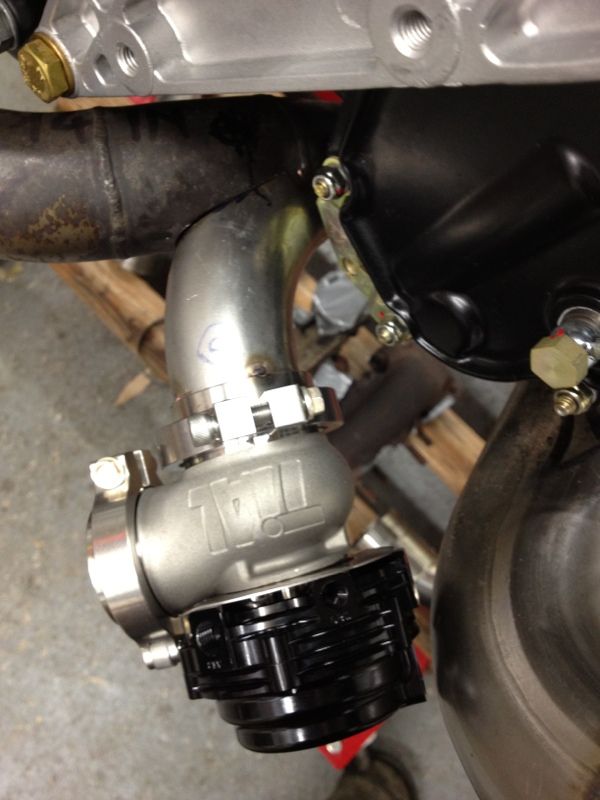 The LH unit, cyl 1-3---> 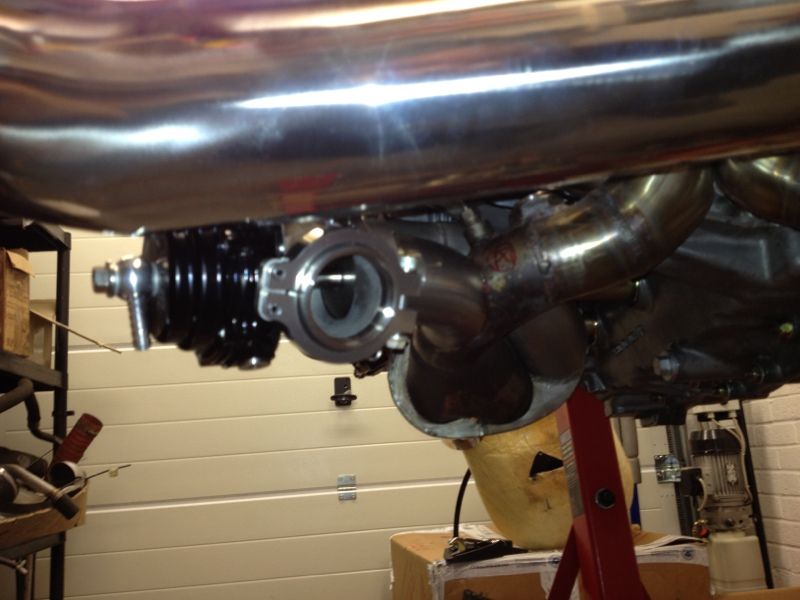  And the RH W/G...a lot tighter ---> 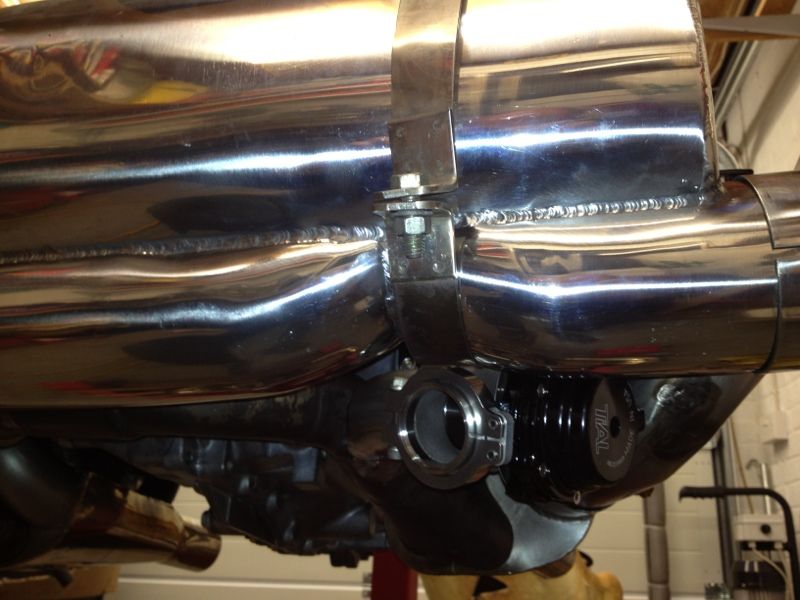 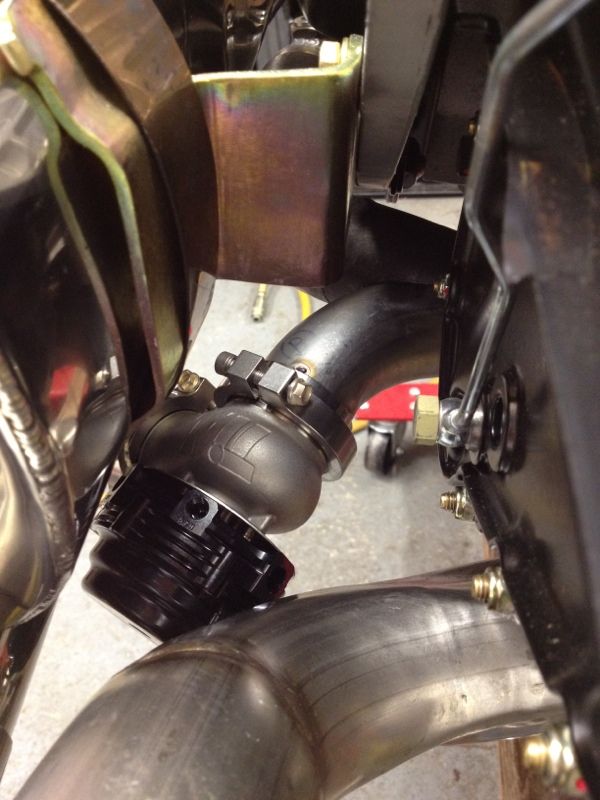 And a couple of stubby screamer pipes out the back of these bad boys, nice! 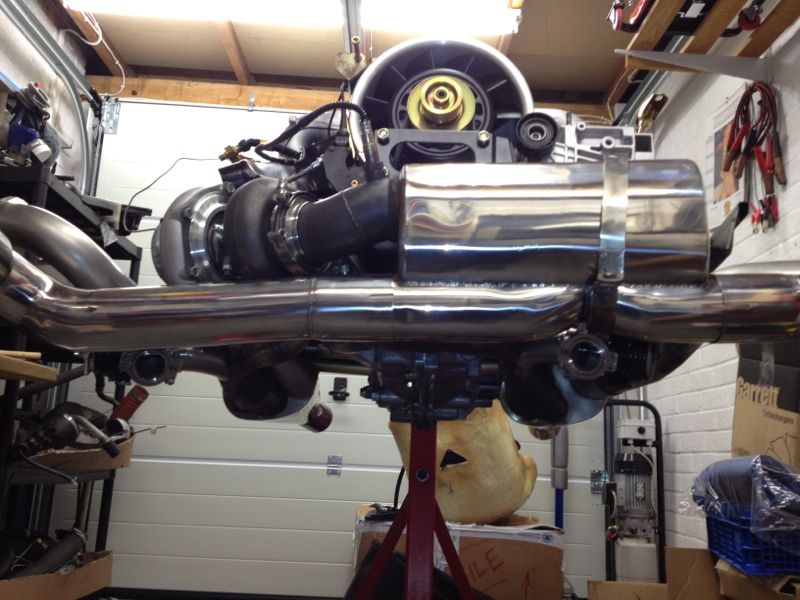 Not sure if I'm going to have them firing out the back underneath the bumper, or down to the ground. If out the back, then will probably have to wait until the engine's back in the car, to then measure the drop needed to clear the bumper.
__________________
1993 (MY92) 964 Turbo 3.3 - Horizon Blue - Follow my 964 Turbo project here... http://forums.pelicanparts.com/911-engine-rebuilding-forum/626572-964-3-3-turbo-efi-conversion-using-syvecs-life-racing-engine-management.html On Instagram (along with other stuff) as @spenny_.b #spennybengineproject Last edited by Spenny_b; 10-23-2012 at 03:02 PM.. Reason: Added better photo of the RH wastegate |
||
|
10-23-2012, 12:29 PM
|
|
|
Kartoffelkopf
|
Another job I've been meaning to do, was make a template of the GT35's turbine inlet flange, then overlay it onto the T3 of the manifold, to ensure that when I'm bolting everything together, it's alignment is such that the 2 x divided inputs are central.
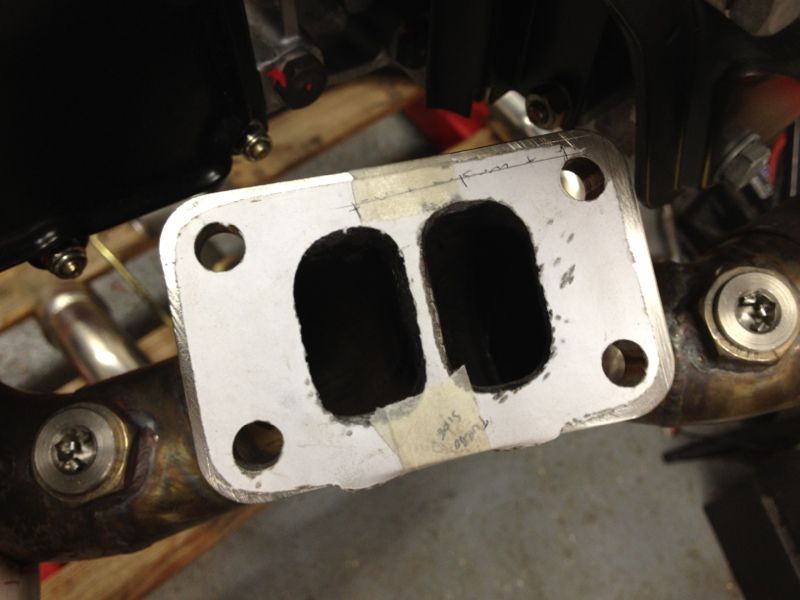 Once taped in place, I scribed the edges onto the manifold flange. I did think about dowling the flanges, but that's (probably?) a little OTT! One thing I did notice, is that the inlet ports on the turbo are a fair amount smaller than those on the manifold.....  Chris/anyone....can the turbo's turbine housing be fettled with the die grinder, to remove the step that the exhaust gas would "see"? I'm guessing that Garrett would throw a wobbly with any future warranty claim!! Is it advisable, or are those inlet sizes optimum for the feeding of gas into the twin scroll housing? Cheers S Last edited by Spenny_b; 10-23-2012 at 03:01 PM.. |
||
|
10-23-2012, 12:40 PM
|
|
|
Moderator
Join Date: Dec 2001
Posts: 9,569
|
What are those plugs on the top? Are those for the 02 sensors?
Are they perfectly vertical? I realize packaging is VERY tight there, do a pair of wideband sensors fit? They stick out quite a bit. I have also been warned that a vertical orientation can cause heatsoak of th sensors. Then again, they can't be pointing straight up nor horizontal either-- it seems that about a 45 degree angle is optimum, which looks impossible given space limitations.
__________________
'66 911 #304065 Irischgruen 96 993 Carrera 2 Polarsilber '81 R65 Ex-'71 911 PCA C-Stock Club Racer #806 (Sold 5/15/13) Ex-'88 Carrera (Sold 3/29/02) Ex-'91 Carrera 2 Cabriolet (Sold 8/20/04) Ex-'89 944 Turbo S (Sold 8/21/20) |
||
|
10-23-2012, 12:45 PM
|
|
|
Registered

Join Date: Mar 2005
Location: Phoenix, AZ
Posts: 2,862
|
Sure, take off that turbine housing and port-match it with a carbide grinder. Not a problem.
Future warranty claim... not much goes wrong with a thick cast turbine housing! Non-issue.
__________________
Chris Carroll TurboKraft, Inc. Tel. 480.969.0911 email: info@turbokraft.com http://www.facebook.com/TurboKraft - http://www.instagram.com/TurboKraft |
||
|
10-23-2012, 12:51 PM
|
|
|
Kartoffelkopf
|
Quote:
So....I can either leave the bosses in place with a bung; which goes agains everything my OCD tells me and makes me twitch ever-so-slightly just thinking about it. Or, I can take them back up to H&S to be re-modified, probably lose another fortnight and cost a few £££'s to do it. But it'd look neater with those sections chopped out and replaced. The ECU's Lamda sensor will now be installed into the short length of pipe between the turbo exit and the silencer, where the existing one is (which is connected to the Zetironix). I think I'm also going to install the 3rd EGT sensor there (again, for the Zeitronix)....for curiosity's sake, I can then compare temps either side of the turbo. It'd be useful - and neater - to be able to take 2 feeds from a single sensor, one for the ECU, the other for the Zeitronix, but I know that the Lamda's are calibrated individually, so don't want to change the circuit LCR by piggybacking another electrical load onto it. Same with the thermocouples, I know they're v sensitive and must use K-Type wire, so one feed per sensor.
__________________
1993 (MY92) 964 Turbo 3.3 - Horizon Blue - Follow my 964 Turbo project here... http://forums.pelicanparts.com/911-engine-rebuilding-forum/626572-964-3-3-turbo-efi-conversion-using-syvecs-life-racing-engine-management.html On Instagram (along with other stuff) as @spenny_.b #spennybengineproject |
||
|
10-23-2012, 02:56 PM
|
|
 |
|
|
| Tags |
| 964 c4/c2/turbo , efi conversion , life racing , syvecs , turbokraft |


 1993 Porsche 911 (964) Turbo 3.3
 2006 Lotus Exige Cup 240 (#45 of 50)
 BMW M2 Competition
 BMW R1250 GS Rallye HP
 Ducati 748R


