|
|
|
|
|
| Author |
|
|
Straight shooter

|
JB weld works fine on the backside of the studs on the chain boxes.
You should be able to replace all tensioner ramps without splitting the case. You can back the bolts that hold the inner ramps out of the case which will pop them loose. When you reinstall it can be a bit tricky to wedge the new ramps back into place.
__________________
Of the value traps, the most widespread and pernicious is value rigidity. This is an inability to revalue what one sees because of commitment to previous values. In motorcycle maintenance, you MUST rediscover what you do as you go. Rigid values makes this impossible. ― Robert M. Pirsig, Zen and the Art of Motorcycle Maintenance: An Inquiry Into Values |
||
 10-11-2013, 09:31 PM
|
|
|
Always Be Fixing Cars
Join Date: Nov 2012
Location: SE CT
Posts: 1,629
|
Fan related questions:
Should the alternator be rebuilt as a matter of course or should I let it be? Will any old shop be able to handle it or will they be stunned by this (french?!) object from a weird german car? Ive read the thread on fan resto. I have no desire for bling or body color anything but would like to know how to at least get the housing resembling clean. The fan itself cleaned up decently with elbow grease. Housing... Yuck. Any ideas?
__________________
'91 964 C4 - New Daily '73 Alfa GTV - 90% done 50% to go '65 912 - Welding in process |
||
|
10-12-2013, 04:02 PM
|
|
|
Always Be Fixing Cars
Join Date: Nov 2012
Location: SE CT
Posts: 1,629
|
Progress
Got the new TOB and old starter gear installed on the new PP. Anyone spot mistakes? The inside of the new TOB is splined (?) whereas the old one is not. Curious.
  Think I'll have the flywheel lightly resurfaced. Cleaned it with scotchbrite but there are some marks from the rivets or rivet relief pockets that are a bit stubborn.   Pics of the clean fan and very un-clean housing. What can I do to this housing in my garage that will make it look just slightly better?  
__________________
'91 964 C4 - New Daily '73 Alfa GTV - 90% done 50% to go '65 912 - Welding in process |
||
|
10-13-2013, 11:23 AM
|
|
|
Registered Loser
|
Nice work. I have been using Waynes book for my work, Also have the Bentley but have not referred to it much. Well it sems Wayne left out that you need the P212 tool to remove the tiny sprocket holding thingy.
I was easily able to remove the 19MM cam nut with my newly acquired tools! Is there any alternative the P212 tool?
__________________
Current Rides:: 1987 Red 911 Targa, 2007 R320 CDI, 2003 Red Dodge Ram Hemi, 1993 Beater Jeep Cherokee, Airbus A320 Gone but not forgotten: 1981 VW Scirocco S, 1989 Honda Accord Coupe LXI, F-16C (still my favorite vehicle!),MC-130P, C-130E, T-38, T-37, C150, C172, PA180 |
||
|
10-13-2013, 11:33 AM
|
|
|
Always Be Fixing Cars
Join Date: Nov 2012
Location: SE CT
Posts: 1,629
|
Not sure I'm following you Whiz - looks like P212 is for installing the flywheel shaft seal.
I was able to get the cam nut, tensioners, sprockets etc out w/o special tools.
__________________
'91 964 C4 - New Daily '73 Alfa GTV - 90% done 50% to go '65 912 - Welding in process |
||
|
10-13-2013, 11:38 AM
|
|
|
Schleprock
Join Date: Sep 2000
Location: Frankfort IL USA
Posts: 16,640
|
The flywheel looks pretty good. I'd leave it alone. Just be sure to clean the stepped area above the clutch disc contact surface. This stepped surface is where the clutch housing seats.
The release bearing looks good. DO NOT put any grease on the inside diameter of it. It's plastic and does not require grease. But do put a LIGHT swab of extreme pressure grease or antiseize on the release bearing ears where the fork contacts it 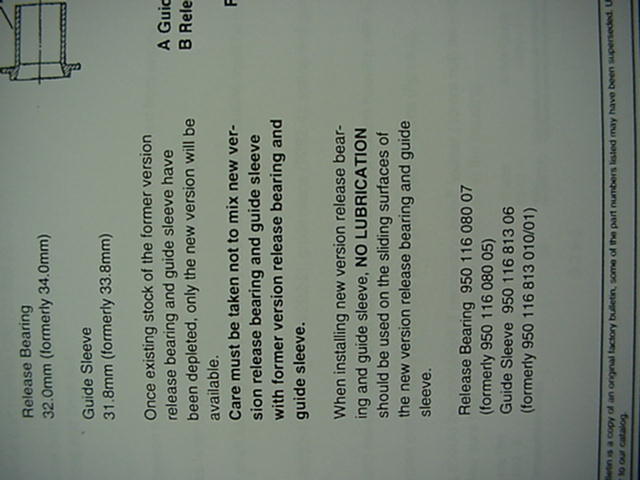 You can scotchbrite the fan housing and paint it with some high temperature black paint. Flat black looks pretty good in my opinion.
__________________
Kevin L '86 Carrera "Larry" |
||
|
10-13-2013, 04:19 PM
|
|

|
|
Always Be Fixing Cars
Join Date: Nov 2012
Location: SE CT
Posts: 1,629
|
Kevin, what about those round markings on the flywheel? I'm not certain I understand how they got there but they are also on the old PP. Most wear happens when the parts are moving, and obviously you would not get a perfect circle in that instance. I suppose its an impression left from the car sitting? It came from Upstate NY where it probably sat 6mos/year. I ran my fingernail along and could juuuust barely feel something in some instances but it is certainly not a deep cut. Another hour with the scotchbright will probably get it off.
  
__________________
'91 964 C4 - New Daily '73 Alfa GTV - 90% done 50% to go '65 912 - Welding in process |
||
|
10-13-2013, 04:28 PM
|
|
|
Schleprock
Join Date: Sep 2000
Location: Frankfort IL USA
Posts: 16,640
|
Don't sweat those spots. Those are from the rivets on the clutch disc. I'm sure it's rust from sitting for so long. Won't be a big deal with the new disc.
__________________
Kevin L '86 Carrera "Larry" |
||
|
10-13-2013, 04:43 PM
|
|
|
Straight shooter
|
Rivet marks from long parks are normal. I would leave it alone as well. Clean everything with brake clean including finger prints.
__________________
Of the value traps, the most widespread and pernicious is value rigidity. This is an inability to revalue what one sees because of commitment to previous values. In motorcycle maintenance, you MUST rediscover what you do as you go. Rigid values makes this impossible. ― Robert M. Pirsig, Zen and the Art of Motorcycle Maintenance: An Inquiry Into Values |
||
|
10-13-2013, 04:46 PM
|
|
|
Always Be Fixing Cars
Join Date: Nov 2012
Location: SE CT
Posts: 1,629
|
Thanks dudes, will do.
Going to the garage to clean up that disc and hopefully get some purchase on the damn guide tube screws. Why pan head screws used ANYWHERE outside the cabin of a car is beyond me.
__________________
'91 964 C4 - New Daily '73 Alfa GTV - 90% done 50% to go '65 912 - Welding in process |
||
|
10-13-2013, 04:49 PM
|
|
|
Always Be Fixing Cars
Join Date: Nov 2012
Location: SE CT
Posts: 1,629
|
Parts cleaning is going full speed while my heads are being dissasembled at Anchor Atlantic.
A few sealing questions I'd like to put to the community: 1. I made the decision not to disturb the pistons in the cylinders. Compression was good all around prior to the rebuild, bores look fantastic, and I don't want to gamble with re-ringing the alusils. If I put it back together and it smokes from the rings, well I'll cross that $3200 bridge if I come to it. During dissasembly the cylinders were nudged about a tiny bit, and more over, pressure was of course released on the cylinder base gaskets. Must these base gaskets be replaced? I'd prefer not to wrangle with the cylinders to get them off with the pistons still in their bores but I want to do the job right. 2. The plan is to seal metal to metal surfaces with Loctite 574 and dress the gaskets (not shaft seals) with Curil-T. Any other sealants we feel are must haves? 3. I have a black magic fear of changing the rear main seal. I am well aware that no sealant should be used on the OD of the seal and that i should look for a groove in the crank. Is there anything else to know? one brand better than another? I'm letting the dog sleep on the pulley seal as it is bone dry. My breather was a firehose of oil all over the back of the motor so I really can't confirm if the r main was leaking or not so it feels right to replace it.
__________________
'91 964 C4 - New Daily '73 Alfa GTV - 90% done 50% to go '65 912 - Welding in process |
||
|
10-17-2013, 02:29 PM
|
|
|
Schleprock
Join Date: Sep 2000
Location: Frankfort IL USA
Posts: 16,640
|
No need to disturb the cylinders and potentially break a piston ring. Just ensure that during your work & cleaning that no crud gets under the base gaskets. Do a cursory inspection and clean up around them, nudging the cylinder off the case a bit to ensure you get everything clean around/under them.
You should have no issues with smoke or whatever when you put it back together. You will have not disturbed anything on the piston & cylinder so there's no reason to believe there will be a problem. 574 on the camshaft housings is fine. Just don't over-do it. A thin coat of it is all that is needed and only on one surface. Many cam housings i've seen have a ton of sealant oozed out of them. BTW a good product i've found for 574 removal is Loctite Chisel Remover. Can get it from Grainger or Pegasus Racing. Tried the new low VOC Permatex & CRC formulas and they're weak. Curil T is ok on the gaskets like the breather cover, chain housing-to-engine case and the chain housing covers. But they do OK dry too. Don't put the Curil on the valve cover gaskets. They don't need it IMO. Curil would be good on the intake manifold gaskets too. Just make sure to flatten/level the insulators to get a good seal with your gaskets. 574 is recommended on the pesky paper gasket that goes under the circular cam plate that seals the chain housing to the cam housing. Sometimes sticky Curil can make that one leak if the gasket sticks in place while installing the cover plate. 574 is less sticky and lets the gasket "glide" if it needs to move a bit. Most importantly, look at the gasket from the back side of the chain housing after you've installed the cam cover plate. If the gasket has moved, do it over again. You don't want a leak there because the engine is coming back out again...... Another thing to note about the cam cover plate. This cover, and it's receiving surface on the cam housing, are usually not all that flat. I would highly recommend putting a piece of 800 wetsand paper on a piece of glass and "resurfacing" the covers and the receiving sealing surfaces of the cam housing. It'll make for a much more reliable seal. As they stand right now, I bet the amount of contact area for the gasket sealing is minimal. As a test, you can color the sealing surfaces of both parts with a permanent marker and run them across the sandpaper. You'll be surprised how NOT flat they are when you see how little marker comes off as you make a few passes across the paper. You are wise to leave the snout seal alone. If it ain't leaking, leave that sucker be! And honestly, a lot of people mistake the snout seal for a leak culprit when its actually the #8 main bearing housing o-ring. That o-ring is inside the case so there's really nothing one can do to fix the leakage w/out splitting the case. Good to hear yours isn't leaking. The rear main seal can be a crapshoot. It's not hard to replace, as you just dent it with a blunt flatblade screwdriver and a hammer at the notch in the case. Then it prys right out. Installation can be a bit tougher. Many people just tap the new one in with alternating taps opposite each other. Sometimes it just won't go well and the seal keeps popping out. Or worse, the edge of the case grabs the rubber coating on the seal and scrapes it off. If you do replace the flywheel end seal, I recommend using a fine tooth file and lightly chamfer the edges of the bore. Doing so helps eliminate the damage to the rubber coating going in. I use some water or spit around the perimeter of the seal to lube it going into the bore. Water/spit dries up and avoids opportunity for lubed seal to pop out. The Curil-T on the seal periphery is a BAD application of that stuff. Just use a LIGHT swab of oil on the seal lips where it seals against the spinning crankshaft area. This is recommended to avoid dry spinning during first startup. If you do the tapping-in method, use some sticky grease on the back side of the seal to keep the garter spring attached to the seal lip. The heavy tapping can sometimes pop the garter spring off the seal and you don't even know it. That's why many service manuals say to "pack" the seal with grease before installation. I'm lucky that I acquired a small lot of Porsche specialty tools a while back. Two of the tools are the crankshaft seal presses for front & rear seals. They work fantastic.
__________________
Kevin L '86 Carrera "Larry" |
||
|
10-18-2013, 07:25 AM
|
|

|
|
French Import
|
Quote:
__________________
Gilles & Kathy Happiness is not having a Porsche in the garage... Happiness is having a Porsche on the road!  86 Porsche 911 Cabriolet, 2011 BMW 1200RT, 03 Saab 93 Cabriolet, 06 MB E350 Estate |
||
|
10-18-2013, 04:56 PM
|
|
|
83 911 Production Cab #10
|
Quote:
 Holly caca, It's a big one.
__________________
Who Will Live... Will See 83 911 Production Cab #10, Slightly Modified: Unslanted, 3.2, PMO EFI, TECgt, CE 911 CAM Sync / Pulley / Wires, SSI, Dansk Sport 2/2, 17" Euromeister, CKO GT3 Seats, Going SOK Super Charger |
||
|
10-18-2013, 09:50 PM
|
|
|
Always Be Fixing Cars
Join Date: Nov 2012
Location: SE CT
Posts: 1,629
|
Kevin - many thanks for this informative reply. Any advice on what to do about the slight carbon buildup at the top of some cylinders? Scotchbright it off?
 While my heads are in the shop I've been cleaning and painting. I'm using VHT high temp primer / satin black on most everything except parts that are too pitted/rusted and difficult to clean back to bare metal such as the D/S front lower tin on which I'll use POR-15 (which is in fact rated to 450 degrees F). I rebuilt my fuel lines with Gates Barricade FI hose and Oetiker clamps. I've only clamped down one side per line to avoid "clocking" (thanks Smoove for that tip) and will clamp the other side upon install. I checked that the clamp sizes I used were appropriate to the OD of the hose on this very thorough chart from Oetiker.  Removed the old JB Weld on the back of the chain covers and re-applied with JB High Temp Expocy  Cam towers have been cleaned  Fan housing / flapper boxes / engine tin are being high temp primed and painted. The VHT stuff needs to heat to 200F to cure. I know the flapper will see this - presuming the rest of the motor (ie fan housing) will as well?  
__________________
'91 964 C4 - New Daily '73 Alfa GTV - 90% done 50% to go '65 912 - Welding in process |
||
|
10-20-2013, 04:19 PM
|
|
|
Always Be Fixing Cars
Join Date: Nov 2012
Location: SE CT
Posts: 1,629
|
Another question I forgot -
Can someone tell me if the piece that holds the two speed reference sensors should have two identical metal sleeves to receive the senders? I don't have a picture of mine, but I was surprised to find that it was asymmetrical, that is to say there was a metal sleeve to house JUST ONE SENDER (I think the lower but can't recall). PET makes it look like there should be two metal housings - see red. 
__________________
'91 964 C4 - New Daily '73 Alfa GTV - 90% done 50% to go '65 912 - Welding in process Last edited by r-mm; 10-20-2013 at 06:02 PM.. |
||
|
10-20-2013, 04:31 PM
|
|
|
Always Be Fixing Cars
Join Date: Nov 2012
Location: SE CT
Posts: 1,629
|
Pic of the sender holder in question

__________________
'91 964 C4 - New Daily '73 Alfa GTV - 90% done 50% to go '65 912 - Welding in process |
||
|
10-20-2013, 06:02 PM
|
|
|
Smoove1010
|
Quote:
GK |
||
|
10-20-2013, 07:53 PM
|
|
|
Always Be Fixing Cars
Join Date: Nov 2012
Location: SE CT
Posts: 1,629
|
Quote:
Nor am I positive I know what the inside of the TOB is supposed to look like. Anyone care to chime in on this?
__________________
'91 964 C4 - New Daily '73 Alfa GTV - 90% done 50% to go '65 912 - Welding in process |
||
|
10-20-2013, 08:38 PM
|
|
|
83 911 Production Cab #10
|
Quote:

__________________
Who Will Live... Will See 83 911 Production Cab #10, Slightly Modified: Unslanted, 3.2, PMO EFI, TECgt, CE 911 CAM Sync / Pulley / Wires, SSI, Dansk Sport 2/2, 17" Euromeister, CKO GT3 Seats, Going SOK Super Charger |
||
|
10-21-2013, 04:40 AM
|
|
 |
| Thread Tools | |
| Rate This Thread | |
|
|


 P911
P911

 Car with no name
 Das Babe
 Das Babe Metalberiech
 1987 Porsche 911 Cabriolet


