|
|
|
|
|
| Author |
|
|
Registered
Join Date: Jul 2003
Location: Perfidious Albion
Posts: 4,184
|
Quote:
 Quote:
I have a $500 blue box installed on my 930/66 that provides per-cylinder knock detection/adaptive retard with a single control (gain). Which was really quite trivial to set up. It may well have saved me big bucks when my dizzy stopped retarding and locked at ~25 degrees at idle - and the box compensated (but lit up the indicator lights very busily, which was how I knew). Having watched that box deal with the shortcomings of 70's technology (namely CIS, distributors) and poor gasoline in daily driving for quite a long time now, I'm sold. And don't intend to spend money on EFI without enabling knock detection. It's almost as difficult to buy a decent DME without knock detection these days as it is a car without it. The tuner I use is MoTeC-certified - including for their knock feature (which I'm told is quite an expensive course, without which they won't sell you the knock modules/feature). He doesn't think it's a big deal to set it up; in fact he thinks it's a very sensible idea. As in all these things, your guy may tell you something else.
__________________
'77 S with '78 930 power and a few other things. |
||
 03-17-2012, 05:43 PM
|
|
|
Kartoffelkopf

|
Quote:
Thanks for the info....it's certainly not something I'm doubting, for sure I can see the value of it, and in your case it certainly seems to have paid dividends. I'll raise the subject again when I next pop into his workshops - now is the time to include it, especially as the Nikkies already have the facility to bolt on a bridge to accommodate a sensor (whereas in the beginning, I wasn't even sure to what level I was going to tear down the engine, if at all, so machining the Mahles to bolt on a bridge would have meant significantly more work). I'll try and remember more accurately what Steve told me the first time (w.r.t. the kit needed to set-up the knock point) and post it. I didn't do a particularly elegant job of trying to explain his thoughts yesterday! If we can utilise something (either sensors or settings) from another model then I'm certainly keen to build-in as much safety as possible. Cheers Spuggy S |
||
|
03-18-2012, 10:24 AM
|
|
|
Kartoffelkopf
|
Update....
Evening folks,
Have now got my rods back from the third round of re-working. They were re-bushed by Rob Walker Engineering for a second time after we decided to use Omega pistons with a 22mm gudgeon pin, rather than the stock 23mm pin. However....when I showed these to Mr Omega himself (Fred), he was happy with the quality of the honing of the small-ends, but not at all happy with the sizing. So, not only did the trip up to the Midlands prove fruitful for buying a set of brand new Omega pistons, but thankfully Fred also "caught" a potential issue for me. The clearance (get this, by FEEL) he reckoned to be about 10um when we assembled a rod to a piston....when actually measured, it was 11um! Fred wants 25um clearance on his gudgeon pins > small end bush, and kindly offered to do these for free* for me, then courier them back the next day. What an absolute star this guy is. Judging by the less than professional attitude I got from Rob Walkers office lady (meaning she hung the f***ing phone up on me at one point when discussing invoicing and how I can pay), I certainly wasn't prepared to go back there again. Pity, Rob himself comes over as a very nice guy. I have to say, the surface finish of the re-honed small-ends is now stellar, very pleased indeed. When dummy fitting to a piston, I think the best word I can think of to describe the feel of the fit, is "plush"...bit of a mountain bike suspension fork description, but kinda hits the nail on the head. So, time for some more cleaning and then some weighing..... * - Yes, I did try to give him a "drink"...practically forcing money into his hand, but he would NOT have it. Last edited by Spenny_b; 03-26-2012 at 01:04 PM.. |
||
|
03-26-2012, 12:30 PM
|
|
|
Kartoffelkopf
|
Internal component weighing & matching....
After a quick borrow of my Brothers office digital postage scales (measure to the nearest gram), I weighed everything individually with the aim of mixing and matching for a balanced set of components.
I've measured: - The con-rods (without shells or bolts) - The pistons (without gudgeon pins or clips) - The gudgeon pins - The new ARP rod bolts I've not measured the shells, small-end clips or piston rings; surely there can't be any variation that's either measurable or warrants consideration? EDITED from earlier....I've had a juggle with the spreadsheet numbers; chatting this through with a mate earlier this evening, he had a good point with regards to the pins being matched (honed) to the pistons at Omega, so probably not a good idea to start swapping them about. As you can see from the screen grab below, I've mixed and matched the various components to get consistent set of 6 (haven't got around to measuring bolt lengths yet) ---> 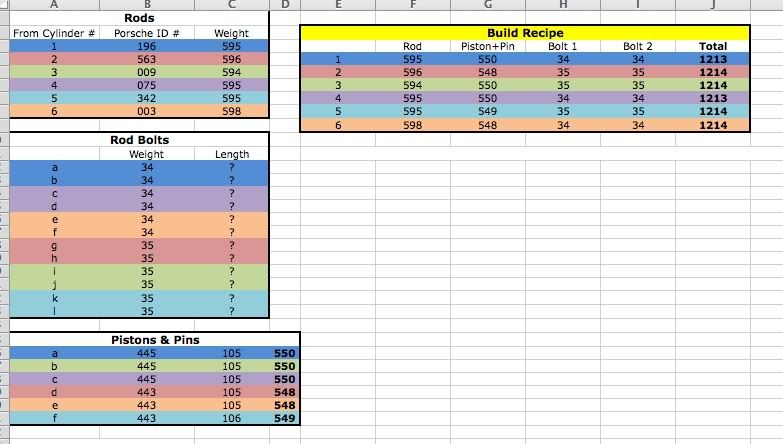 So, re-calculating the total combined weight of the assembly as they came from Omega, I plugged these new numbers in, and got an even better result than previously. I still have two assemblies that are 1gsm lighter than the other four, on #1 and #4, where I'd want them. I also don't now need to have one lighter bolt paired with a heavier bolt in order to fine-tune the rod weights. Good stuff. A question.....Would you guys go to the trouble of grinding 1gsm from the inside of the pins on the 4 heaviest assemblies, to bring them all down to 1213g? Finally...does all this look ok to you? Method and the actual numbers? Cheers guys Spencer. Last edited by Spenny_b; 03-26-2012 at 06:25 PM.. Reason: Recalculating of spreadsheet numbers |
||
|
03-26-2012, 12:53 PM
|
|
|
Kartoffelkopf
|
Another "waffer-thin" update....
Another job sorted yesterday....got the cooling fan back from my mate Shaun the other day. A very simple one for him to do, just etch prime and spray satin 30% black.
I had removed the spigot/bearing carrier beforehand, making it easier and tidier to spray than masking up. I thought I was going to have an issue, as it took heat from a heat gun on the fan itself, to open it up enough to push the steel centre out. Of course, need to be a little more careful now it's painted! Steel collar into the freezer for a couple of hours......kitchen oven set to 70degC.....hope for the best but plan for the worst.....it flew in like a charm....even the 3 periphery holes lined up straight away. I even remembered to orientate the collar correctly as there was a witness mark from the pulley pin that told me which of the 3 holes to index to (rotationally), so no balancing issues to worry about (if one ever does worry about them?) 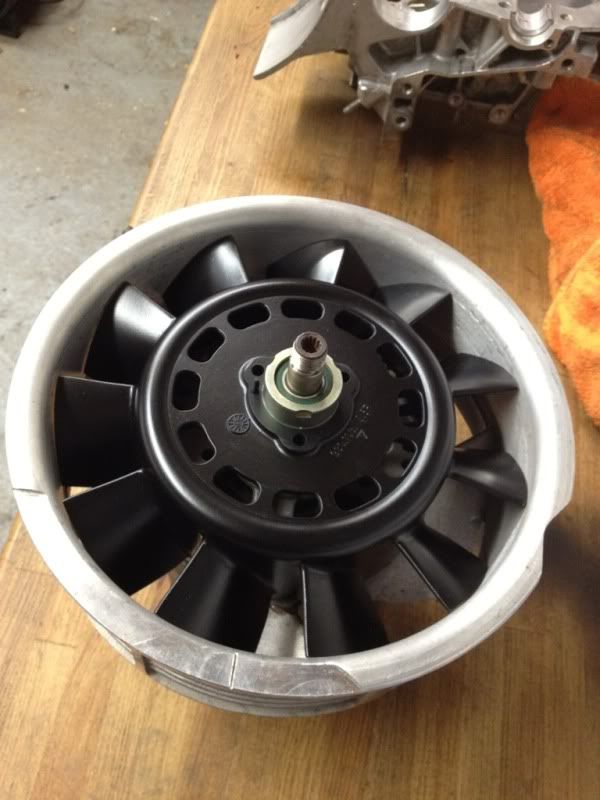 Not fully assembled until I get the pulley halves, etc, back from the plating shop....but I'm happy with that! |
||
|
03-26-2012, 01:16 PM
|
|
|
Kartoffelkopf
|
Another quick update...
A job I've been meaning to do for weeks but never quite got around to it....check the piston squirters on the RH crankcase half. I did the easier LH squirters a month or so ago; all ok.
Using the method described in this thread, I found a length of thin-walled pipe...a very snug fit that required a long 8mm bolt to be dropped into the top, then gently tapped to get the pipe down t'hole and block off the cross drillings: 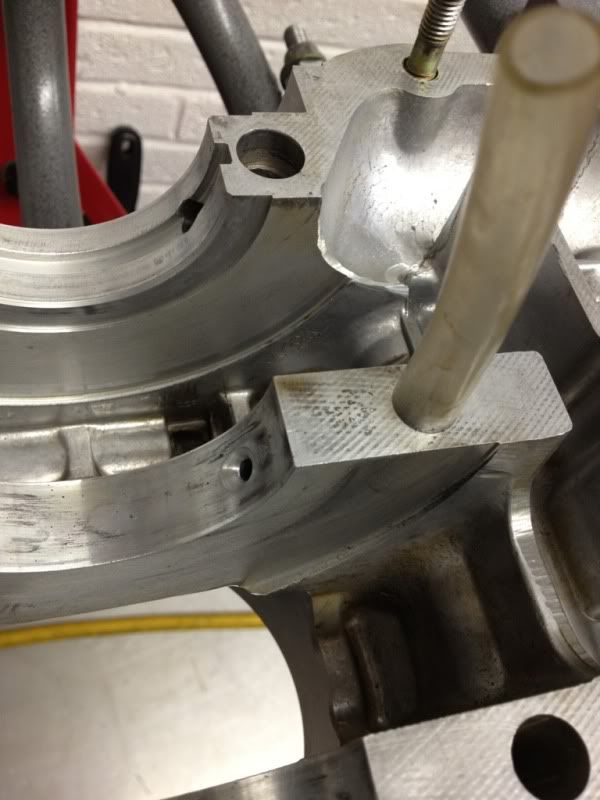 Once each was sealed, a squirt of duck oil down the hole in the main bearing holes, then a quick blow through with the air produced a nice oily mist the other side. No blocked squirters that need drilling out. Good news. 
|
||
|
03-26-2012, 05:28 PM
|
|

|
|
Kartoffelkopf
|
Powder coated items
More progress....went over this lunchtime to collect the powder coated items I dropped off a few weeks ago.
Really am very happy with the results - the tinware was looking really shabby before, but after some incineration to remove the old crud, and a nice prime and top coat, they look like new again. Big thanks to the guys at Windridge Coatings in Broadstairs, Kent...they went "above and beyond" to block all thread holes and tape up all the mating faces to prevent any scratching (and overspray of course). Any holes they didn't have a bolt for (oil feed banjo bolt holes in chain covers) they bunged with foam plugs. Proper job. A few more items to do later on; tonights job is to fabricate some strengthening gussets for the engine mount bar, then get it welded at some point, then powder coated. I'm sure I'll find some other items that I missed the first time, in the various storage locations around the house! 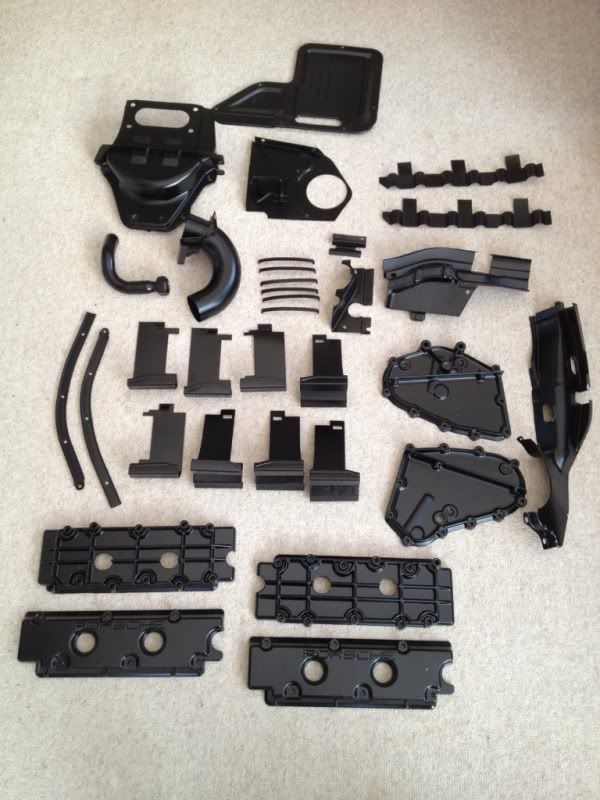 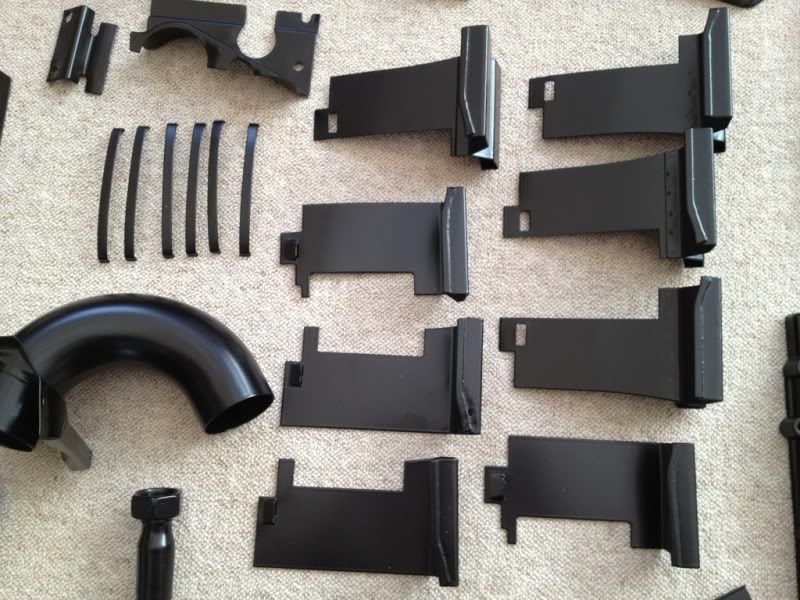 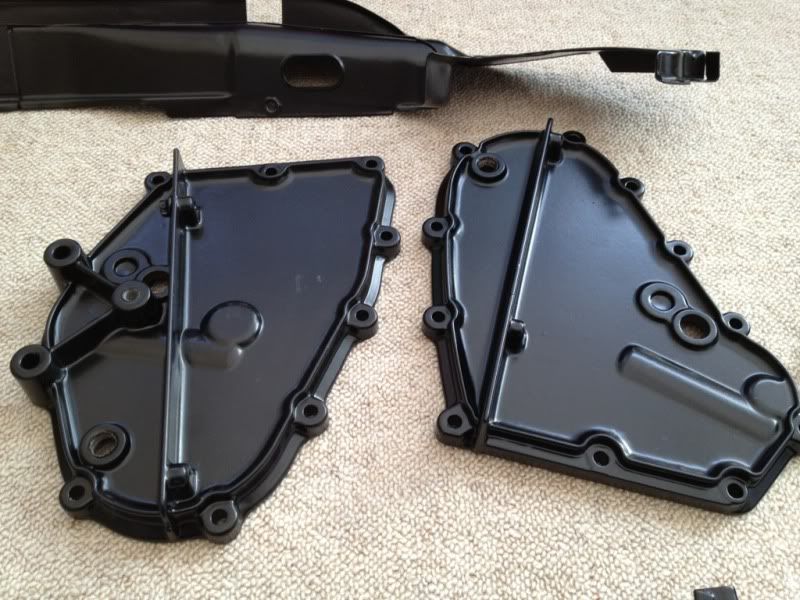  (That's not a scratch on the valve cover, just a sliver of cardboard...dirty fingerprint on the chain cover, not got around to cleaning it all yet)  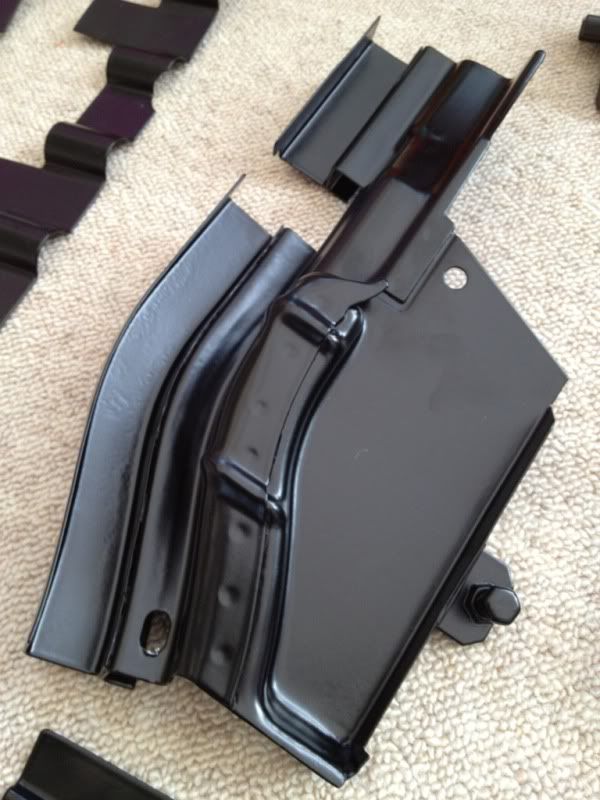 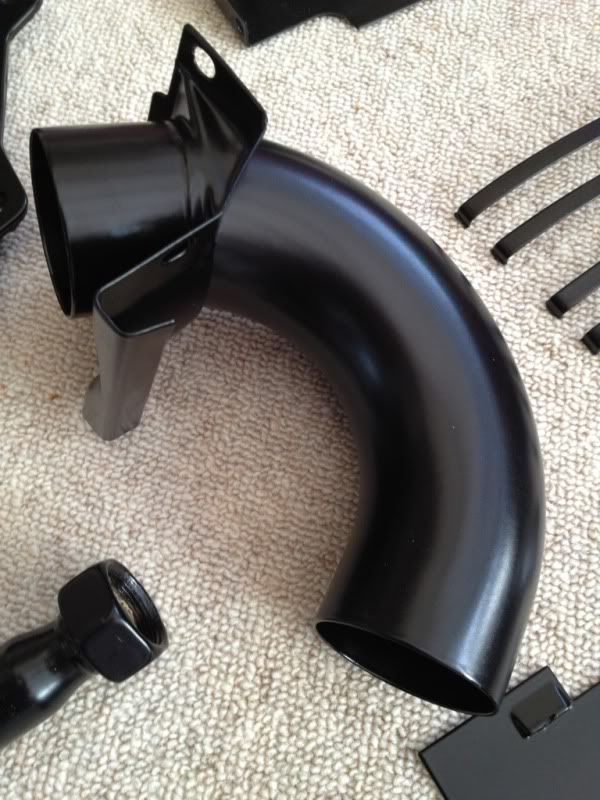 The plating of a gazillion items will be completed early next week. Nikkie cylinders have been machined are about to be shipped (tomorrow hopefully) from LN Engineering. The big (>30kgs!) shipment from TurboKraft is also en route, due in the next day or so. All getting very exciting. Well, for me at least. 
|
||
|
03-28-2012, 11:34 AM
|
|
|
Kartoffelkopf
|
Rods & Bolts....
Time to check the bolts and big-end > journal clearances.
All went without a hitch. I have to say, I love the stretch method of fastening the bolts; somehow it feels so much more accurate than only using a torque wrench. A very worthwhile addition to the tool chest. Removes any calibration concerns, whether the torquing action is done in one smooth movement, etc. An observation we made along the way - the ARP instructions say to use 40lb/ft or torque in the absence of a stretch gauge - we set the wrench to 37lb/ft to start with, and this got us to 80% of the stretch spec. Gradually upping the setting until 0.0100" was achieved. What I didn't do, was to leave the torque wrench set per the previous bolt...being a little cautious I set it back down to 37 again - glad I did. The first bolt took about 42lb/ft to get it to 0.01", the second only took 39lb/ft....so there is variation. This continued throughout the set of 12....nothing wildly out, but worth taking the time. Worth noting, that the supplied ARP lube was used on the threads and on the underside of the nut. Once all 6 were done, time to measure the ID's. The table below shows the measurements I got, and the corresponding clearances once you subtract the crank journal dimensions....all nicely in spec As a double check, I mic'd the old shells right on the very edge, and compared the new ones, in case Glyco had done another "skinny" batch like my crank main shells....seem ok, <0.01mm thinner than the OE ones. I did try to Plastigauge the rods onto the crank, but using the stretch gauge, even with my Dad holding stuff as still as possible, it was a bloody nightmare, simply impossible on a bench to get a stretch gauge onto the rods. Maybe with a jig made up, and a vice-mount bracket to bolt onto the flywheel end of the crank, it may be possible, but after an hour or two of trying, failing, head-scratching, we agreed that the slight wobble that's inevitable, would render the readings almost useless anyway, so I'm pretty happy to just go with the "mathematics" method of subtracting the journal dimensions from the bore ID. The big ends were checked for ovality and centre-centre dimensions, when the small ends were re-bushed the first time around. When the time comes, I'd triple check using Waynes "droop" check once the rods are assembled with assembly lube onto the crank. Finally, undid all the ARP fasteners, checking that they return to their undone bolt lengths, and by jingo, they're all spot-on. Phew.
Last edited by Spenny_b; 04-05-2012 at 02:00 PM.. |
||
|
04-05-2012, 01:54 PM
|
|
|
Kartoffelkopf
|
Other odds-n-sods updates....
More bling collected today - all the gold passivate re-plating has been done and for the most-part looks absolutely fantastic. Only one or two items have come up a little matt - which I knew was a gamble, as they were so far gone with rust. Full marks to Butterworths over in Ramsgate though, they gave it a couple of attempts at the bits they weren't happy with. I'm really chuffed with the fuel rails - they did look very secondhand previously--->
    Some pics of the more interesting items....but also lots of studs, nuts & bolts, washers, etc. All for the princely sum of £45. Bargain. 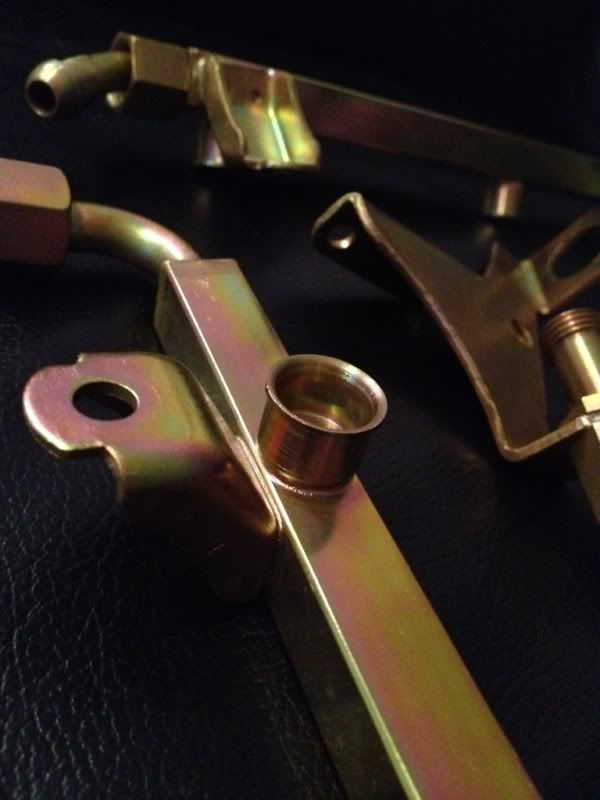 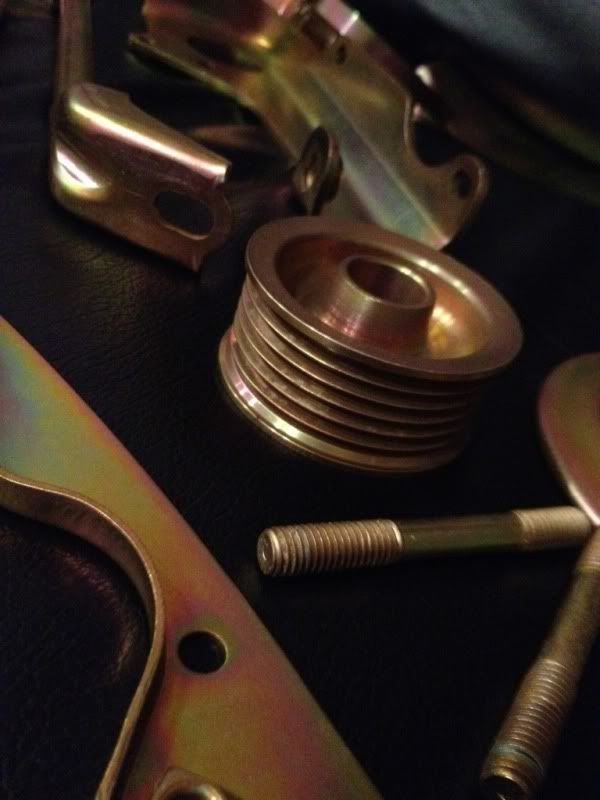 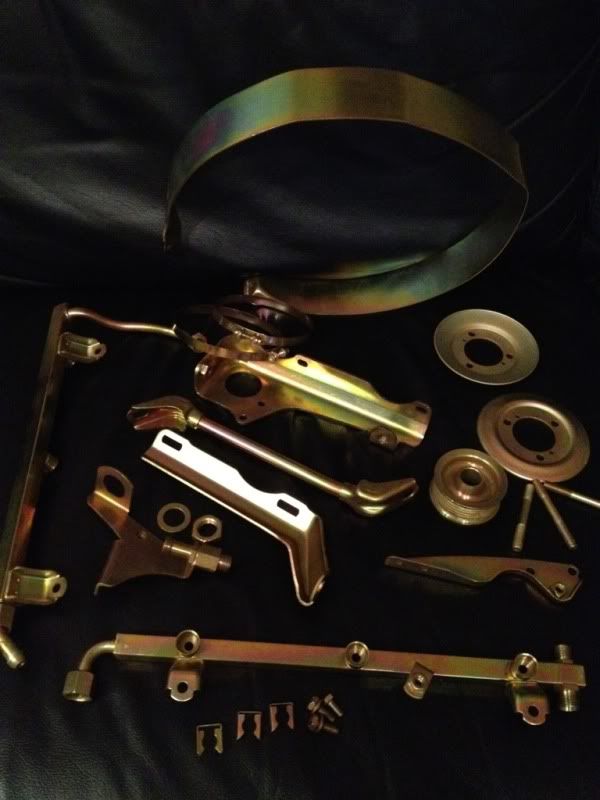 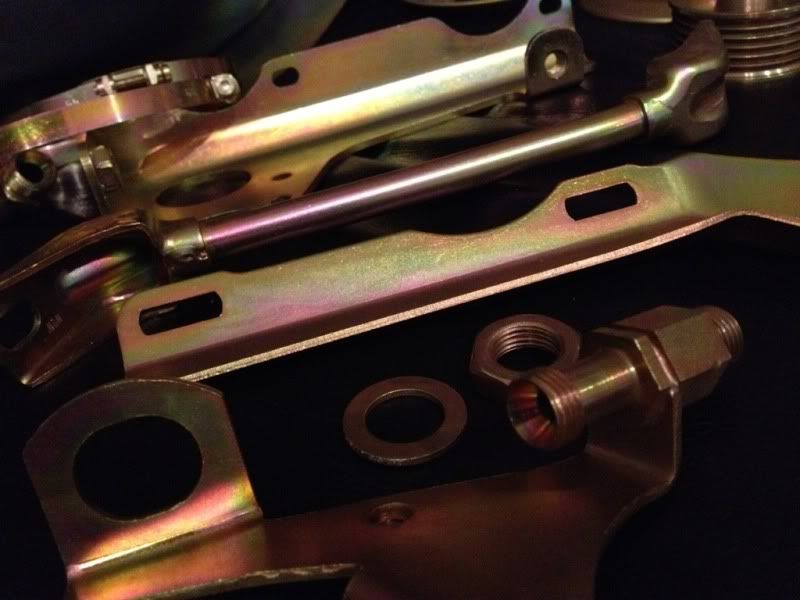 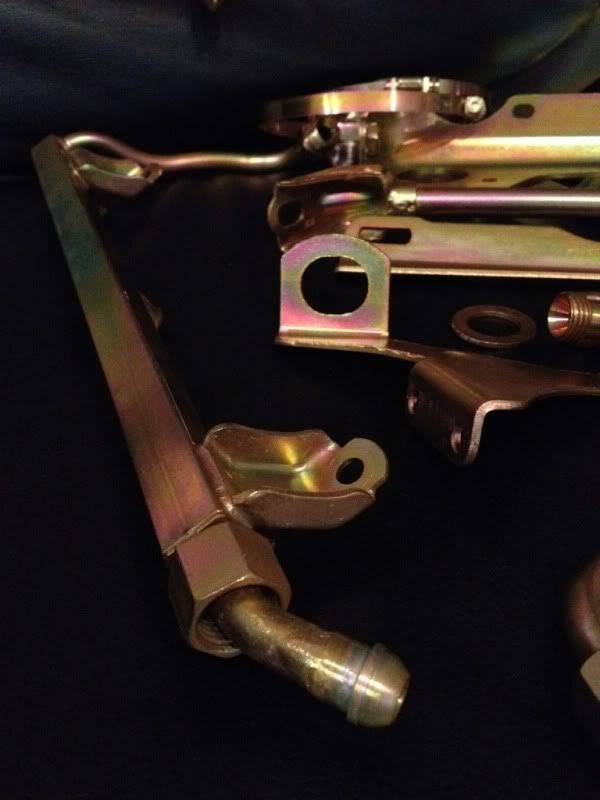 My next task is to re-sort all the nuts and bolts, lol!! Time to open the Porsche PET doc and go searching, haha. The second consignment from TurboKraft has finally cleared UK Customs, and will be waiting for me to collect it (and pay duty/VAT) on Saturday morning. The cylinders from LN Engineering have also now been dispatched - I guess these are about 8-10 days away, so no engine building over the Easter break, but it does give me chance to start tidying up the engine bay, fitting new Bilstein HD dampers, cleaning up the suspension and getting the second batch of items ready for powder coating (bumper brackets mainly) I've now reinforced the engine mount bar, along the lines of the Rennline item, but not quite. All fabricated using the same 3mm steel plate as used for the main bar itself. Didn't snap any pics of that before dropping it over to be coated, but was very neatly welded by the Ducati-nuts over at Fabweld in Deal, excellent job as usual. Last edited by Spenny_b; 07-02-2012 at 01:42 AM.. |
||
|
04-05-2012, 02:27 PM
|
|
|
Registered

Join Date: Mar 2005
Location: Phoenix, AZ
Posts: 2,862
|
Looks like you'll be rebuilding/replacing the fuel lines, too?
If you don't want a Fuel Pressure Regulator with a clamp on hose barb on the bottom, use a FPR from a 964.
__________________
Chris Carroll TurboKraft, Inc. Tel. 480.969.0911 email: info@turbokraft.com http://www.facebook.com/TurboKraft - http://www.instagram.com/TurboKraft |
||
|
04-05-2012, 02:45 PM
|
|
|
Kartoffelkopf
|
Quote:
|
||
|
04-05-2012, 02:51 PM
|
|
|
Kartoffelkopf
|
The Eagle Has Landed....well, the eagles component parts
Yep, the second shipment from Chris @ TurboKraft has arrived, finally clearing UK Customs on Thursday and in my local depot this morning ready for collection.
I'll be surprised if I haven't got a speeding ticket, such was the excitement of more toys to go and collect! This package: 1 x Garrett GT35R 1 x Silicon 4">3" 90deg elbow 2 x Tial Wastegates, spring choices & V-band assy's 1 x Tial blowoff valve & V-band assy 1 x 964RS single mass flywheel & clutch release bearing/tube 1 x 997 GT2 clutch plate 1 x Twin-scroll stainless exhaust flange & gasket 6 x Denso Coil-on-Plug coils & electrical connections 1 x Distributor blanking plug 1 x Pack of RSR rocker shaft oil seals 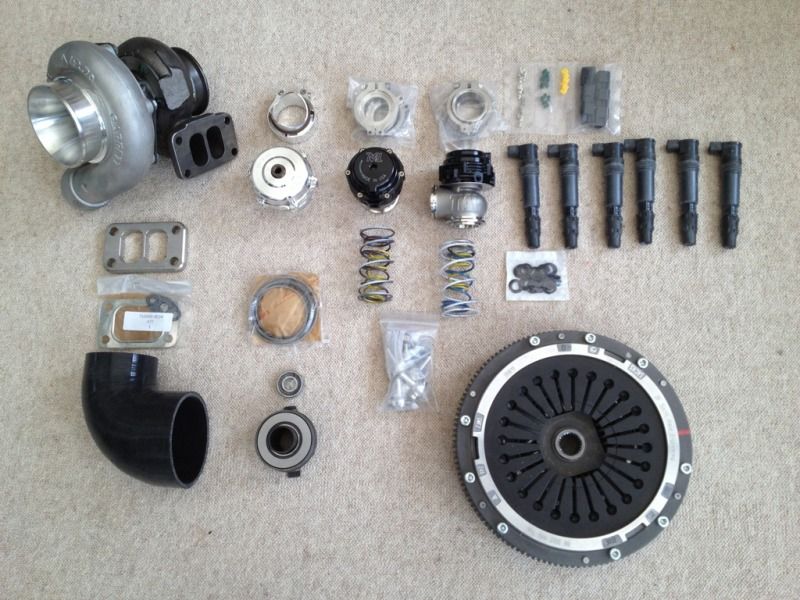 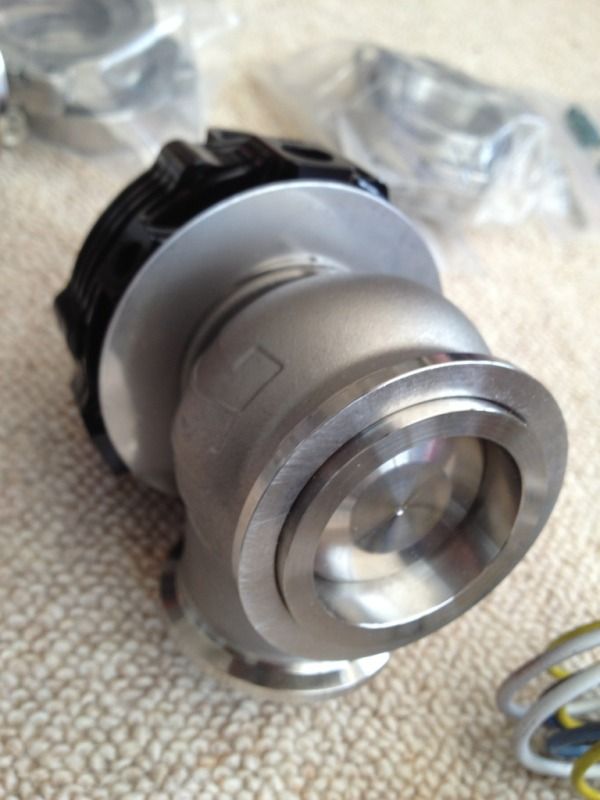 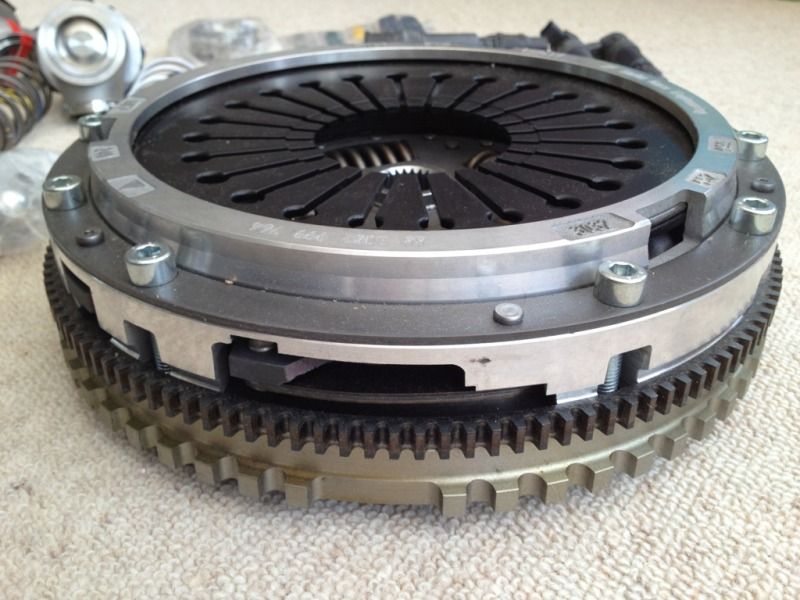 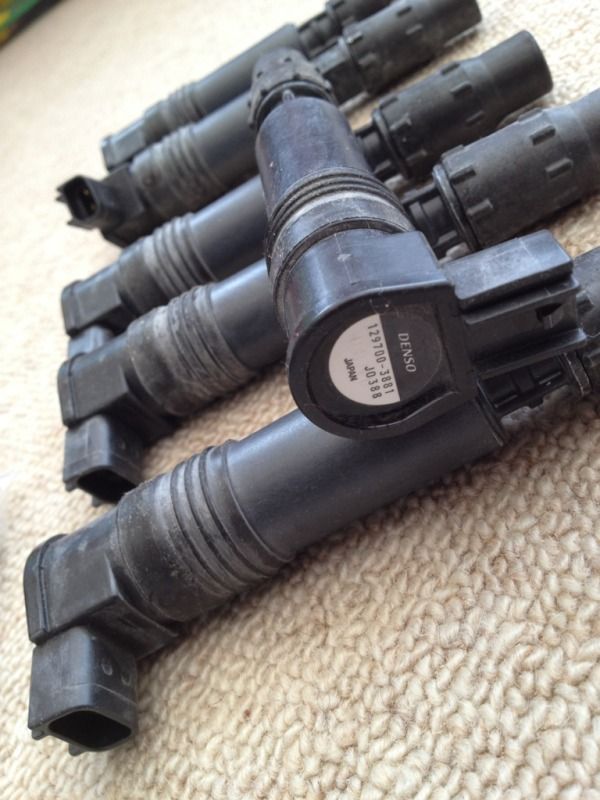 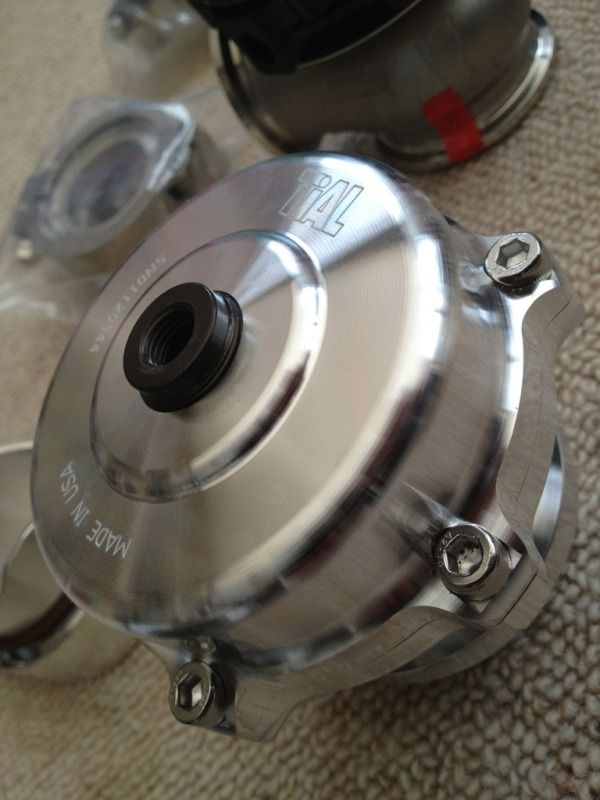 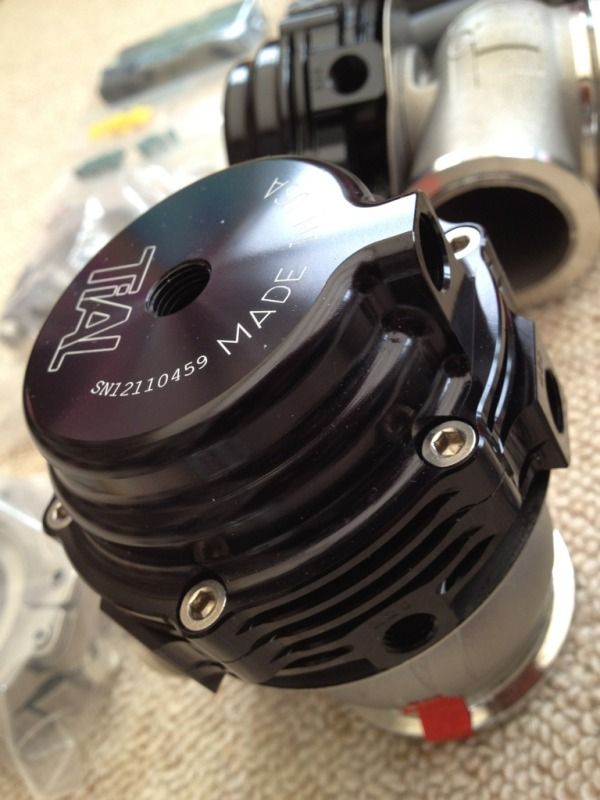 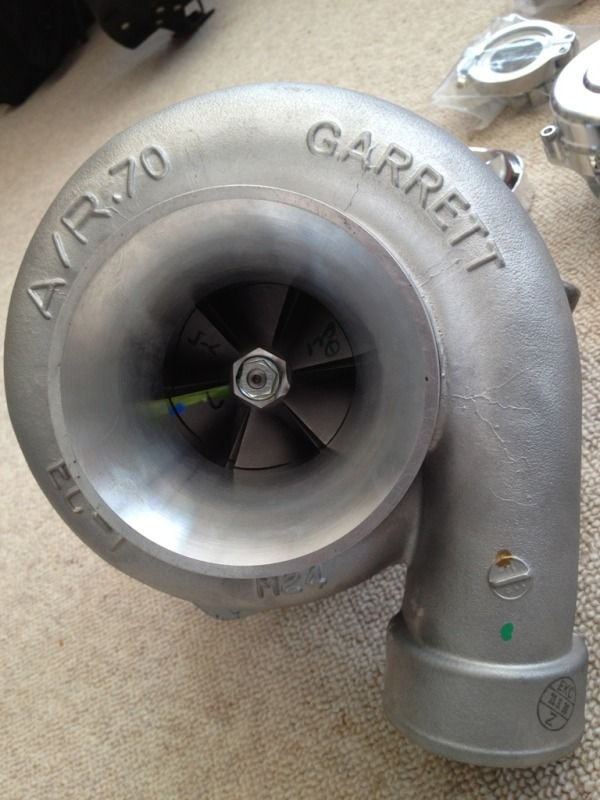 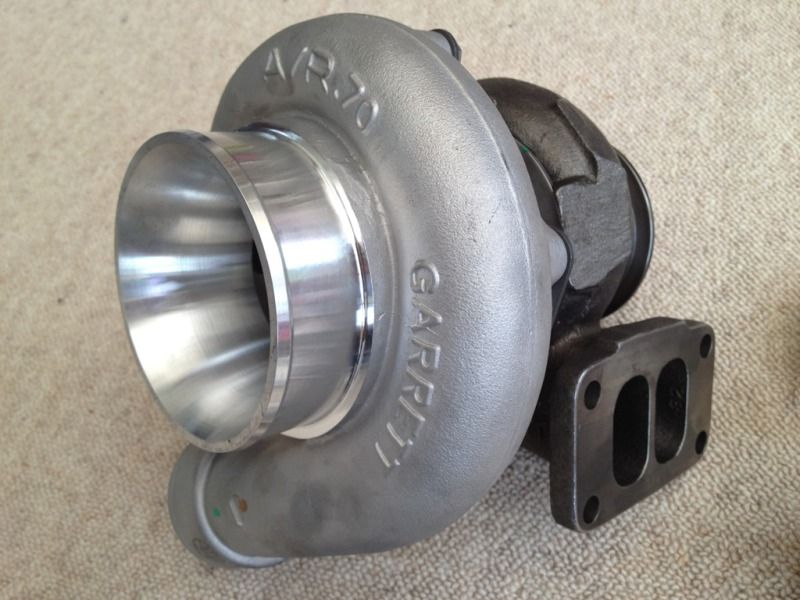 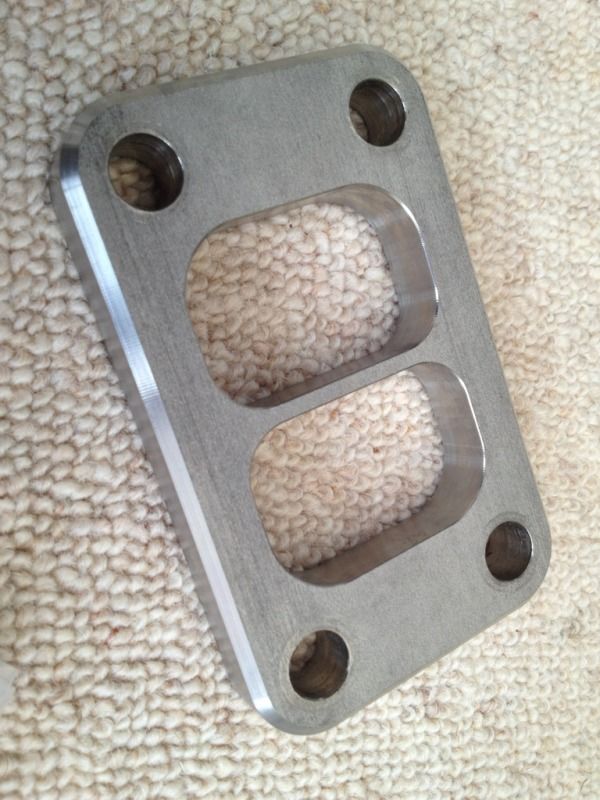 New Nickies are now well on the way over to the UK from LN Engineering...plan coming together nicely..... |
||
|
04-07-2012, 08:02 AM
|
|

|
|
Kartoffelkopf
|
Todays tinkering....
Just a few more photos of todays playing about in the garage - was going to fit new Bilsteins and clean the suspension, but weather not great...maybe tomorrow.
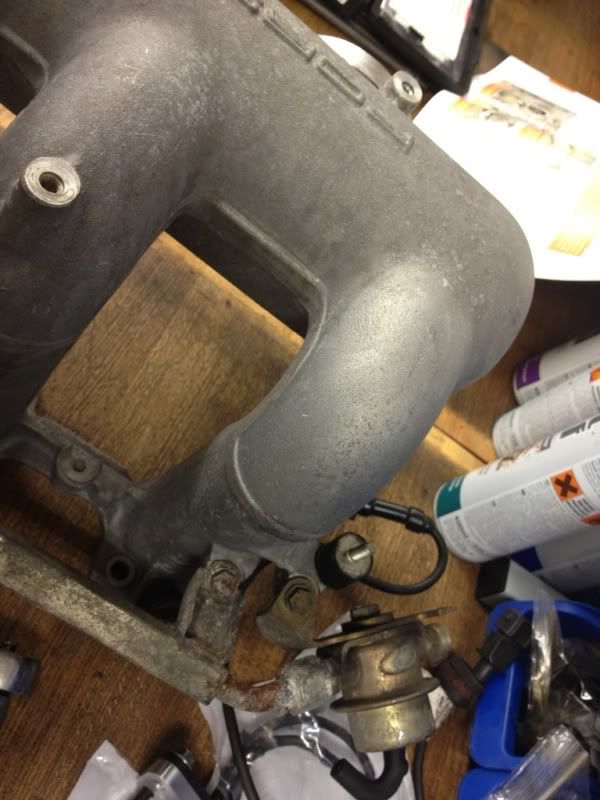
Gentle rubbing back of the powder coating on the Porsche text...lots of masking of the surrounding area and a nice heavy, flat aluminium sanding block with abrasive paper double-sided onto the underside.  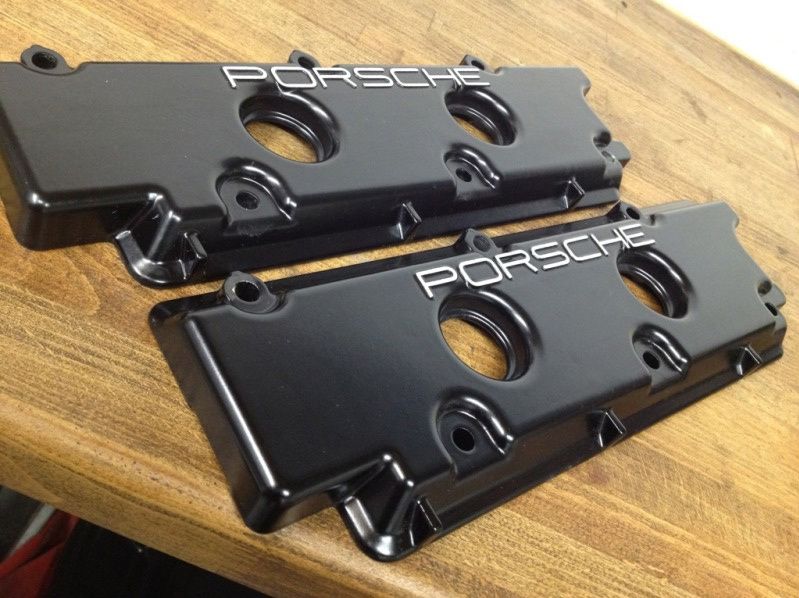 Quick assembly of the alternator/cooling fan. Despite thinking I'd got the hub spigot housing aligned perfectly when I heated the fan & froze the spigot, it was ever-so-slightly off, so some very gently heating required to twist it around by a fraction. Think I may take the fan housing off to be vapour blasted - not quite as uber-clean as the intake. It'll aggravate every time I open the engine bay if I don't! 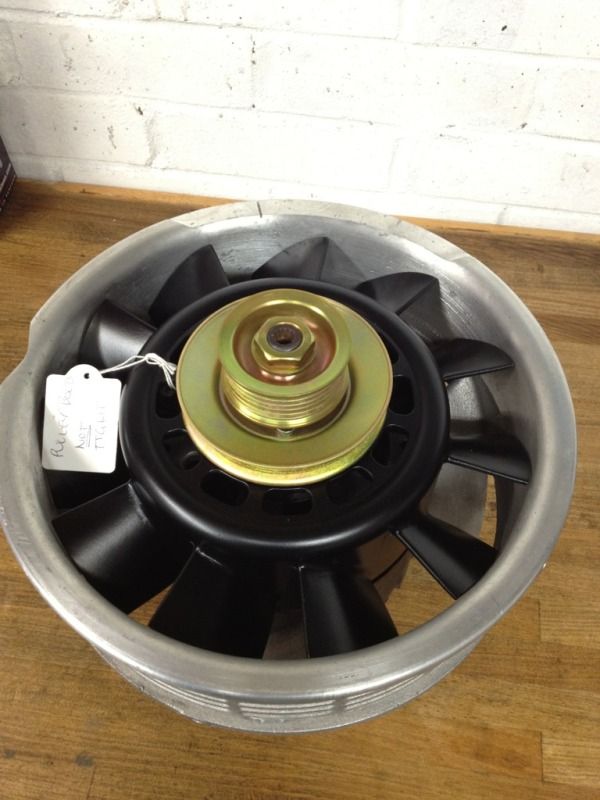 Decided to build up the inlet manifold...nowhere near needing it built up, but a good way to see some progress and clear down some parts boxes. 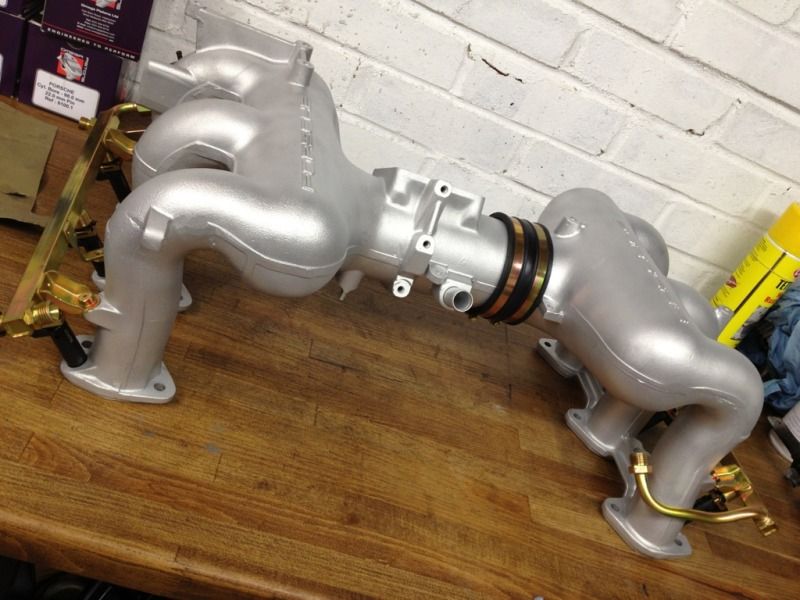 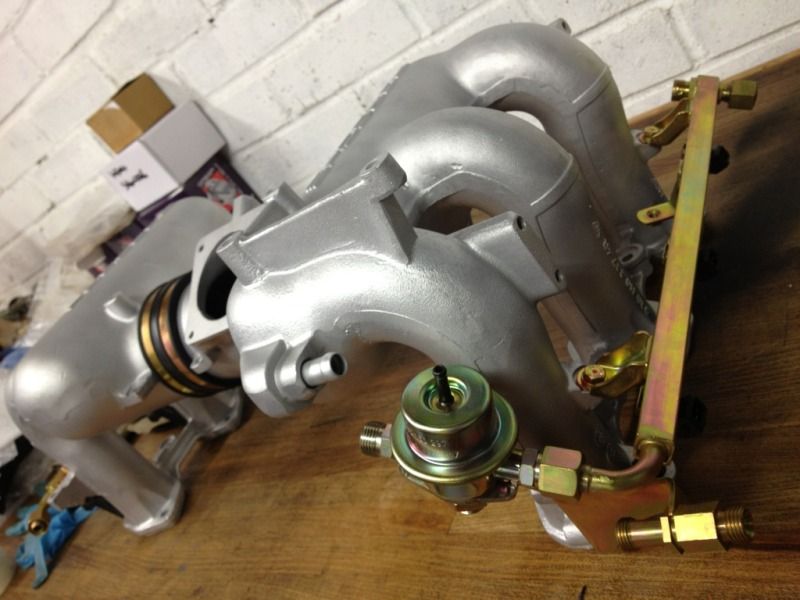 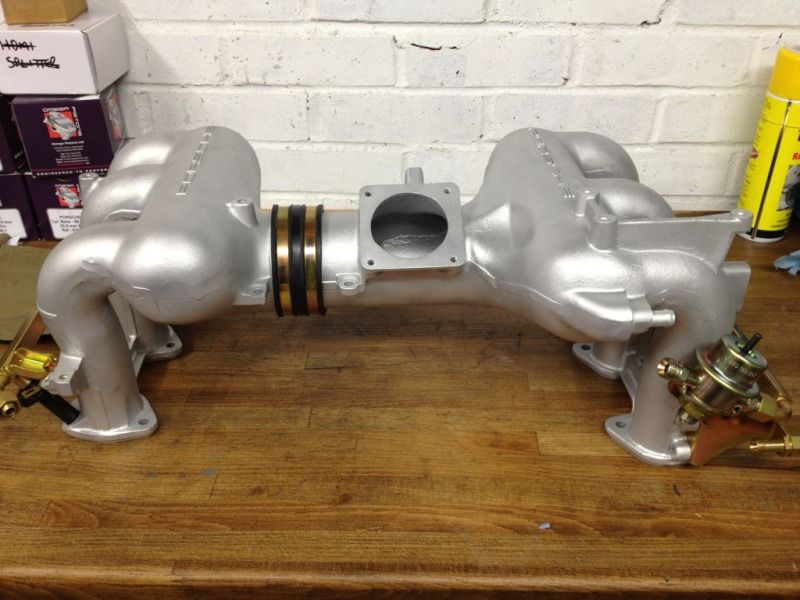 
|
||
|
04-08-2012, 04:40 PM
|
|
|
Kartoffelkopf
|
Just a minor update.....
My 98mm Nickies have now cleared UK Customs & Excise...woo-hoo!!....will be collecting them tomorrow on the way to taking my daughter to her first skiing lessons. I decided that after the shenanigans with a certain reputed "specialist"...more of which later....I wanted to strip each head down to check everything's ok and that the correct hardware has been used. Got as far as checking 2 of the heads, measuring everything and documenting. Specifically looking to capture the installed height of the new springs, and thankfully it looks ok dimensionally. Apart from anything else, I want to get all this data logged for any future reference. Pity the items used to build the heads weren't cleaned.....   Anyway, a little time spent doing what I seem to do a lot of (!!) and it's all good again.
__________________
1993 (MY92) 964 Turbo 3.3 - Horizon Blue - Follow my 964 Turbo project here... http://forums.pelicanparts.com/911-engine-rebuilding-forum/626572-964-3-3-turbo-efi-conversion-using-syvecs-life-racing-engine-management.html On Instagram (along with other stuff) as @spenny_.b #spennybengineproject |
||
|
04-11-2012, 04:56 PM
|
|
|
Kartoffelkopf
|
Whilst waiting for the cylinders to arrive, I got on with some chassis work. Didn't get as far as I wanted to with regards to swapping dampers, but did remove all the rear bumper/heat shield stays, and various other brackets.
Jesus, HOW MUCH are replacement brackets??!!....6 x bent bits of tubular metal....$551 + shipping + tax + duty....ouch! I can actually source some of the items (but not the Turbo specific brackets) from Euro Car Parts - local auto store here in the UK - for quite a lot less, but even so, more than I want to spend unless I really have to. So, wire brush time. After closer inspection, I reckon they will actually come up ok....lots of road grime from 20years & 84k miles. Another batch for my favourite blasting and powder coating outfit to play with. Was also a good opportunity to remove the rear blowers and give them a good clean up. Will probably be replacing those hot air hoses, but have also stripped off associated bracketry for re-plating. This is fast turning into a full resto project. Argghhh!!
__________________
1993 (MY92) 964 Turbo 3.3 - Horizon Blue - Follow my 964 Turbo project here... http://forums.pelicanparts.com/911-engine-rebuilding-forum/626572-964-3-3-turbo-efi-conversion-using-syvecs-life-racing-engine-management.html On Instagram (along with other stuff) as @spenny_.b #spennybengineproject Last edited by Spenny_b; 04-11-2012 at 05:08 PM.. |
||
|
04-11-2012, 05:04 PM
|
|
|
Kartoffelkopf
|
The Nickies have landed....
Collected the Nickies from our local surface mail parcel depot, yesterday morning. Opened the package this evening, and am very pleased. Ni-resist rings machined into the tops, and the two barrels I've checked, the rings I already have seem to be a perfect fit.
So, the obligatory bling shots..... 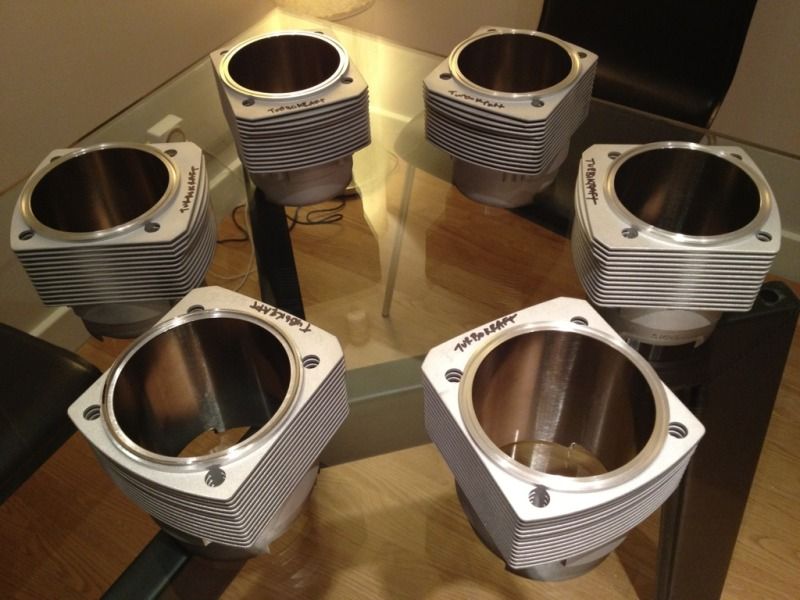 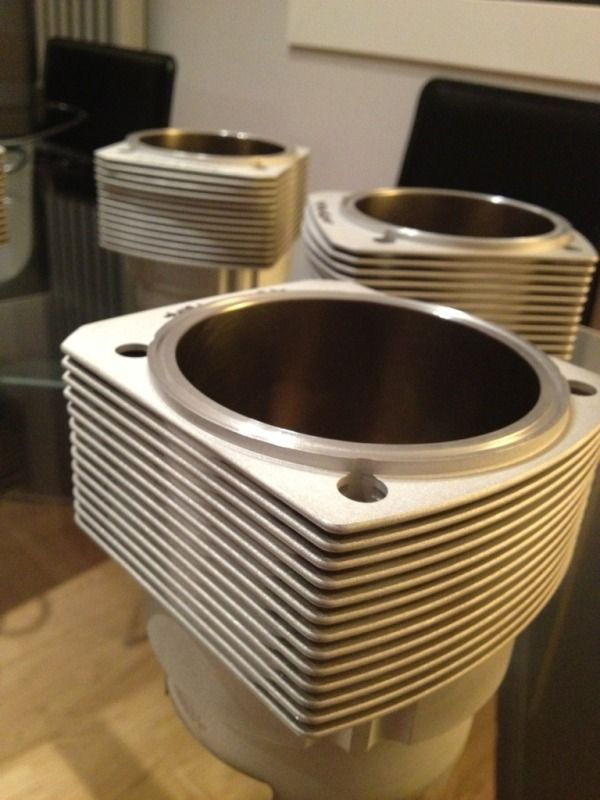 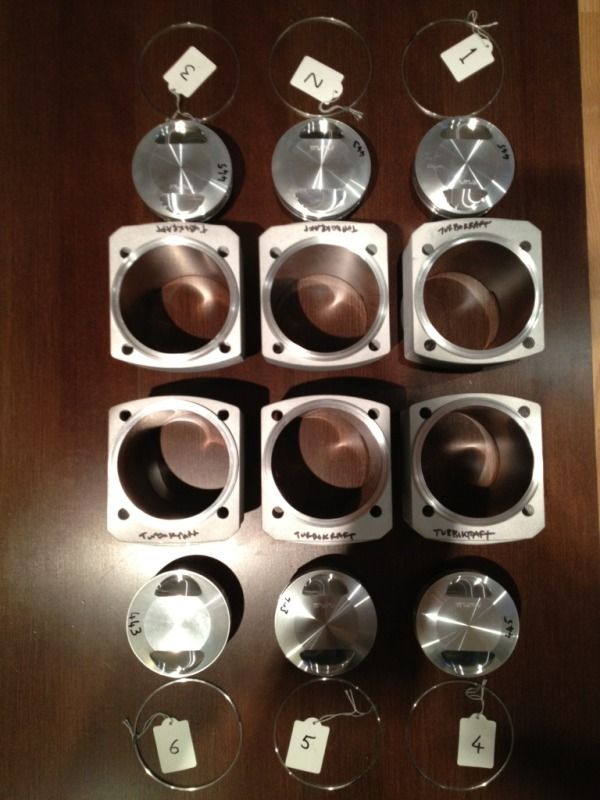 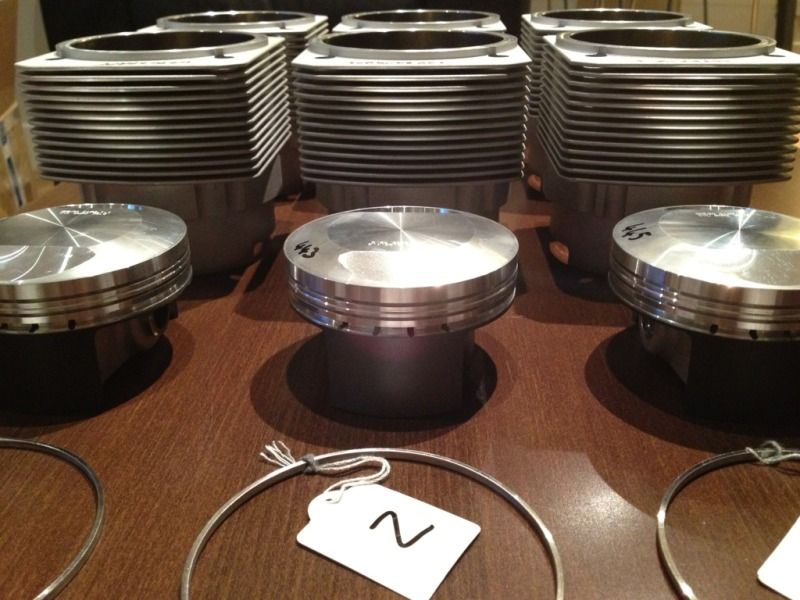 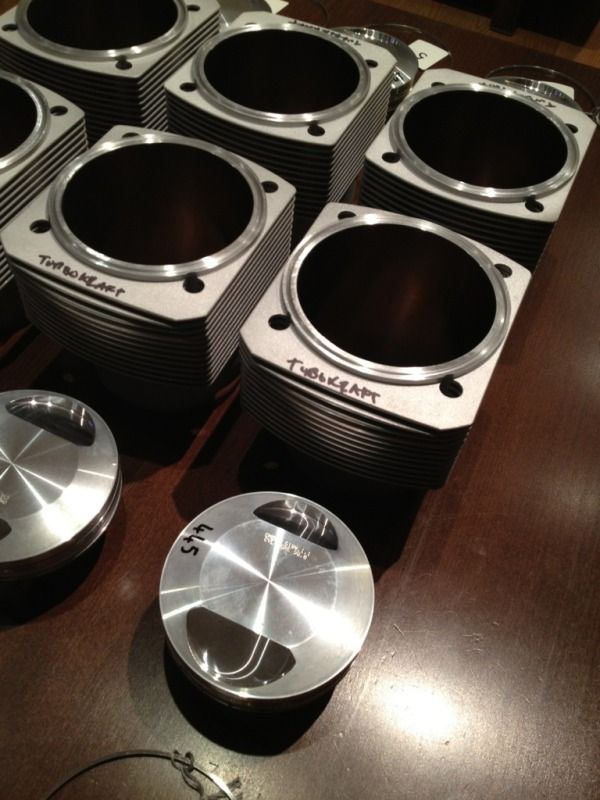 So, next job will be to re-do a dummy build to ascertain the shims required to get close to 8:1 compression ratio. Then a plasticine build to check internal clearances.
__________________
1993 (MY92) 964 Turbo 3.3 - Horizon Blue - Follow my 964 Turbo project here... http://forums.pelicanparts.com/911-engine-rebuilding-forum/626572-964-3-3-turbo-efi-conversion-using-syvecs-life-racing-engine-management.html On Instagram (along with other stuff) as @spenny_.b #spennybengineproject |
||
|
04-13-2012, 06:35 PM
|
|
|
Kartoffelkopf
|
Well, in preparing for this weekends activities, dummy-building to check clearances, etc, I guess I'm now in a position to lap-in the new cylinders with my (fire-ringed) heads.
I had a thought at the back of my mind (like most of my thoughts) that I had stashed away a pot of lapping/grinding paste. I'm aware that this is utterly trivial to all but a few people reading this (Matt ), but it did make me smile a bit. Sure enough, the first storage box I looked in, there it was.....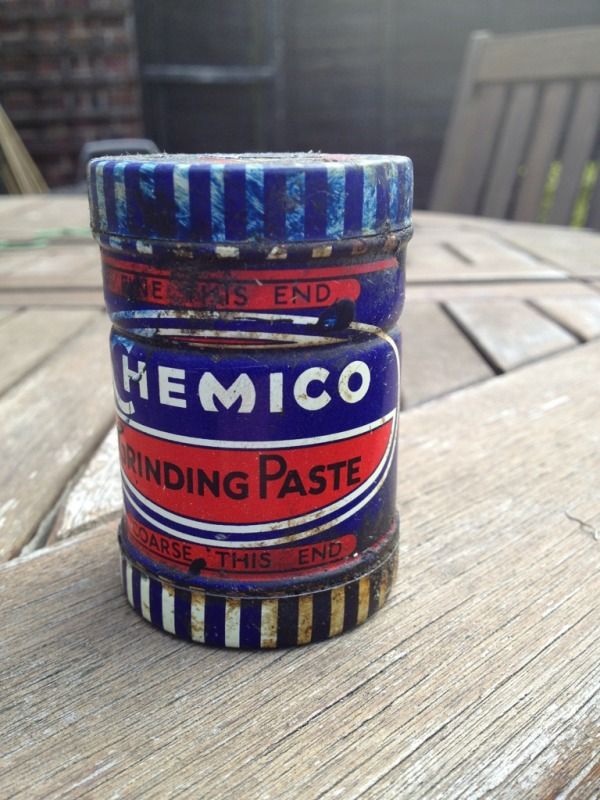 If I were to tell you that this was my Grandads....and he died in 1984, and hadn't tinkered with cars for a good 8-10 years before that, this puts the pot of paste at about 36-38yrs old. It's as old as me!!!...was given to me by my Grandma (along with a load of his tools) when I started getting into cars @ 17yrs old. So, now my ol' Grandma and Grandad are part of my engine build.....and that makes me very happy indeed 
__________________
1993 (MY92) 964 Turbo 3.3 - Horizon Blue - Follow my 964 Turbo project here... http://forums.pelicanparts.com/911-engine-rebuilding-forum/626572-964-3-3-turbo-efi-conversion-using-syvecs-life-racing-engine-management.html On Instagram (along with other stuff) as @spenny_.b #spennybengineproject |
||
|
04-16-2012, 05:03 AM
|
|
|
Kartoffelkopf
|
Long overdue updates....
Okay finally making lots of progress!
Another stunning effort from the guys at my local powder coating shop, Windridges. I collected the second batch the other week, with a number of items I thought would be touch-and-go as to whether they were recoverable or not (the bumper heat shield brackets). One of the diagonal supports under the chassis was rotten through, so didnt even attempt to re-coat it, but everything else, I swear, looks like new again. Very pleased indeed: 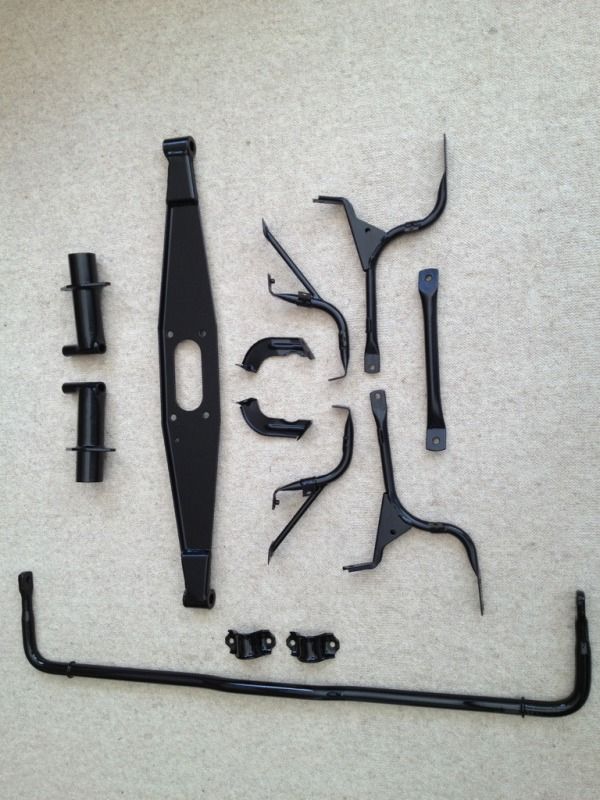 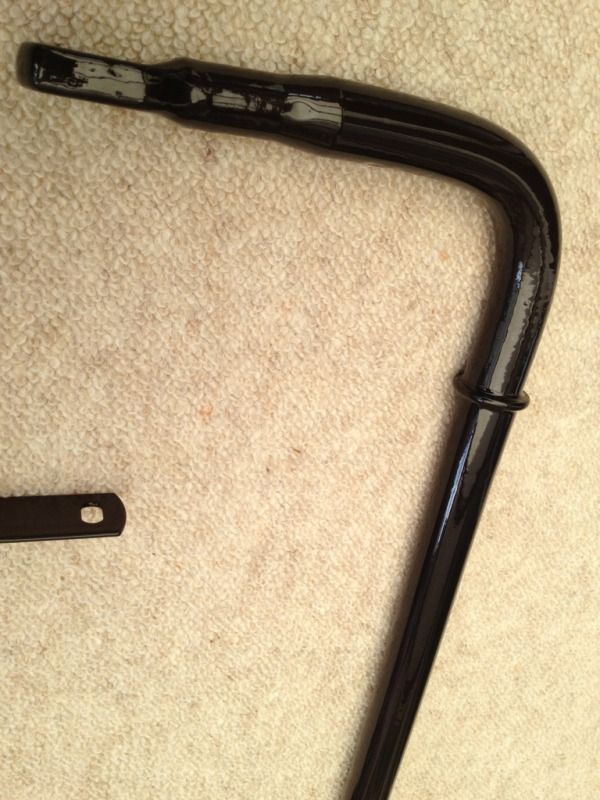 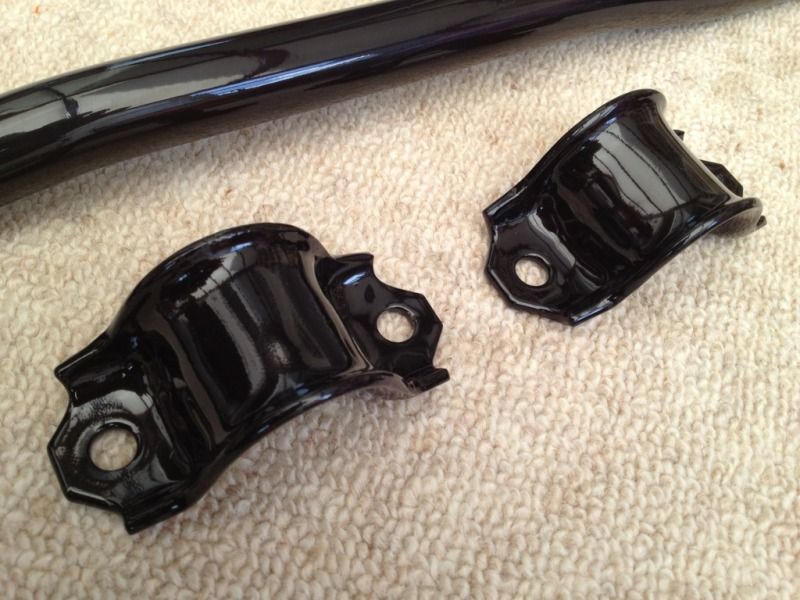   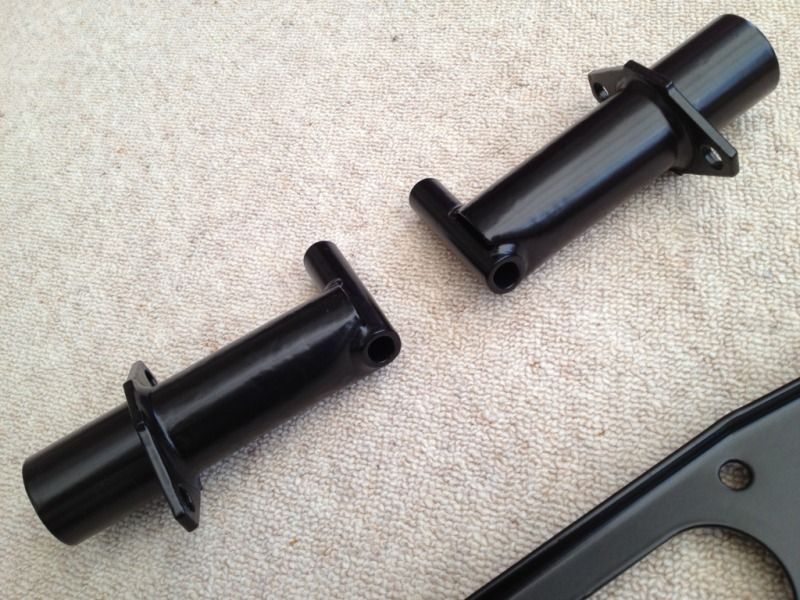 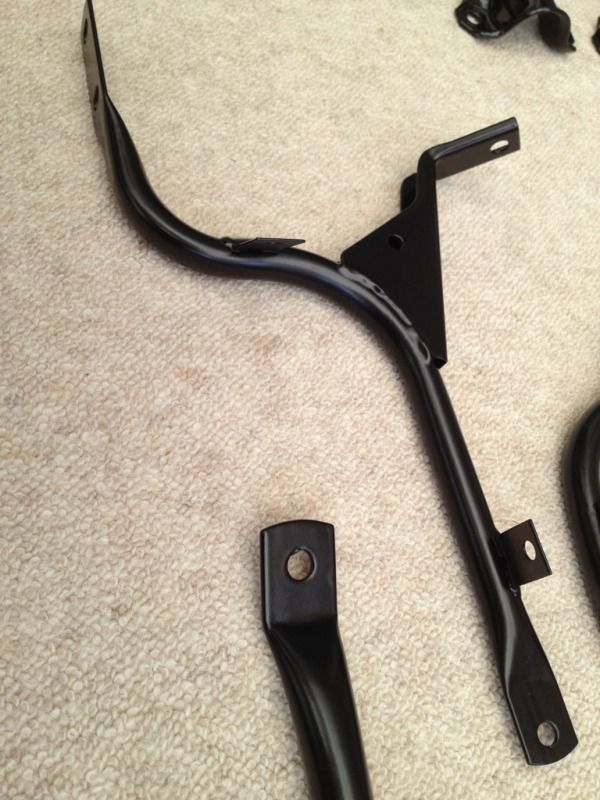 And my modified engine mount bar, which I fabricated using the same gauge steel as the rest of the bar, to reinforce the mount points: 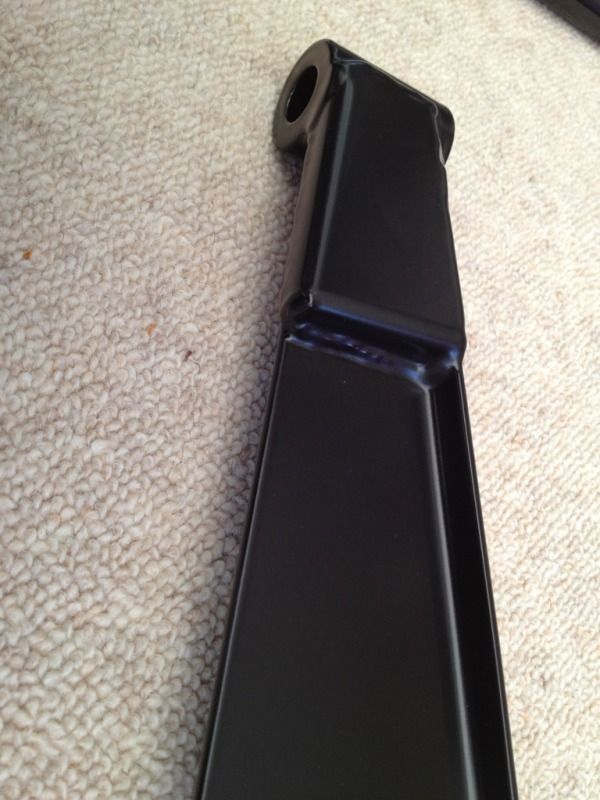
__________________
1993 (MY92) 964 Turbo 3.3 - Horizon Blue - Follow my 964 Turbo project here... http://forums.pelicanparts.com/911-engine-rebuilding-forum/626572-964-3-3-turbo-efi-conversion-using-syvecs-life-racing-engine-management.html On Instagram (along with other stuff) as @spenny_.b #spennybengineproject |
||
|
05-14-2012, 03:44 PM
|
|
|
Kartoffelkopf
|
Some previous corrections on the heads
Next, I stripped all the heads back down to check that theyd been built with the correct spring installation heights. In short, they hadnt; how entirely bloody predicable.
Three of the valves (In+Ex on #5, Exh on #1) were set up with too great a height (ie., too soft base pressure). Thankfully I had some shims to adjust them with. I also took the opportunity to clean the valve train components (!) they still had the anti-rust coating on, as shown previously. Also worth noting that when I first got the heads back a 250 mile round trip I found that they hadnt even been ported correctly with regards to the inlet tract not matching the stock Carrera inlet manifold spacers. So, another trip back up there for it to be rectified. Real basic stuff, cocked-up.  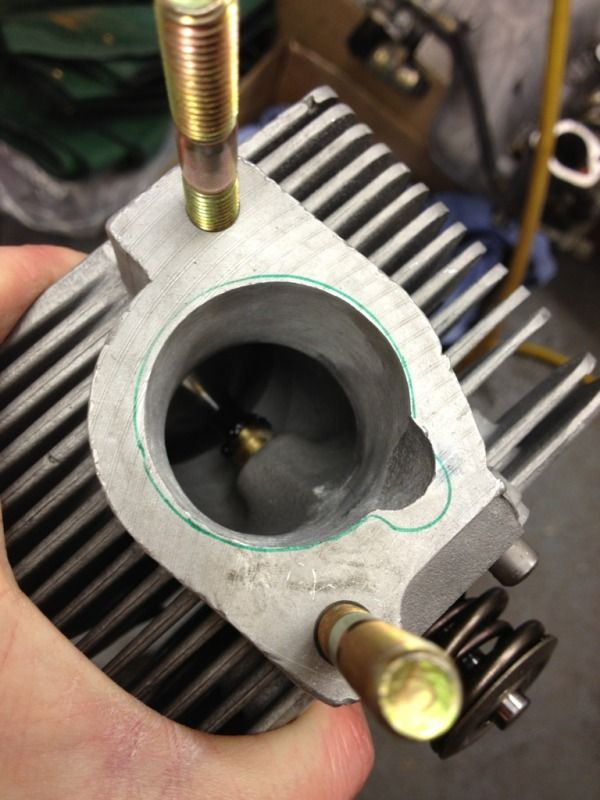 Which when transposed onto the Carrera intake manifold I'm using, would've resulted in the injector presenting itself like this --> 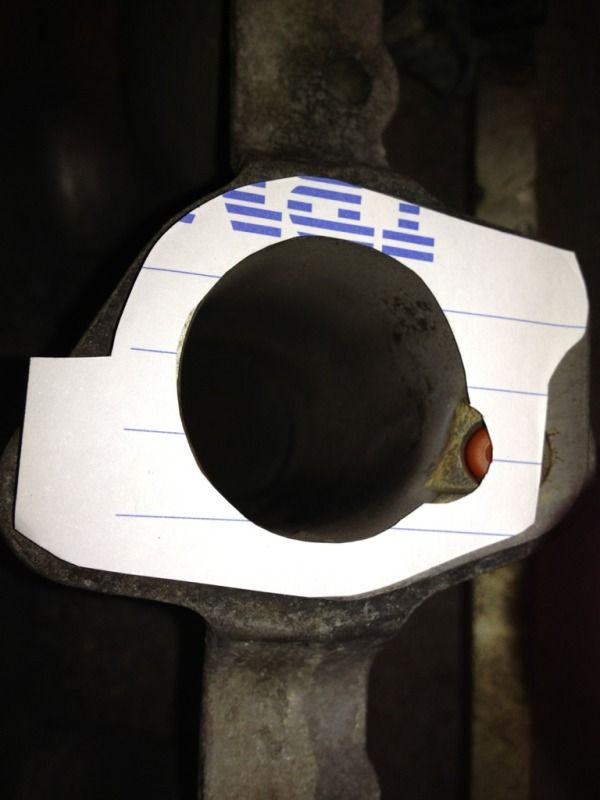 Not the sort of thing Id expect with the money I ended up paying very much wish Id just decided to go the whole hog straight away, and shipped the heads over the Pond to XTreme Heads. Oh well, live and learn.
__________________
1993 (MY92) 964 Turbo 3.3 - Horizon Blue - Follow my 964 Turbo project here... http://forums.pelicanparts.com/911-engine-rebuilding-forum/626572-964-3-3-turbo-efi-conversion-using-syvecs-life-racing-engine-management.html On Instagram (along with other stuff) as @spenny_.b #spennybengineproject |
||
|
05-14-2012, 03:53 PM
|
|
|
Registered User
Join Date: Apr 2012
Posts: 25
|
Wow great progress Spencer
Not that you don't have enough to do with your own rebuild - but you got mail, sorry I'm over excited! Cheers, PS> When you opening the 'Spenny B' garage? Last edited by Porsche964FP; 05-14-2012 at 04:08 PM.. |
||
|
05-14-2012, 04:02 PM
|
|
 |
|
|
| Tags |
| 964 c4/c2/turbo , efi conversion , life racing , syvecs , turbokraft |


 1993 Porsche 911 (964) Turbo 3.3
 2006 Lotus Exige Cup 240 (#45 of 50)
 BMW M2 Competition
 BMW R1250 GS Rallye HP
 Ducati 748R

