|
|
|
|
|
| Author |
|
|
Kartoffelkopf

|
Exhaust Backpressure Monitoring
Okay, so the Posty arrived bright and (very) early this morning, along with my NPT tap. Skipped breakfast to get straight out into the garage before the working day; 20mins later, both Lambda bosses are now tapped....first time I've cut a tapered thread (I think?)...hmm, it certainly gets quite tight when you're nearing the end of the thread. Was thankful for being to mount each bung into the 3-jaw and lock the gearbox into slow speed setting.
Looked to have judged it perfectly; a quick look in the Hobby Machinist fora suggests that one ought to tap deep enough to leave 4-5 threads showing on the male thread, however, I don't have the luxury of height to really do this, so mine sit about 2 threads clear...it's still damn tight and also looks better  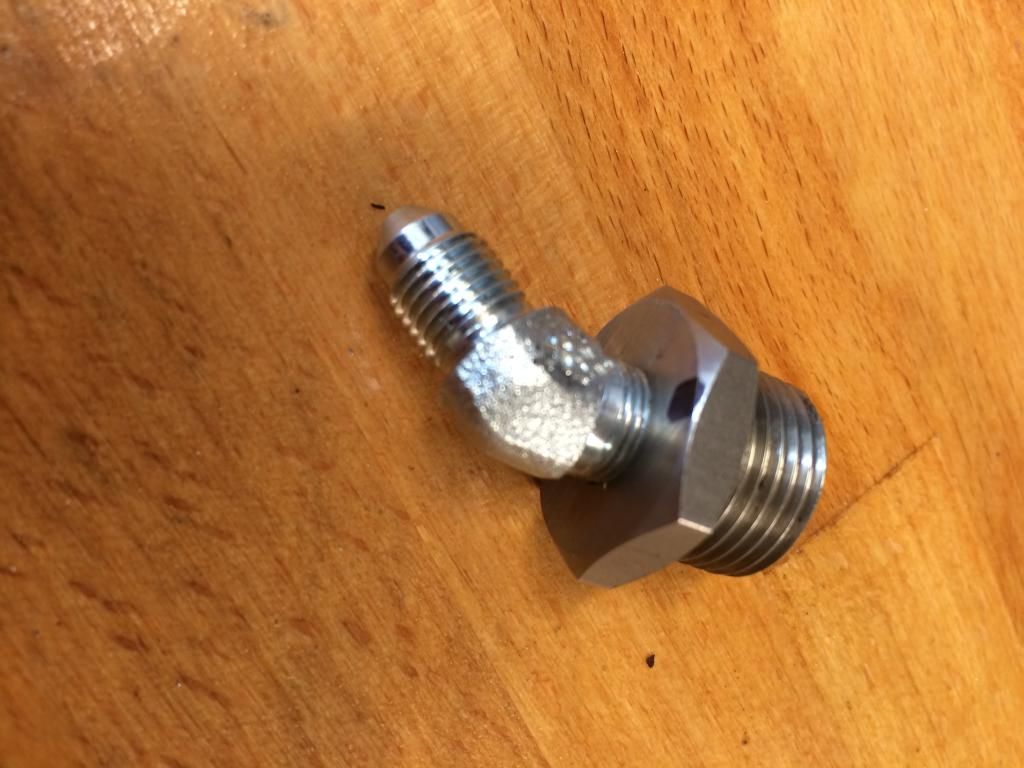 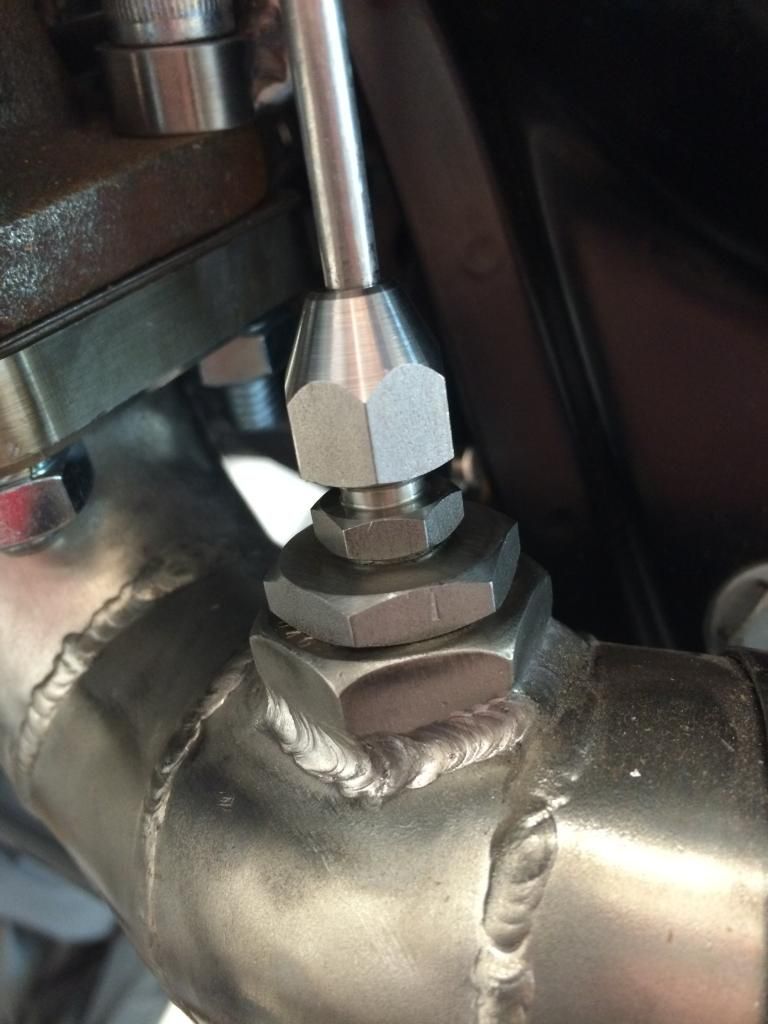 I need to make some ally sealing washers for the bungs; the RH one is easy, the LH one I need to do some maths with, to ensure the orientation of the 45deg -3AN coupling is correct Collected the 3/16" pipe bender at lunch, and quickly bend one of the tubes approximately into position. Just playing with it really, but it's a very nice tool to use and bends precisely. I'll finish this off tonight, but it's perhaps 95% correct. 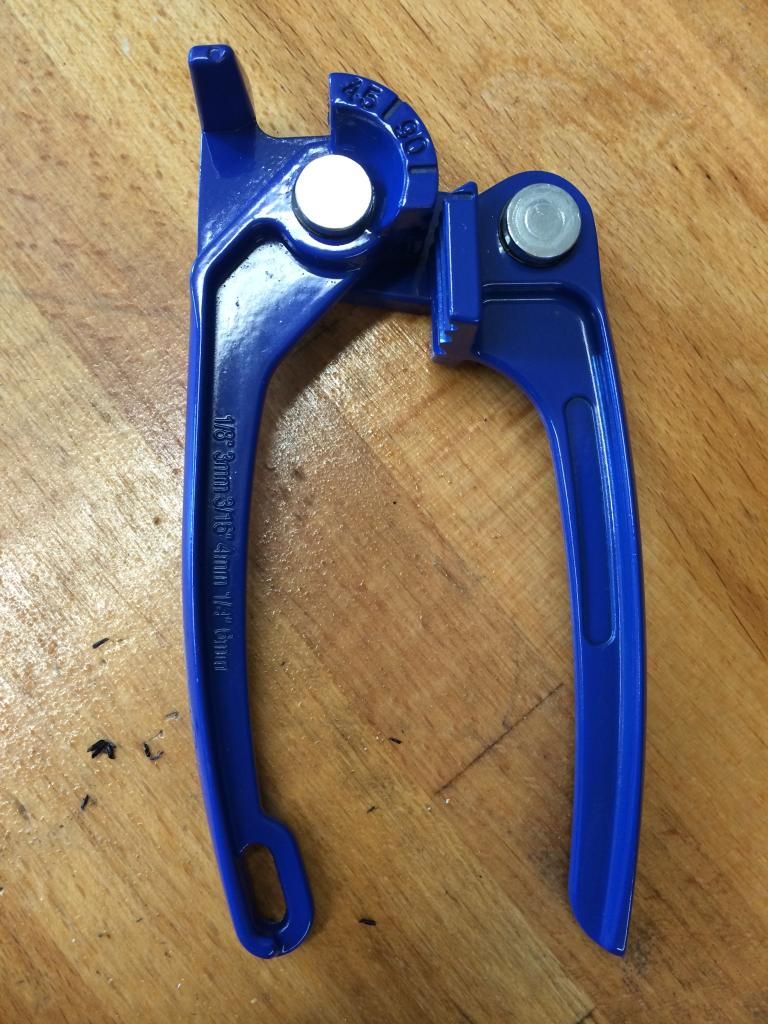  The Q-Max cutters and Kennedy hand punch set also arrived this morning. No immediate need for these parts until I get the loom. Work commences on this on Tuesday apparently. The next item to start thinking about is heat protection. Initial plan - which I think I'll still do - is to use Design Engineering Reflect A Gold - Demon Tweeks and stick on the underside of the tinware, directly above the turbo. However, via the Lotus forums, I also stumbled upon a link to Nimbus material, which is very similar to what Porsche (and Lotus) currently use for their heatshields. It's a rigid honeycomb-like sheet of material, nice and light and can be bend/formed into various shapes. I don't want to use a turbo blanket - I've heard some not-so-good feedback on them, but this material, if formed into a suitable open shroud, could do the trick. It could then be afixed to the underside of the tinware, hanging over the turbine side of the turbo. |
||
 07-29-2014, 07:07 AM
|
|
|
Registered

Join Date: Mar 2005
Location: Phoenix, AZ
Posts: 2,862
|
Both heat shielding materials are very effective.
__________________
Chris Carroll TurboKraft, Inc. Tel. 480.969.0911 email: info@turbokraft.com http://www.facebook.com/TurboKraft - http://www.instagram.com/TurboKraft |
||
|
07-29-2014, 09:11 AM
|
|
|
Kartoffelkopf
|
Quote:
Think I may have had a brainwave about the speed sensor mounting on the front uprights as well. Maybe. It'll need no small amount of engineering and a significant quantity of tea. |
||
|
07-29-2014, 05:51 PM
|
|
|
Registered
Join Date: Mar 2005
Location: Phoenix, AZ
Posts: 2,862
|
Looking great, Spencer. My OCD is humbled and bows down to your OCD. ;-)
__________________
Chris Carroll TurboKraft, Inc. Tel. 480.969.0911 email: info@turbokraft.com http://www.facebook.com/TurboKraft - http://www.instagram.com/TurboKraft |
||
|
07-29-2014, 06:03 PM
|
|
|
Kartoffelkopf
|
Haha, thanks matey! I find my OCD gets worse as time goes by. Which doesn't bode well if I'm spared until I reach retirement age.
|
||
|
07-29-2014, 06:29 PM
|
|
|
Kartoffelkopf
|
Spent a couple of hours last night removing the intercooler, the sensor "station" and rubber bobbins, so that I could drill the hole for mounting the LH exhaust backpressure sensor; the lengths of the hard and flexi lines worked out perfectly to be able to locate this where all the other senders are, and in an upright position so that the gassy condensation drains back out, like you ideally try and mount Lambdas.
As you can see, it was a tight fit getting the fitting into the secondary but ok once 1mm was removed from the NPT thread. Some careful routing to avoid the EGT, the compressor housing and the air intake to the turbo, but with a 45deg -3AN, 1/8" NPT fitting, it *just about* cleared everything. Now the 45deg fitting is in the bung, there's about 10mm clearance (angle of the photo looks like it's touching - it isn't) 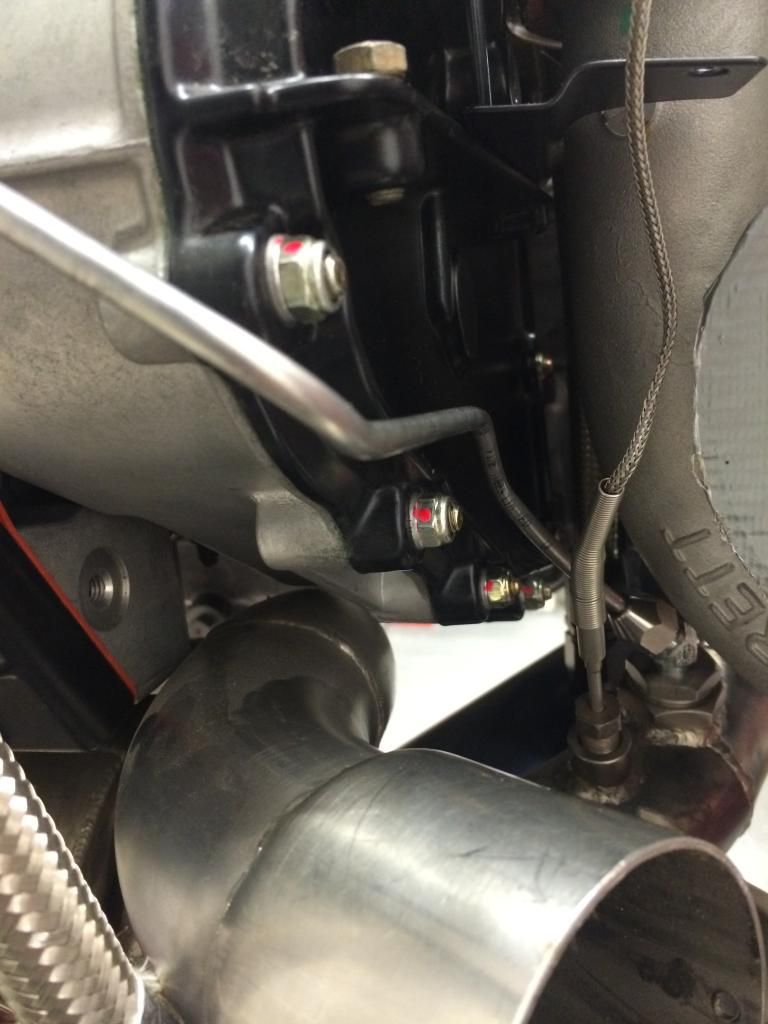 Runs neatly along the 1-2-3 bank, under the tinware. I'll drill into the tinware to retain the hard pipe using a P-clip, before the tinware goes back to be re-powder coated. 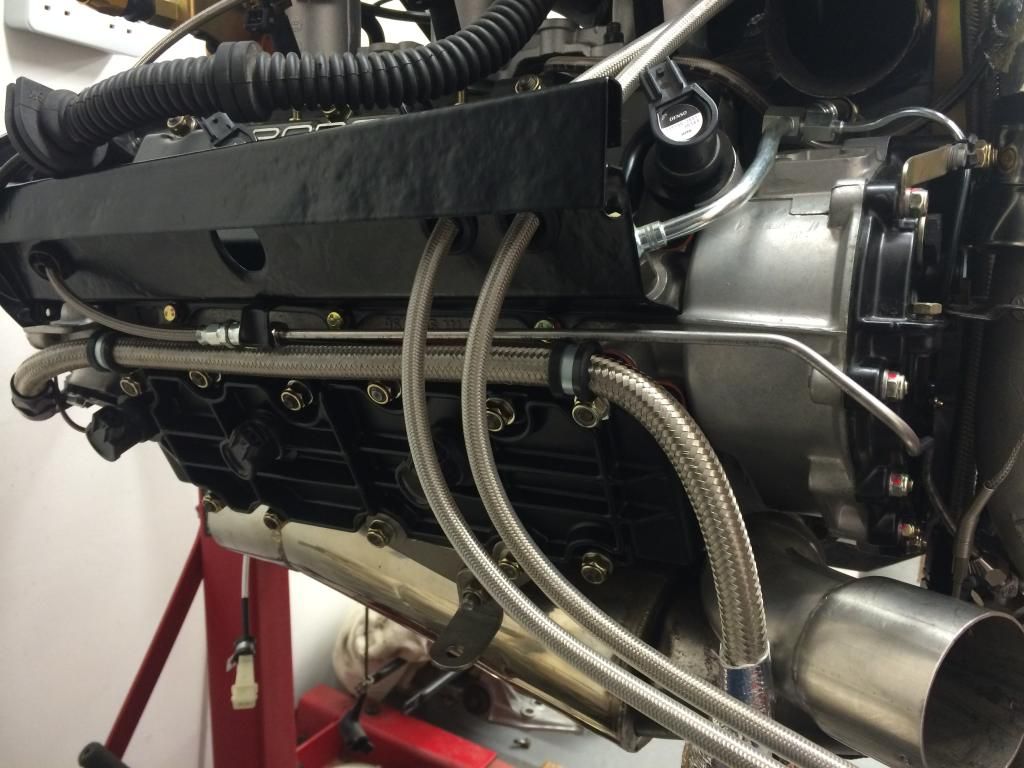 The sensor mounted on the bracket....grrrr, a blue anodized fitting  ....that'll be getting the black treatment, when I deliver the throttle linkage over to the plating shop. I also swapped out the 3x male/male rubber bobbins that hold the bracket onto the inlet manifold, for some male/female bobbins - imho it just looks nicer with 3 x stainless capheads holding it on rather than 3x M6 nylocs. ....that'll be getting the black treatment, when I deliver the throttle linkage over to the plating shop. I also swapped out the 3x male/male rubber bobbins that hold the bracket onto the inlet manifold, for some male/female bobbins - imho it just looks nicer with 3 x stainless capheads holding it on rather than 3x M6 nylocs. Other Lambda bung also now in place for the final time, after turning-up an ally sealing washer; sods law, I had one washer in my complete gasket kit, but not a second. Just some steady progress really; a case of gradually knocking these small jobs "on the head". Need to get back onto the throttle linkage...the longest small job ever. Last edited by Spenny_b; 08-01-2014 at 11:54 AM.. |
||
|
08-01-2014, 11:46 AM
|
|

|
|
Kartoffelkopf
|
Time for another very quick update, not much happening this week, busy at work travelling up and down (or was it east and west?) across the country.
But, managed to duck-out over lunch and collect the latest batch of powder coated items. Every time I unwrap the parts, it's like Christmas, as these guys really do do a superb job. I'm (super) fussy, but really can't critique the quality of the coatings; nice and even, perfect %'age satin, and not gloopy and over done, looks just like a sprayed finish. They really do look like new, off-the-shelf parts that've come straight from the OPC. So, here we've got the headlight rims, horn bracket, A/C condensor radiator bracket with its tie brace and the rear wing brace. 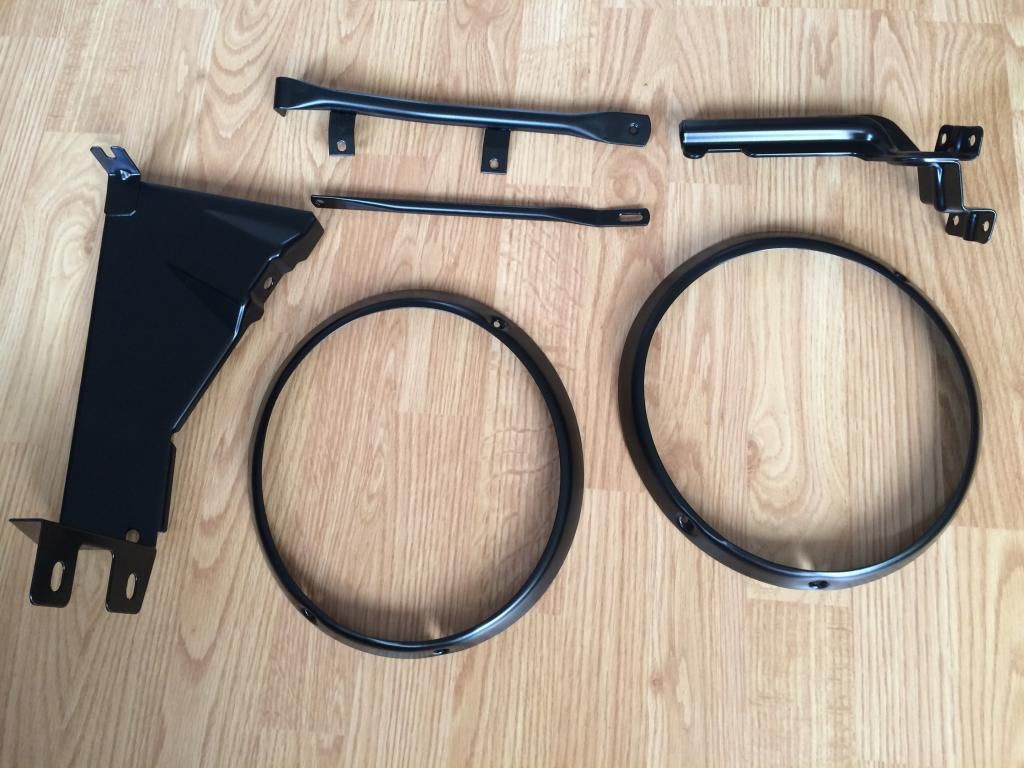 And to refit back into the headlights, I've decided I am going to ditch the HID's that a previous owner installed, and revert back to street legal 55W H4 bulbs, albeit some highly regarded ones that are in the "+90%" category. 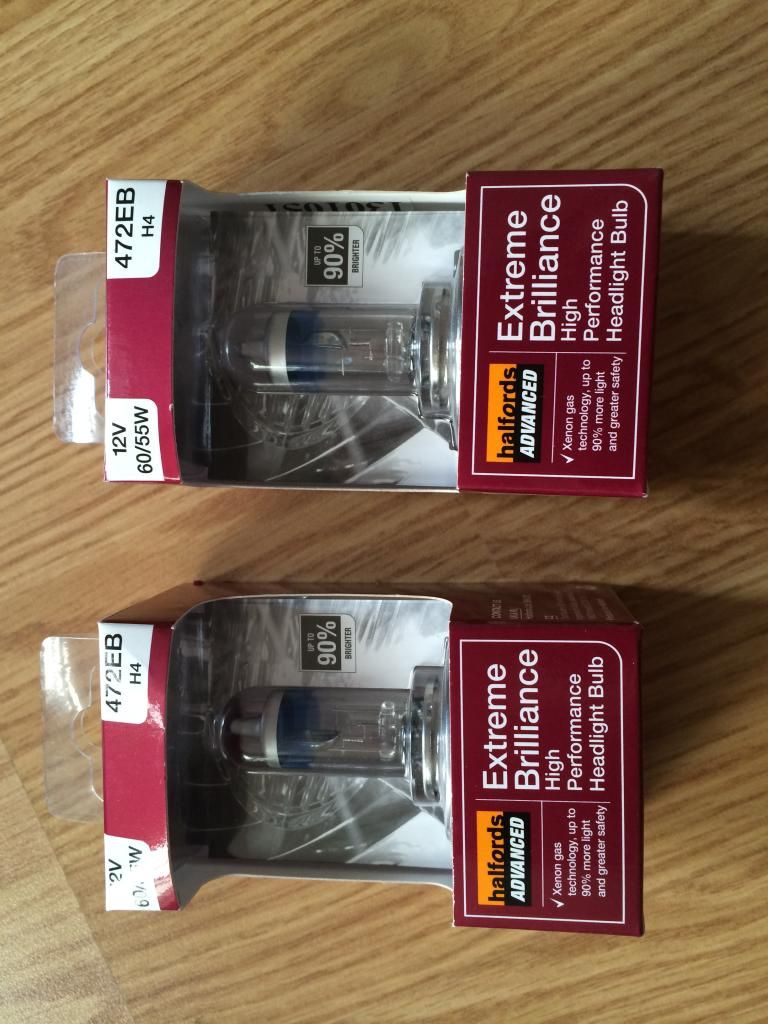 Tomorrow I'm planning on driving across to the wiring loom guys workshop, and get some shots of progress so far....tbh, I don't think there's been that much; as-of yesterday, only the board had been laid out in preparation for the wires being run....apparently that's the job being tackled with peace-and-quiet this weekend. Order has just been placed with my local OPC for the new hoses in the engine bay; mainly oil feeds and returns from the tank and thermostat but also a new fuel hose (suction from tank outlet > pump#1)......still can't get my head around the fact that 9x hoses can cost almost £500!!!....but hey-ho, will be a whole load more than that, should one of the originals "let go". In for a penny, and all... So, apologies for there not being anything wildly exciting to report yet...once the silly-season with holidays has gone, then I'm sure we'll be trucking along a bit swifter. |
||
|
08-08-2014, 07:31 AM
|
|
|
Kartoffelkopf
|
Another quick update folks; travelled across the south coast this morning to go and visit Simon @ Si-Leck, the guy making my wiring loom....we're underway!
The peg board is now laid-out. 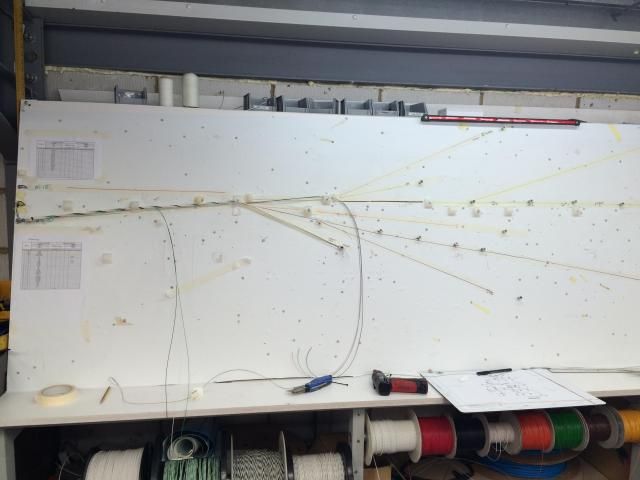 To explain further (without posting the schematics, which I'm not at liberty to do, as they're Simons I.P.), there are two looms: 1) The main part is the engine loom, does what it says on the tin, and will interface via some lovely big Deutcsh connectors to the.... 2) .....second loom that is mostly within the cabin. It has boost control, traction control, the ECU connector, the main +VE feed, GND plus the 4x wheel speed sensors The transition from cabin to engine bay will be done via the large oval aperture in the transmission tunnel. The 2x Deutsch connectors will mount neatly at the back LHS of the engine (as viewed from the cooling fan end), with the bulkhead part of the connector being mounted on the tinware above the turbo scavenge pump. There should be enough clearance on the outside of the tinware to accommodate the 2x Raychem moulded rigid boots. Simon was hoping that once I stopped pestering him (!), it was time to lock the workshop door and finish all the wiring runs of the engine loom, get it sleeved and sealed using the RT125 potting compound in areas where the loom breaks out from the core. This compound is the stuff that Raychem developed especially to work with their heatshrink and boot materials, but it does need 2 days with absolutely no movement, in order to set and create that weatherproof/oil proof seal. 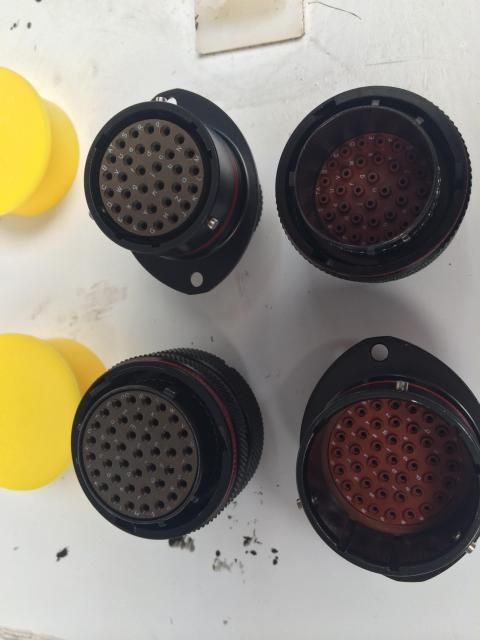  The Deutsch connectors *are* hellishly expensive...but...when you look at things like the gaskets and threaded bulkhead plate, you can see why...that plate is so delicate and exquisitely made....connector porn! (hmmm, never thought I'd ever say that) So, outlook is that the looms will be finished in about a week. Will post more pics when they're in my grubby mits. |
||
|
08-09-2014, 03:15 PM
|
|
|
Kartoffelkopf
|
Received an in-progress photo of the loom from Simon @ Si-Leck, as of yesterday evening.
 The main loom, on the bench with the sealants setting. Connectors will be going on tomorrow. |
||
|
08-11-2014, 01:26 PM
|
|
|
Registered
Join Date: Mar 2005
Location: Phoenix, AZ
Posts: 2,862
|
Nice work there! 8-)
__________________
Chris Carroll TurboKraft, Inc. Tel. 480.969.0911 email: info@turbokraft.com http://www.facebook.com/TurboKraft - http://www.instagram.com/TurboKraft Last edited by TurboKraft; 08-11-2014 at 02:36 PM.. Reason: edit |
||
|
08-11-2014, 02:36 PM
|
|
|
Kartoffelkopf
|
Thanks Chris, looks like it's coming along nicely....another pic that Simon sent me whilst I was on vacation --->
 Hoping to drop into Simons place after work tomorrow and either collect the engine loom or just see where we're up to. |
||
|
08-18-2014, 01:40 AM
|
|
|
Registered
Join Date: Mar 2005
Location: Phoenix, AZ
Posts: 2,862
|
That's how we make our harnesses, too. Incredibly time-intensive, normal to have over 2 days into building a complete ECU/chassis + engine harness that includes 12x CoP and all the additional sensors. And over $1k in materials, easy.
Looks like you're entering the home stretch, my friend!
__________________
Chris Carroll TurboKraft, Inc. Tel. 480.969.0911 email: info@turbokraft.com http://www.facebook.com/TurboKraft - http://www.instagram.com/TurboKraft |
||
|
08-18-2014, 09:19 AM
|
|

|
|
Kartoffelkopf
|
Quote:
 I can still think of a dozen decent sized tasks to get done yet though. Tomorrow I'm collecting the oil hoses (and one fuel suction hose) from my OPC, who are en-route to a meeting I'm travelling to. On the way home in the evening I'm still hoping that I can collect some of the loom, assuming it makes sense to do so and it's ready for us to bench test. [/searches for a :fingers-crossed: smiley] |
||
|
08-18-2014, 11:53 AM
|
|
|
Kartoffelkopf
|
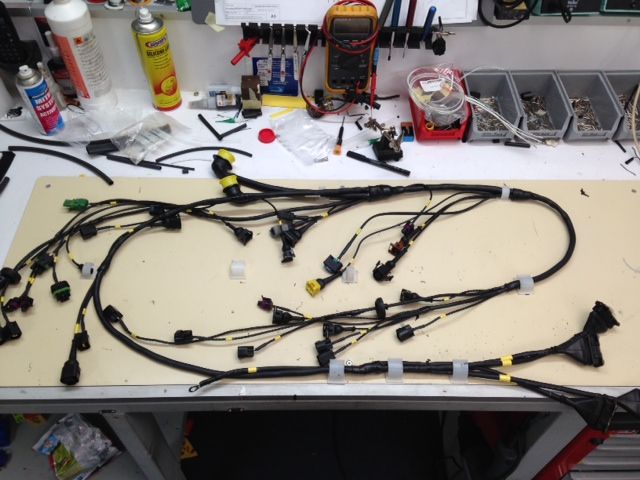
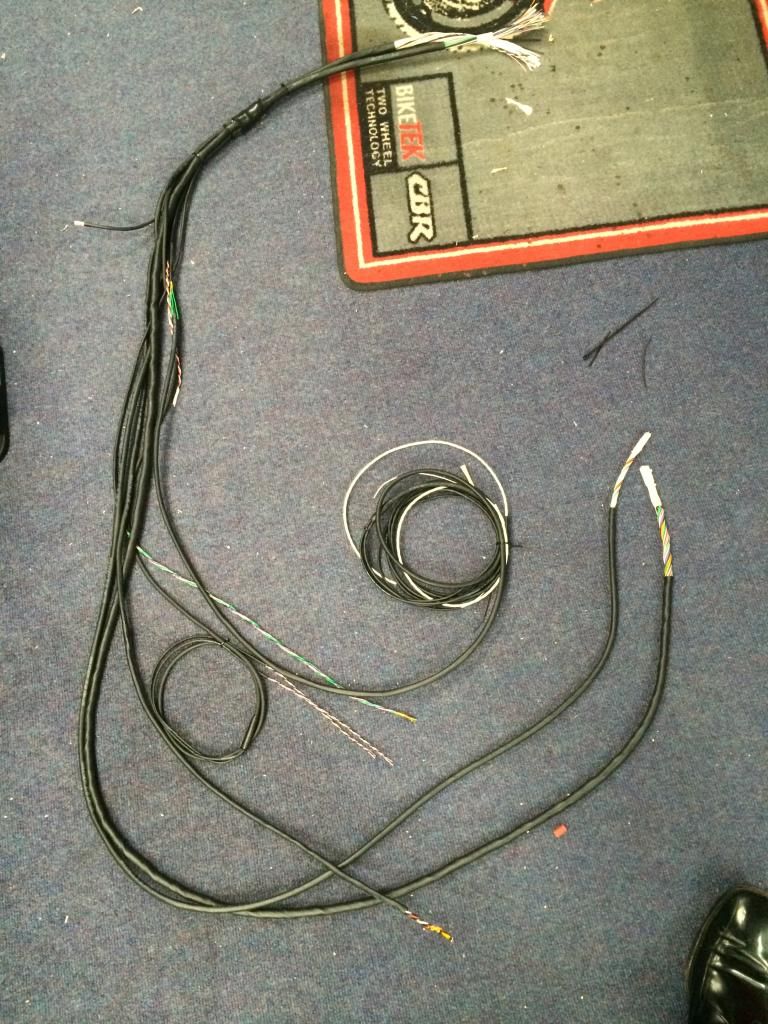
Engine Loom
The loom is here!
I'm a fussy bugger, but I tell you what, Simon wasn't kidding when he said "it's one sexy loom" (he wanted to keep it, to frame and hang in his office). It's superb, can't see one thing I'd do differently or better, and my dim-and-distant background is as an electronics apprentice and then electronics engineer. The twisting of the wires and then the Raychem sleeving gives it so much flexibility, it's ridiculous. No kinking, even after tieing in knots ---> 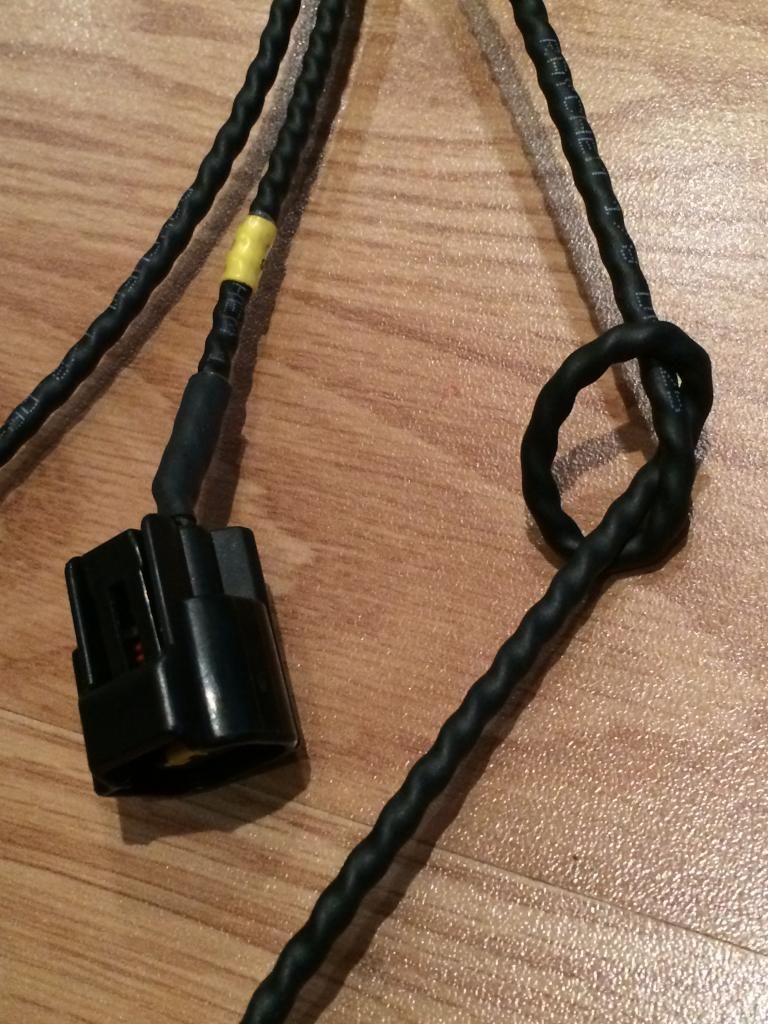 There's heatshrink, and there's heatshrink. I've only ever used the cheap stuff before but this is DR-25, almost the same stuff as used in F1, apart from they use DR-25TW (thin walled) for a smidge of weight saving. 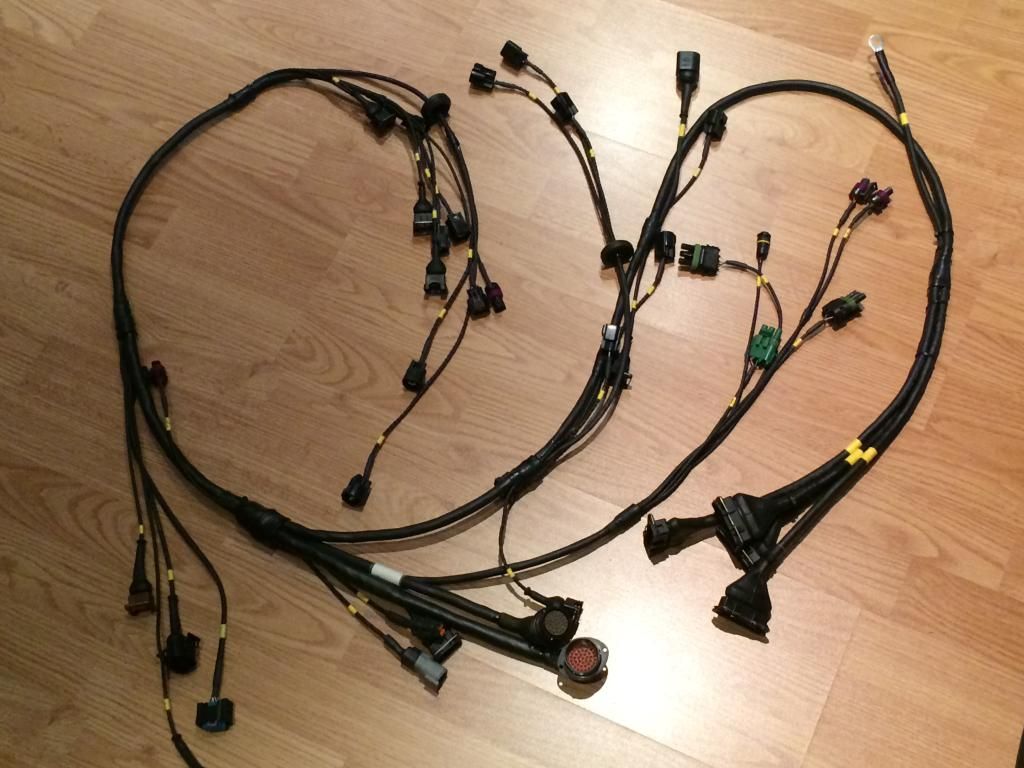 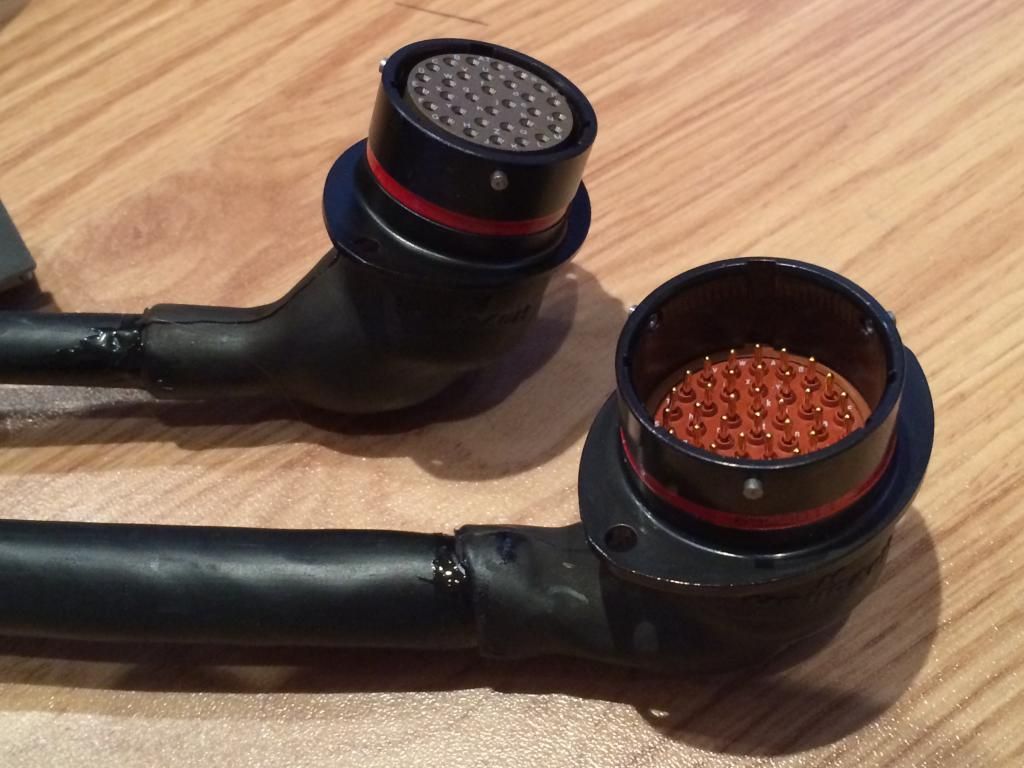 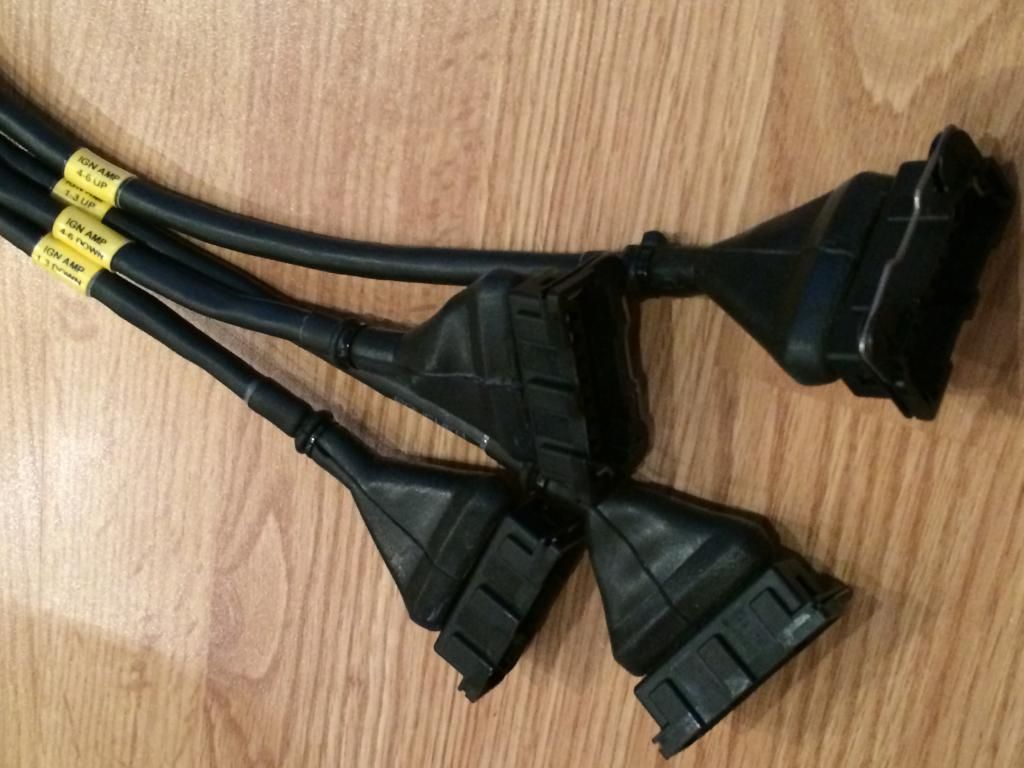 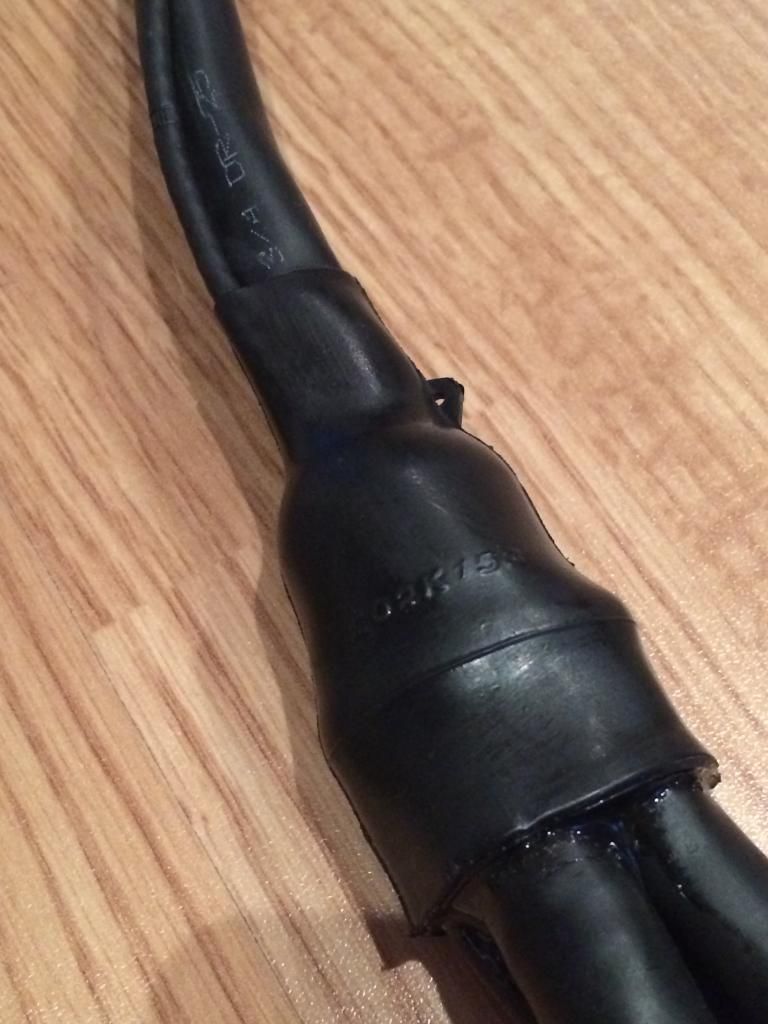 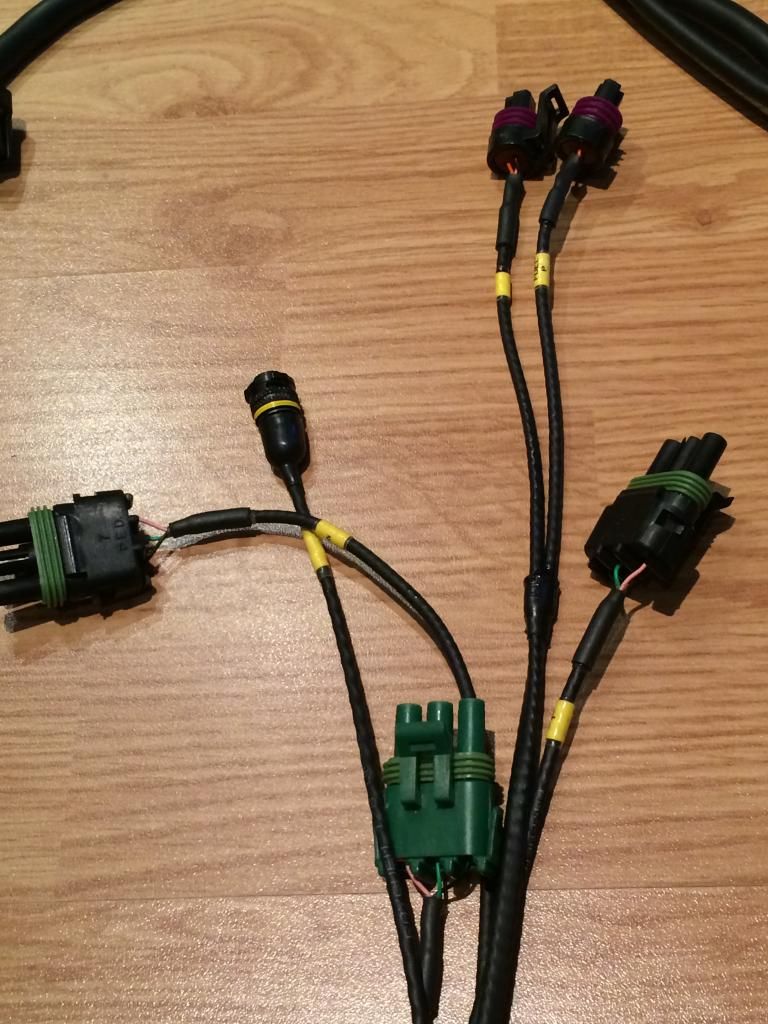 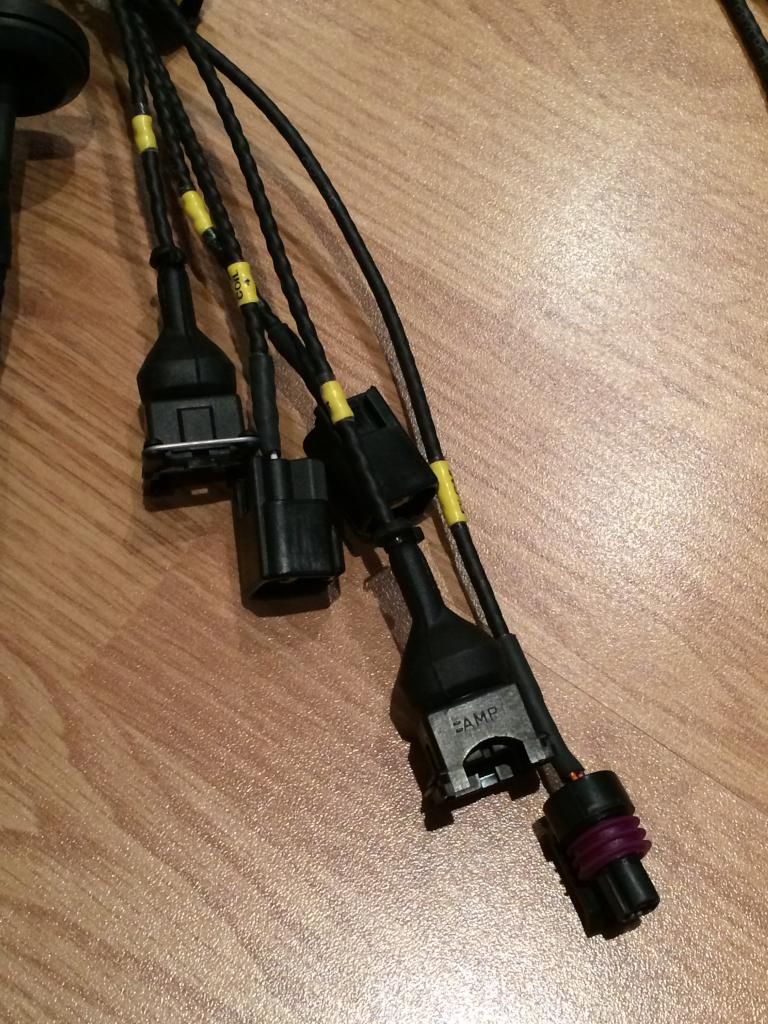 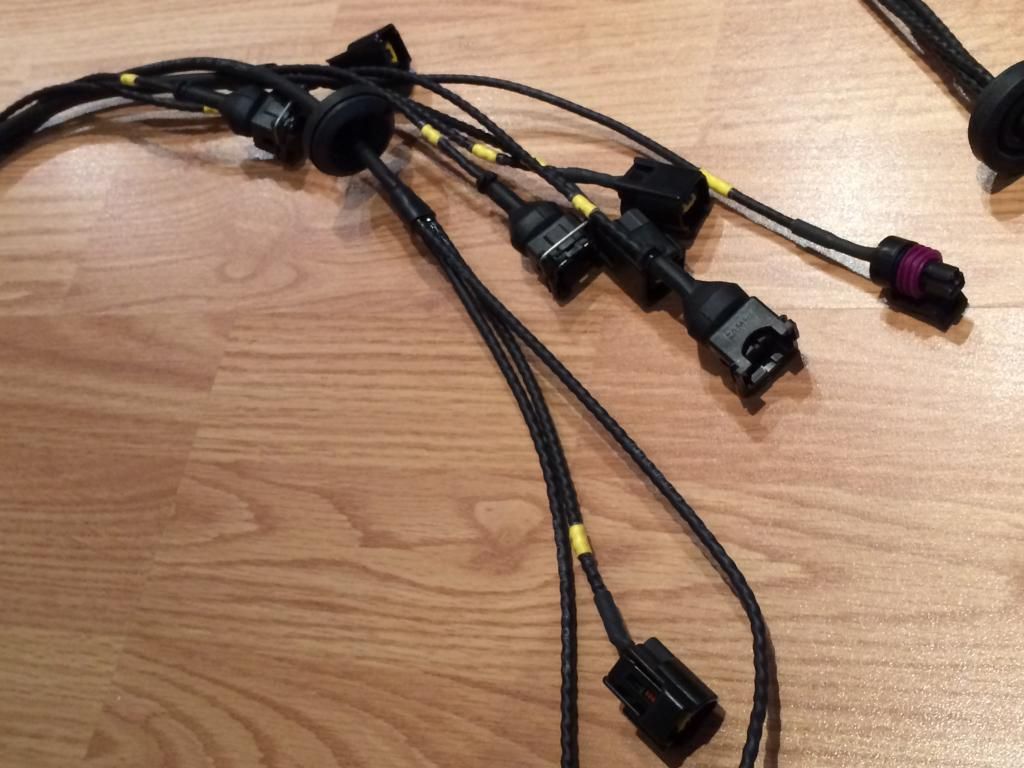 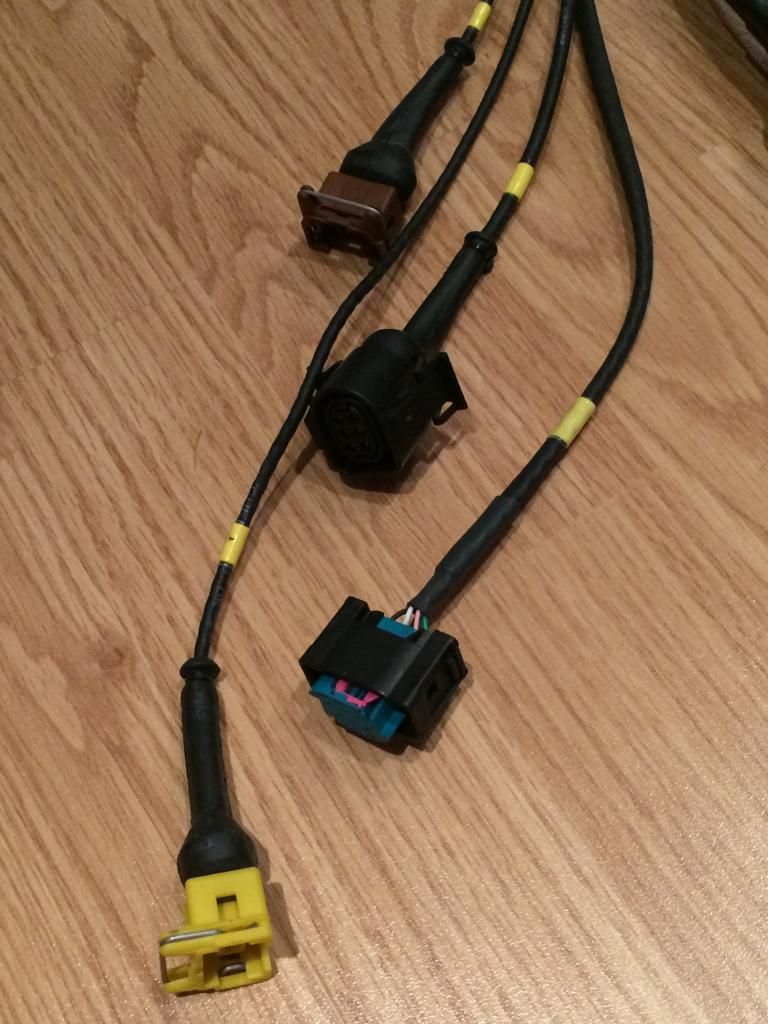 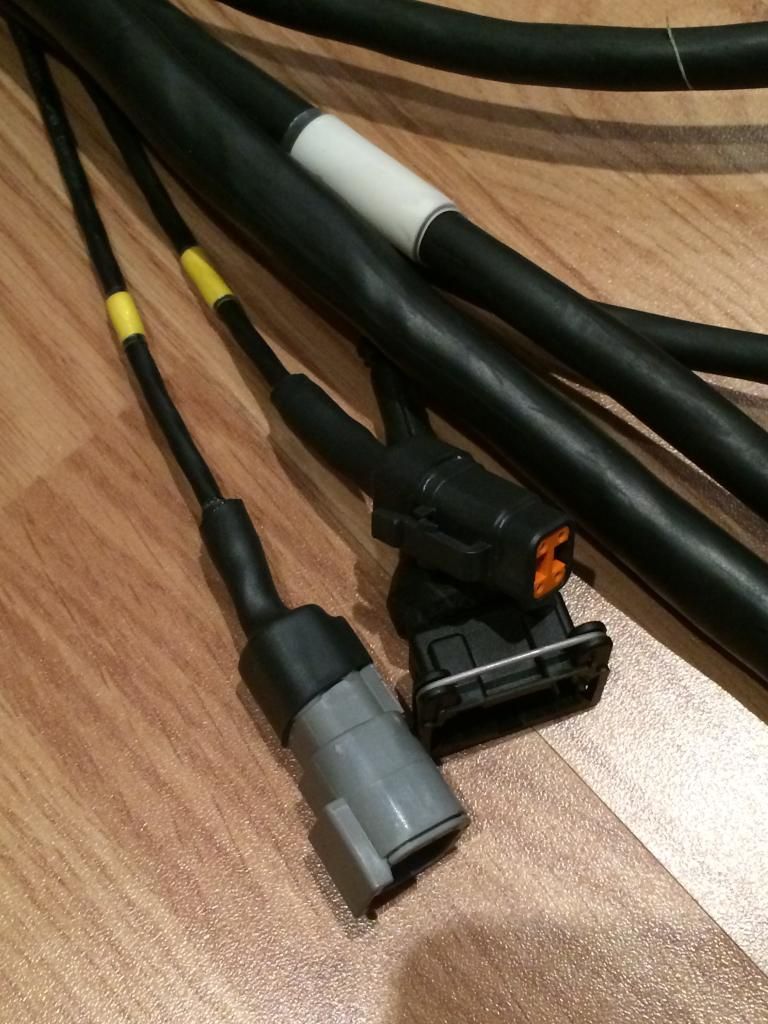 Just had a trial fit, and will be using this to then correctly locate and cut the holes in the tinware over the weekend. Simon (Si-Leck) is now on vacation, but when he's back, I'll return the loom once the other half is finished, so that we can test and make any changes that we feel necessary. |
||
|
08-19-2014, 04:16 PM
|
|
|
Kartoffelkopf
|
The other half is also coming along well; all the wires are laid and sleeved, it just needs terminating and finishing. Here's how it's looking at the moment --->
 Apparently, the engine half has taken 3 days solid, and the above part about a day and a half so far, with about another day to terminate. This *may* sound excessive, but there's a lot of research and planning going-on, i.e., making sure we're picking the right signal and T connector on the original loom for things like fuel pump priming and drive, the oil cooler fan (which we're "T-ing" into, so that we can either let the cars original management take control, or override via the MBE ECU to kick it in earlier if needed (eg, activate it earlier if we find that the ambients are significantly higher) and the inputs to the MBE ECU itself....apparently I've now completely run out, I'm being compared to a rolling laboratory, nickname "Pinkman" (Breaking Bad) Last edited by Spenny_b; 08-19-2014 at 04:24 PM.. |
||
|
08-19-2014, 04:18 PM
|
|
|
Kartoffelkopf
|
New rubber.....
....pipes.
Collected the new oil pipes and fuel suction hose this morning, from the ever helpful guys at Porsche Tonbridge, on the way to a meeting. Now completely broke even with Nick @ Tonbridge being very helpful with my shopping lists. I really am trying not to think too hard about having spent over $700 on a few hoses, but it's no good half-doing the job. I can now rest easy knowing that the car will want for nothing perishable for another 20 years. 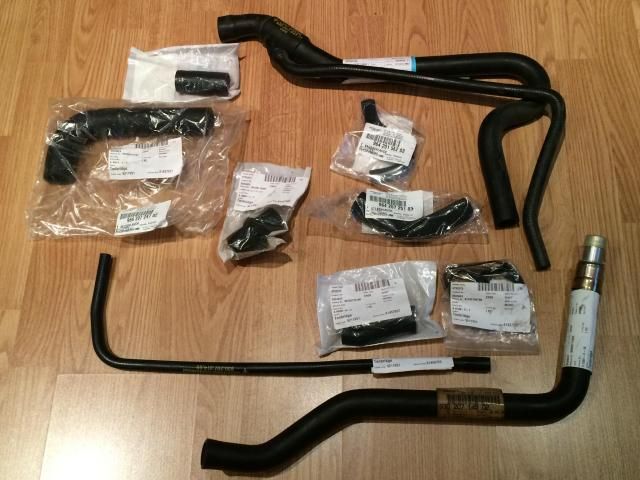 Judging by the dust on the siamesed hose, I guess that Porsche don't sell too many of these!
__________________
1993 (MY92) 964 Turbo 3.3 - Horizon Blue - Follow my 964 Turbo project here... http://forums.pelicanparts.com/911-engine-rebuilding-forum/626572-964-3-3-turbo-efi-conversion-using-syvecs-life-racing-engine-management.html On Instagram (along with other stuff) as @spenny_.b #spennybengineproject |
||
|
08-19-2014, 04:33 PM
|
|
|
Kartoffelkopf
|
Boost Gauge Project
Right folks, another mini-update.
Yesterday my new boost gauge arrived in the post....this is another sub-project that I thought about over a year ago, slowly maturing from a concept to something now being worked on. Not going to reveal too much about it just yet, suffice to say that what I'm looking to achieve is a factory look setup, so.... a) no 522mm gauge installed into some kind of donut bezel that then goes where the clock once was b) no cheap-n-nasty plastic auxiliary gauge housing fixed to the A-pillar This is more complicated than the earlier 930 setups, as the 964 has a myriad of periphery warning tell-tale lamps behind the clock face, which clearly I don't want to sacrifice either. So....concept conceived, parts arrived and a plan is in place to come up with something pretty trick and up to date, whilst looking like something Porsche would've done, back in the day. Hopefully it's 2-3 weeks away from being completed, after which I'll post pics....assuming what I want can be done, and there's no hidden gotchas Watch this space..... Last edited by Spenny_b; 08-22-2014 at 04:21 AM.. |
||
|
08-22-2014, 04:19 AM
|
|
|
Kartoffelkopf
|
We've got a Bank Holiday (public hols) this weekend here in the UK (or is it just England that gets it? Scotland had one a few weeks ago, iirc....anyway...) so the plan is to get a tonne of stuff done on the car and finally start moving parts from my home office, conservatory, back bedroom back onto the car.
I've finally decided to get off the fence and keep the wheel arches in the black protective coating that a previous owner had applied. Need to do a final check and ascertain if it's Waxoyl or Dinitrol they used, but whichever, they did a good job and frankly, getting it back off is going to be a nightmare unless I'm willing to sacrifice the base stonechip and Horizon Blue paint underneath. I've spoken to a number of folk....paint shops, detailing companies, etc, to try and find a solvent that will bring it off, to no avail. So, I'll clean it up, re-apply some more black coating where necessary and start to reassemble:
As you can see, there's loads to go at now that I have all the new oil lines. Time to crack-on and GET IT DONE....no excuses* *.....(apart from whatever motorsport may be on TV this weekend) Last edited by Spenny_b; 08-22-2014 at 04:32 AM.. |
||
|
08-22-2014, 04:28 AM
|
|
|
Kartoffelkopf
|
Okay, so the public holiday long weekend is over, but lots got done, making good use of the sunny Sat & Sun. The above list isn't a lot shorter, however I have got 3 of the 4 wheelarches cleaned and re-sprayed....a job I've been agonising over and putting-off for many months.
The paint I was sold last week by the local paint factors was absolutely spot-on; looks to be the same product that a previous owner had applied and have to say, after deliberating whether or not to try and get it back to factory Horizon Blue under there, and now seeing it prestine and freshly blackened, I'm rather pleased with it. As it happens, the rubberised coating is overpaintable, so when I eventually get onto stripping and refurbing the suspension and steering, I'll have the option to clean and paint, should I feel like it....I'd post pics, but they're just shabby black versus deep black, not particularly photogenic subject matter! Perhaps it'll look better with the masking paper removed and everything back in place. A few of the grommets for pipework, wiring looms and heating ducts were re-installed with a dose of WaxOyl around the channel of each part, ensuring no weather can penetrate and marr anywhere that may have compromised paintwork. The ballast resistor for the oil cooler fan has been replaced (a lot easier while everything's apart), also with a smear of waxOyl between the ally panel and the washer of the ballast. This attracted a lot of corrosion last time, so can't harm. Ally panel also cleaned ready for installing.  Another job I did was to remove those HID's - surprisingly weighty - and find some perfectly sized blind grommets to fit where a PO had made access holes in the rears of the bowls, for cable access to from the ballast packs. Thankfully, no rust all, and they've cleaned up really nicely. A couple of new gasket seals also arrived from my OPC on Saturday morning, so the lights can now go back in.  Yesterdays weather was foul, so only indoor work took place. While I was in the swing of prepping and painting, I thought it'd be a good idea to re-paint the engine bay - or at least, the lower section down to the rubber skirts. Some of it was looking a little tired, other parts had yellowed pretty badly, the area under the power steering reservoir and oil filler neck particularly.  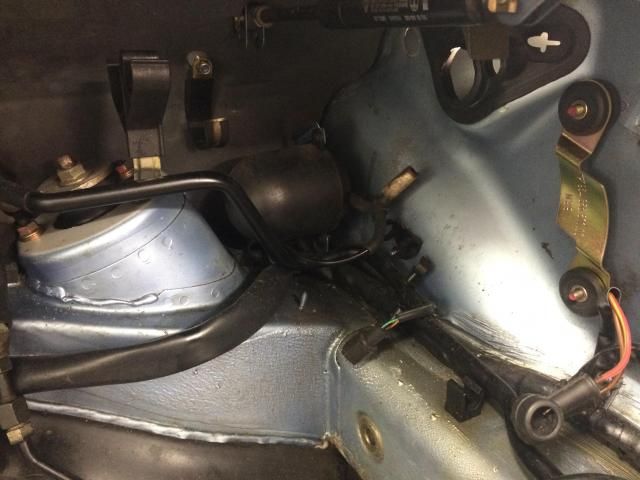 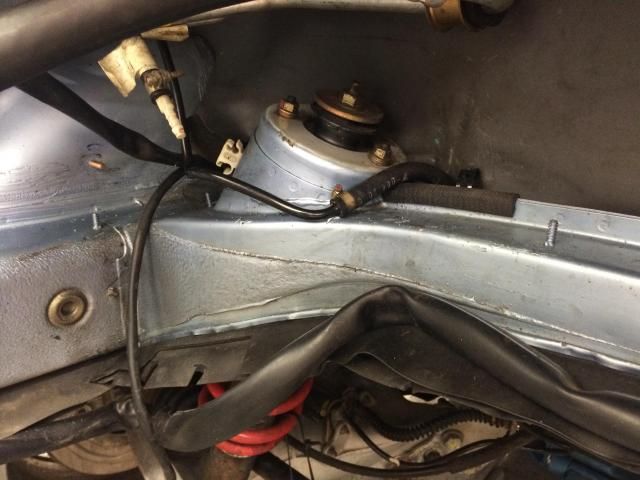 I suppose it's like decorating; 95% of the time goes into preparation and in the case of cars, the masking-off. Those arches took me 2 days for the three I got done, yet only 10mins each to paint! Last night I got as far as diligently masking the engine bay, tonights job is to do a final clean using thinners and put some paint on. 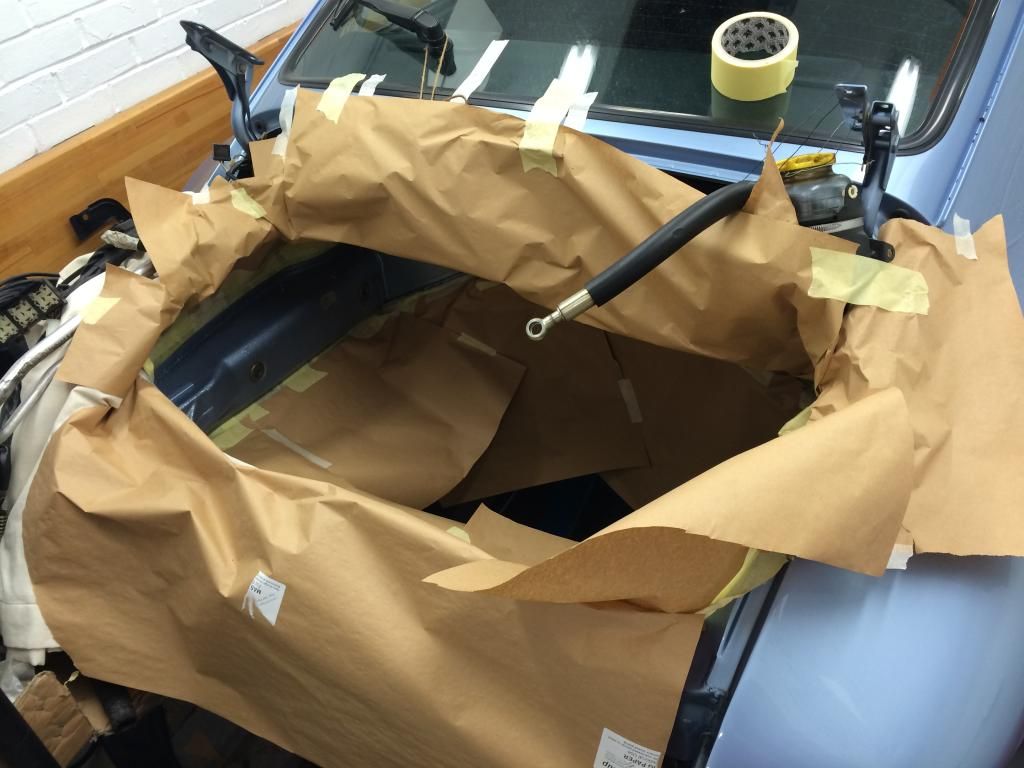 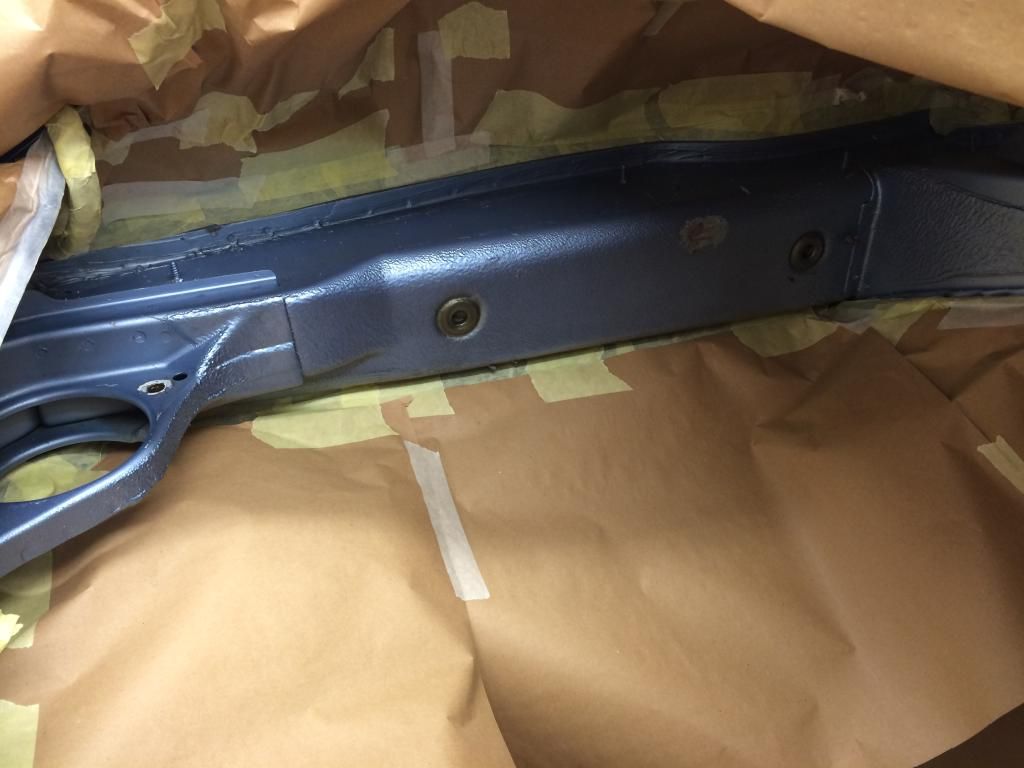 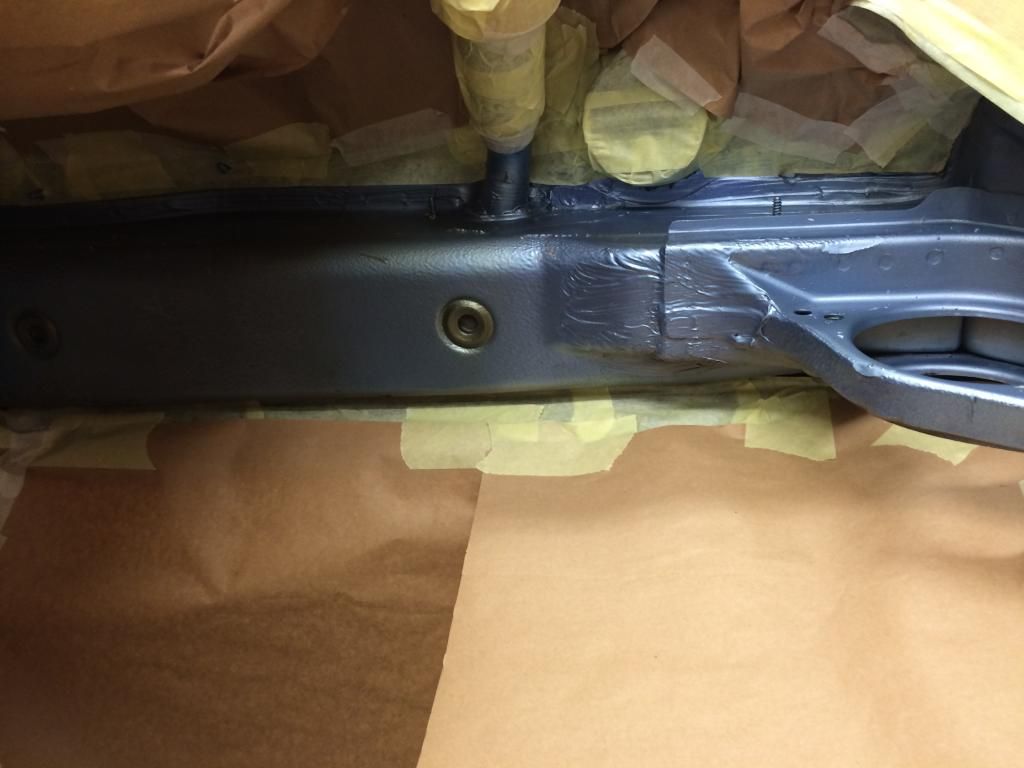 I'll be back later this evening with some pics of the engine bay! It's going to have to be done indoors; weather still lousy and way too damp for spraying. My lovely, surgically prestine white garage is about to get a dusting of Horizon Blau... Last edited by Spenny_b; 08-26-2014 at 04:31 PM.. |
||
|
08-26-2014, 10:21 AM
|
|
|
Moderator

Join Date: Dec 2001
Posts: 9,569
|
That looks pretty good. . .don't paint it Spencer! Just touch it up.
__________________
'66 911 #304065 Irischgruen 96 993 Carrera 2 Polarsilber '81 R65 Ex-'71 911 PCA C-Stock Club Racer #806 (Sold 5/15/13) Ex-'88 Carrera (Sold 3/29/02) Ex-'91 Carrera 2 Cabriolet (Sold 8/20/04) Ex-'89 944 Turbo S (Sold 8/21/20) |
||
|
08-27-2014, 09:06 AM
|
|
 |
|
|
| Tags |
| 964 c4/c2/turbo , efi conversion , life racing , syvecs , turbokraft |


 1993 Porsche 911 (964) Turbo 3.3
 2006 Lotus Exige Cup 240 (#45 of 50)
 BMW M2 Competition
 BMW R1250 GS Rallye HP
 Ducati 748R


