|
|
|
|
|
| Author |
|
|
Registered speed offender
|
This repair is behind me. My Turrets is worsening however.
I have a couple pieces yet to fit but I'm going to leave them open until I can get all that media blast crap OUT! I bore scoped the rest (rust sniffing dog) of the voids so I can stop writing these "I found more rust" posts. This has/is a good project for me so that I can own a Porsche like I've always wanted but this is more likely a better example of what NOT to buy. (unless the price is right of course) It still amazes me there are people that take on much worse. Fabulous fabrication Batman!  Frankensteined back together  Remnants... what a mess! What's lurking inside your car? 
__________________
If you keep looking back, you'll never move forward. http://forums.pelicanparts.com/paint-bodywork-discussion-forum/506621-project-911r-something.html |
||
 04-28-2010, 01:54 PM
|
|
|
Bird. It's the word...
|
Great work! I've just done a similar job, but with the advantage of the floor pan off.
__________________
John Forcier Current: 68L 2.0 Hotrod - build underway |
||
|
04-29-2010, 04:17 AM
|
|
|
300hp 1800lbs is the goal

|
sub'd..... I have alot of similar repairs to make on my '66

__________________
The '66 912 Bastardization project has begun. Note to PO's: LAY OFF THE FREAKING BONDO!!!! The science was settled: Earth was flat. Galileo : Flat Earth denier. 
|
||
|
04-29-2010, 10:47 PM
|
|
|
Registered
|
Go get 'em 78SCRSMAN.....we're all behind you.
Great progress so far. Hang in there and you'll have the car you always wanted. Watching your progress. Good luck my man. 
__________________
"Are you out of your Vulcan mind?" Doug 2022 Carrera 4S, 1989 Delta Integrale, 1973 911T CIS |
||
|
04-30-2010, 12:59 AM
|
|
|
Registered speed offender
|
Progress Update!!!
Thanks for the kind words all.
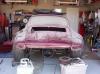
Here are some photos of the repairs made to the front fender well areas. The PO had done some things that I didn't quite care for so I decided to source some sheet metal and replace it! First section (both sides needed the same treatment) Out with the old, in with the new.     
__________________
If you keep looking back, you'll never move forward. http://forums.pelicanparts.com/paint-bodywork-discussion-forum/506621-project-911r-something.html |
||
|
06-04-2010, 06:59 AM
|
|
|
Registered speed offender
|
Updates Cont.
Here is some gap work. I got this idea from a thread Freddie Hernandez posted on a repaint of someones car. On the passenger side, the gap was too large near the top and along the edge so I welded the edge of the door until it was looking good and ground it down to perfection. The drivers door had a short section near the bottom trailing edge (bottom curve) where the gap was too tight so I ground the edge back and welded the seam back together, then ground it to shape.
I should mention I'm using new door bushings and pins. Here are the results of the passenger side.   For the record, I really have no idea what I'm doing on this as I haven't done this sort of work before (at least not to this extent) I wanted to make sure I could get the gaps correct before I start spraying primer on anything. I figure once I have Epoxy Primer on the panels, I'll re-mount the fenders, doors and front hood for a final gap check and the fenders will stay on for the remainder of the paint job. I'll remove the hood and doors to paint them separate. Gaps are looking good now... ***Notice the fuel filler cup has been removed, never to return!***  
__________________
If you keep looking back, you'll never move forward. http://forums.pelicanparts.com/paint-bodywork-discussion-forum/506621-project-911r-something.html Last edited by 78SCRSMAN; 06-04-2010 at 07:40 AM.. |
||
|
06-04-2010, 07:18 AM
|
|

|
|
Registered speed offender
|
It feels like I'm in a race now. I've had to remove the remainder of the undercoat from inside the rear fender wells. I was told the media blast would take care of it but apparently not. That stuff sucks to remove so in case I didn't mention it before... remove all that you don't want on there before having your car blasted!!!
Anyway, I'm getting some flash rust in places now so I gots to hurry and get some primer on this thing! (normally it's warm and dry here this time of year but we've been getting LOTS of rain so lots of moisture in the air... please turn it off, thanks) Most of the body filler will be applied on top of the Epoxy Primer but I'm using an Evercoat product called Metal 2 Metal on some spots the factory used Lead to fill and some spots where the filler needs to be a bit thicker. This stuff works great and is VERY tough. I hope to be spraying primer within the next two weeks... until then.
__________________
If you keep looking back, you'll never move forward. http://forums.pelicanparts.com/paint-bodywork-discussion-forum/506621-project-911r-something.html Last edited by 78SCRSMAN; 06-04-2010 at 07:39 AM.. |
||
|
06-04-2010, 07:34 AM
|
|
|
Registered

Join Date: May 2003
Location: Winnipeg
Posts: 750
|
Some people on the board here are using PickleX to prevent (and remove?) flash rusting. Let us know what you end up doing about this.
Keep up the good work. Tim |
||
|
06-04-2010, 11:35 AM
|
|
|
300hp 1800lbs is the goal
|
yep... the picklex20 seems to keep the metal looking clean, altho the air in Calgary is very dry.
__________________
The '66 912 Bastardization project has begun. Note to PO's: LAY OFF THE FREAKING BONDO!!!! The science was settled: Earth was flat. Galileo : Flat Earth denier.
|
||
|
06-04-2010, 12:52 PM
|
|
|
Registered speed offender
|
I thought about using Picklex but the flashing is VERY minor (confined to just a couple spots) also just talked to the man at SPI (where I'm getting paints from) and he says not to worry. I'm about two weeks out now from primer. He said NOT to use ANY kind of rust converter prior to Epoxy. Says to simply go over it w/80 grit paper and done.
Usually it's very dry here too. (70's to 80's and sunny) We've been stuck in the sixties for weeks... getting old.
__________________
If you keep looking back, you'll never move forward. http://forums.pelicanparts.com/paint-bodywork-discussion-forum/506621-project-911r-something.html |
||
|
06-04-2010, 01:46 PM
|
|
|
Registered speed offender
|
Back in Black!
I thought I'd post some photos of my setup. The first pic shows the air supply I'm using. The copper trombone pipe is made out of 3/4 plumbing pipe. It's job is to slow down and cool the air causing water in the line to condense and collect in one of two down legs. Each leg has a valve to relieve the H2O. Finally it goes into a water seperator before exiting through the hose and high volume air fittings. The reason for all of this is my compressor is rated at 7cfm so it will be running frequently which causes a lot of condensation in the lines. FYI, The second valve has never yielded any water.
The next couple of photos are of the filtered incoming air and the other is also filtered before exiting through one of five vans. It all seems to work very well. The dust on the floor is minimal and simply sweeps up. (check out the clean spot)    My work bench: 
__________________
If you keep looking back, you'll never move forward. http://forums.pelicanparts.com/paint-bodywork-discussion-forum/506621-project-911r-something.html |
||
|
06-16-2010, 02:16 PM
|
|
|
Registered speed offender
|
Before and after views...
Oops, this should have been in the previous post.
 Back to the nitty gritty...   I must say that rotisserie is quite the ding ding. It sure makes this whole deal go a lot easier. If you are doing something similar, you'll be killing yourself if you don't have one. I'll be selling this one when I'm done but you can make your own if need be.   
__________________
If you keep looking back, you'll never move forward. http://forums.pelicanparts.com/paint-bodywork-discussion-forum/506621-project-911r-something.html |
||
|
06-16-2010, 02:28 PM
|
|

|
|
Registered
Join Date: Jan 2010
Posts: 140
|
Hi Derek,
What is the black stuff ,Por15? You won the war aginst the evil rust, great work. Are you going to add a roll bar also? |
||
|
06-16-2010, 03:25 PM
|
|
|
Registered speed offender
|
Thanks, the black is Epoxy Primer sprayed from an old HVLP w/1.5 tip, no plans for a roll bar... maybe a bolt-in later.
__________________
If you keep looking back, you'll never move forward. http://forums.pelicanparts.com/paint-bodywork-discussion-forum/506621-project-911r-something.html |
||
|
06-16-2010, 03:55 PM
|
|
|
Je Ne Sais Quoi = Targa
|
__________________
'74 Targa lightweight widebody, 3.6 motor, big bars, Speedlines, Sold 2018, '81 SC Targa with 3.2 spoilers, Webers, SSIs, 7&8X16 Fuchs, 911R style exhaust, Had a '71 911S Targa in the 80's, miss it, Had a '61 Roadster in the 70's, miss it also, |
||
|
06-17-2010, 01:54 AM
|
|
|
Registered
Join Date: Jan 2010
Posts: 140
|
Hi Derek,
Do you have the before repair picture of this section? Just curious. Thanks. 
|
||
|
06-18-2010, 05:48 PM
|
|
|
Registered
Join Date: Aug 2003
Location: Westchester, NY
Posts: 889
|
How did you remove the undercoating in the rear wheel wells and up under the quarters?
Did you have it on the rotisserie while doing the panels? I've had some people tell me not to put mine on a rotisserie while doing rockers, longitudinals, etc because the car will flex.
__________________
Sean 1982 SC D-Stock #372 NASA GTS2 1971T restoration in progress, read about it here: http://911restorationmadness.blogspot.com/ |
||
|
06-18-2010, 06:14 PM
|
|
|
Registered speed offender
|
dtaken... there are a couple photos on page two of those areas. Let me know if you need something specific and I'll have a looksee.
sfoster... I used a wire wheel mounted to an electric grinder, some scrapers (sharp) and a needle scaler from Harbor freight (small one) to get the undercoating off. It is a very time consuming, dirty and sometimes painful job. Those little wires shoot out at you from time to time so wear something that covers all of you AND safety glasses. Yes, I did the majority of my metal work while the car was on the rotisserie but took it off for the frontal fender/bumper mount repairs and also to align the door and fender gaps for the final time... just in case. I didn't have any rocker repairs to make but if I had, I would have dismounted it and also used some bracing just to be sure. I hope that helps. Derek
__________________
If you keep looking back, you'll never move forward. http://forums.pelicanparts.com/paint-bodywork-discussion-forum/506621-project-911r-something.html |
||
|
06-19-2010, 07:59 AM
|
|
|
Registered
Join Date: Aug 2003
Location: Westchester, NY
Posts: 889
|
thanks Derek. the small needle scaler is a good idea. I couldn't figure out how to get up there with a grinder - just doesn't fit. Not looking forward to it.
__________________
Sean 1982 SC D-Stock #372 NASA GTS2 1971T restoration in progress, read about it here: http://911restorationmadness.blogspot.com/ |
||
|
06-19-2010, 06:28 PM
|
|
|
Black and Blue

Join Date: Jul 2000
Location: Austin, TX USA - Ya'll
Posts: 2,556

|
nice...nice...NICE! did you decide on the final color?
__________________
Kemo 1978 911 SC Non-Sunroof Coupe, two tone Primer Black and SWEPCO Blue, Currently serving as a Track Whore 1981 911 SC Sunroof Coupe, Pacific Blue Project, Future Daily Driver |
||
|
06-25-2010, 12:31 PM
|
|


 1969 Porsche 911T 2.7RS Spec with Webbers
 '66 Bastardization
 Salvage Talon
 pksystems 97 Talon TSi AWD
 The little UTE that could.
 2005 Legacy 2.5GT Wagon
 Kermee
 1981
1981  1974
1974 

