|
|
|
|
|
| Author |
|
|
Registered
Join Date: Nov 2017
Location: East Bay, CA
Posts: 236
|
__________________
1978 911SC - 3.2 1971 914/4 IG - @etcetera911 |
||
 03-14-2019, 04:01 PM
|
|
|
Administrator

Join Date: Aug 2016
Location: Los Angeles, CA
Posts: 6,087
|
Thank you everyone that is submitting - we're having a blast checking out all these amazing builds and stories. Keep em' coming!
|
||
|
03-15-2019, 10:12 AM
|
|
|
Registered User
|
__________________
77 911 Karminrot Build Thread: http://forums.pelicanparts.com/porsche-911-technical-forum/985164-project-77-new-build.html |
||
|
03-15-2019, 05:55 PM
|
|
|
Registered
|
Thanks, Eric, I am honored by the invite, but I live in the Great White North, not the lower 48 and therefore not eligible. Too bad, I can always use more tools. Great contest, it will be a very tough decision to pick who to vote for. Looking forward to see the results. Cheers, Tom
Pendulum Outlaw, Build, Adventures and Misadventures
__________________
Outlaw .... by definition ..... does not follow rules well www.FloydDesign.ca https://www.youtube.com/watch?v=sV5aIALWlG8 |
||
|
03-16-2019, 12:43 PM
|
|
|
Registered
|
Here's mine. Bahama Yellow 66 3 gauge 912. Enjoy. There's even some shots of me chasing one of Flyn Hawn previous builds here in south MS. It wasn't really a close race.
1966 912 Restoration Story |
||
|
03-17-2019, 06:04 AM
|
|
|
Registered
|
My personal project has been fun, but pales in comparison to the vision, dedication, and resourcefulness shown by these two (I think my favorite two projects on the forum). I'd like to nominate both for the contest.
R / Outlaw project... Hot Rod Projekt Last edited by fanaudical; 03-17-2019 at 07:28 PM.. Reason: spelling error. |
||
|
03-17-2019, 08:25 AM
|
|
|
(man/dude)

|
Quote:
I nominate Tom and his Pendulum build, and I'm sorry I didn't do it sooner. He's a true DIY'er.
__________________
Heavy Metal! Part Deux - The Carbon Copy Project Heavy Metal https://tinyurl.com/57zwayzw (SOLD) 85 Coupe - The Rot Rod! AX beater Quality Carbon Fiber Parts for Classic 911s: instagram.com/jonny_rotten_911 |
||
|
03-17-2019, 06:18 PM
|
|
|
Registered

Join Date: Dec 2017
Posts: 26
|
__________________
Good judgement comes from experience, and often experience comes from bad judgement. Yugoslavia '94' , Israel/Syria '99 , Bosnia '02 , Afghanistan '08-'09 |
||
|
03-19-2019, 03:33 AM
|
|
|
Registered?
|
__________________
Brian R Gruppe #757 70T Ex-Waterlogged Rust Bucket http://forums.pelicanparts.com/porsche-911-technical-forum/519605-waterlogged-rust-bucket.html |
||
|
03-20-2019, 08:57 AM
|
|
|
Registered
Join Date: Oct 2014
Location: Bordeaux, France
Posts: 310
|
__________________
___oOo___ 1972 S 911 Targa kit http://forums.pelicanparts.com/porsche-911-technical-forum/863768-thats-my-first-911-restoration-thread-72-911-s-back-grave-maybe.html |
||
|
03-20-2019, 02:21 PM
|
|
|
Registered User
|
DIY R56 Mini Cooper S Engine and Transmission Rebuild
Imagine setting out to change the water pump on an N14 and ending up finding so many worn out parts that the only solution is to pull the engine and transmission and fix everything.
I guess the bottom line is that Im keeping this car for a while. Here are some key points that were I to do this again, are important to the big job at hand: Note about bolts and threads in general. There are only a few sizes of bolts used in the engine, subframe, etc. Note what they are and the thread pitch and get the proper taps and dies to clean up all the threads before you put parts back together. You never know which mechanic in the past didnt give a damn and crossed some threads. And there is rust. Many bolts were rusty, and I replaced them and chased the threads on the female side of the equation. It just makes you feel all fuzzy and warm inside knowing the bolt just might do its job with clean threads Remove the entire front end headlights, bumper, metal work, radiator, intercooler, A/C condenser, all electrics. Label everything and especially every connector and try to do it with the Bentley manual description in mind. I used orange masking tape and sandwich bags because I know that the dirt will be flying, and greasy fingers abound. As I worked around the front end and the engine I remembered to shoot as many pix as possible with my phone so I could reference them later. I did forget some particularly important shots like the vacuum tubing set-up under the manifold and the placement of the small electronics that I assume control the air bags. Remove the axles (not axels as in triple axel). The passenger side was easy, but the drivers side has a clip that argued with me like a teenager until I won by sheer will. I had these rebuilt. I bought the kits from Mini but could have purchased new axles for almost the same price. There are two types of grease for these axles. I used what came with the repair kit which I assume is a general axle grease. There is a high temp version of the grease, but the rebuilder wanted $40 more and I couldnt understand the benefit. After disconnecting the shift cables and wires to the transmission and all other connections like the exhaust, starter wires, radiator hoses, fuel supply lines (all labeled clearly) I was ready to lift the little thing out of the car. This is a two-person job. Find someone to assist you because if you lift the engine out of the front like I did, you will need to keep it from banging into the frame. A note about cranes: I rented a crane from the only rental shop near me that had one. This was a mistake. It was dirty, bent, difficult to assemble, and took valuable time away from what I had to do. Buy a new one. I bought one from OReilly auto on sale and the $60 for the rental could have been put to better use. Especially because I know I will need it again when I get the engine back. Its helpful to have a crane when to be sure the engine doesnt fall over when putting all the peripheral parts back. And dont forget, mating the transmission to the engine is a delicate job. The transmission is heavy, and my spine health is a concern. If your car has a transmission. Get the seals replaced. My car was driving erratically so I invested in a Wavetrac differential and new carrier bearings. I found a transmission place that looked like a laboratory and the resident genius took the whole tranny apart and put it back together with the new differential. I shopped around on the internet and found a competitive company to sell it to me for under $1000. I hope this improves the handling and the puts the power properly to the ground. Front suspension. I replaced every bushing and ball joint except for the control arms themselves. I couldnt get them out. They were not loose. I can only hope they are in good shape because the poly bushings I used on the control arm brackets will have to be melted off if ever they need replacing. I cannot express how tight those fit up to the control arms. I had to use a puller to press them onto the posts at the back of the control arms. Thats insane. I should also mention that lowering the subframe, while not as scary as it seems did not make it possible to replace the gasket between the steering box and the body of the car. The steering linkage simply would not come loose. Note: replace the bolts for the subframe. These are exposed to water and were all rusted. I used anti-seize on all the bolts and torqued them all. Also, there is one bracket bolt for the control arm that is torque-to-yield. Front hubs. I replaced the hubs and used new bolts as they are torque-to-yield. Note: Re-torque the bolts securing the steering mechanism to the frame. Mine were loose. I cleaned the threads and used anti-seize. Tie rod end links. I replaced the mini links with new adjustable links from Whiteline. I have a set in the rear I installed with a new sway bar. The engine. The thing was obviously suffering with bad valve guides and worn pistons. It didnt have good compression although the leak-down test I gave it before I removed the engine wasnt bad. The turbo was not working well, and it could have been the vacuum pump, regulator Who knows? Arric at JM Turbocoopers rebuilt and upgraded the turbines and I coated the shaft at Micro Blue to keep it from wearing. So, I guess I have more wind than before. One problem I had was that I previously installed a single plate clutch and wasnt aware that the new clutch did not have the 90-degree BTDC hole in it. This is a problem for a duffer like me so I had to call around to a machine shop that could assemble the engine if I couldnt locate a stock clutch plate to use as a proxy. I ended up finding a used clutch plate at a not-so-local-dealer. From top to bottom: Cat cams (#1302603 in case anyone is interested), Supertech +1mm intake and exhaust valves, valve guides, Supertech springs, CP 9.5 + .5mm pistons, CP rods, king bearings. Oh, and I made an investment in having the cylinders reinforced at CNC Werx, and we machined the block at JM Turbocoopers to fit an N18 oil pump. New A/C compressor, rebuilt starter and alternator. New belt tensioner, water pump, friction wheel, pump pulley, timing chain and tensioner, vacuum tank, vacuum regulator, heater hoses, fuel supply hose, fuel pump, injectors, thermostat, vacuum pump, vacuum line, ICI pipe from JM Turbocoopers, motor mounts, ARP bolts in the head, block, flywheel and clutch $$$$ Note: Remove the non-return valve before machining. Its located next to the valve solenoid in the head. Replace with a new one. Dont forget this. Bentley forgot it. The techs at MSD guided me to use an rpm switch and a little gizmo that picks up the rpm from the neg circuit on one of the spark plugs. I also invested in an oil pressure and water temp gauge from Cravenspeed. Brakes: I have Wilwoods on the front and I replaced the rotors and pads. I also have SS brake lines for the rear brakes to be replaced. Fuel filter: New. Disclaimer. The engine is not in the car yet. Yes, this is a cliff hanger. But I think I have the wiring simplified and my hope is that the electronics correctly controls the solenoid on the N18 pump. I am aware of some of the downside of this new set-up and I think I can avoid problems by understanding what not to do. I know the oil can leak through the wire protector coming out of the engine. And that is it for now. Ive included some pix, but I dont think the forum software allows for the pics inline, so I wont add too many. There are some various views of work done just to show the details.       
|
||
|
03-21-2019, 12:32 AM
|
|
|
Registered
|
Here's my vote.
This is nothing short of an epic reincarnation from the dead. Greg,with a little help from his friends (well Larry), finished this beauty 5 years ago. That car was so close to the crusher and now is one of the nicest P-cars on the East Coast!! Lots of neat mods as well. We rolled her out the other week to move something. Had to take a pic!! 6800K since the build https://forums.pelicanparts.com/porsche-911-technical-forum/642031-1968-912-junker-reincarnation.html 
|
||
|
03-22-2019, 11:41 AM
|
|

|
|
Moderator

Join Date: Jan 2015
Location: CA
Posts: 1,137
|
Hi everyone, just giving you guys a quick update. We're planning on closing submissions soon, so make sure to get your build thread submissions and nominations in before it's too late!
Also remember to post an update: in order to be eligible for the DIY build contest you must update to your thread on or after March 8, 2019!
__________________
23 Macan GTS 97 240SX 94 Land Cruiser Too many Miata's to count. |
||
|
03-25-2019, 12:19 PM
|
|
|
(man/dude)
|
So many great threads to choose from, many of which I wasn't aware of till now.
There are a heck of a lot of people putting the "I" in DIY on this forum, which is great to see!
__________________
Heavy Metal! Part Deux - The Carbon Copy Project Heavy Metal https://tinyurl.com/57zwayzw (SOLD) 85 Coupe - The Rot Rod! AX beater Quality Carbon Fiber Parts for Classic 911s: instagram.com/jonny_rotten_911 |
||
|
03-27-2019, 08:05 AM
|
|
|
Registered User
Join Date: Jan 2015
Posts: 2
|
ok I am going to blow the dust off my 1977 targa and get serious about putting it back together. I took it apart 3 years ago and had it painted and never finished it up. Picture to follow
|
||
|
03-27-2019, 08:03 PM
|
|
|
Registered
|
Ok I'm in!
|
||
|
03-28-2019, 09:39 AM
|
|
|
Administrator
Join Date: Aug 2016
Location: Los Angeles, CA
Posts: 6,087
|
Quote:
|
||
|
03-28-2019, 10:31 AM
|
|
|
I would rather be driving

Join Date: Apr 2000
Location: Austin, TX
Posts: 9,108
|
__________________
Jamie - I can explain it to you. But I can not understand it for you. 71 911T SWT - Sun and Fun Mobile 72 911T project car. "Minne" - A tangy version of tangerine #projectminne classicautowerks.com - EFI conversion parts and suspension setups. IG Classicautowerks |
||
|
04-09-2019, 01:31 PM
|
|

|
|
(man/dude)
|
Quote:
__________________
Heavy Metal! Part Deux - The Carbon Copy Project Heavy Metal https://tinyurl.com/57zwayzw (SOLD) 85 Coupe - The Rot Rod! AX beater Quality Carbon Fiber Parts for Classic 911s: instagram.com/jonny_rotten_911 |
||
|
04-09-2019, 01:40 PM
|
|
|
I would rather be driving
Join Date: Apr 2000
Location: Austin, TX
Posts: 9,108
|
Thanks Jonny. Been a bit out of touch past few weeks. Out of the Country too!
__________________
Jamie - I can explain it to you. But I can not understand it for you. 71 911T SWT - Sun and Fun Mobile 72 911T project car. "Minne" - A tangy version of tangerine #projectminne classicautowerks.com - EFI conversion parts and suspension setups. IG Classicautowerks |
||
|
04-09-2019, 02:53 PM
|
|


 1977 911SC - SOLD
 1977 911 #9 (New Build)
 1969 Lotus 7S3
 1982 Porsche 911SC
 Porsche 912
 FJ60
FJ60

 Pre-backdate
 Post-backdate
 New Project
 Project Complete
 2017
2017  Vroom vroom
 2023
2023  2024
2024 
 1980 Porsche 911SC 3.6l
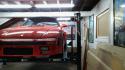 83 Porsche 911 SC Cab Turbo
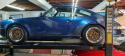 77 Porsche 930 Turbo Carrera
 2000 Saleen S281 SC Speedster


